Before you begin: You can use the monitoring tool to gather information about the
cluster machine. It is not for performing actions on the cluster (for example, start or stop a
cluster node, or have a node connected to another node).
First, you need to set up the local rendering cluster.
Before you begin: About hardware requirements:
Server: a computer with 2 network cards (referred to as NC1 and NC2)
NC1 (for a connection internal to the cluster) with a high bandwidth
NC2 (for a connection outside the network) with a medium to high bandwidth
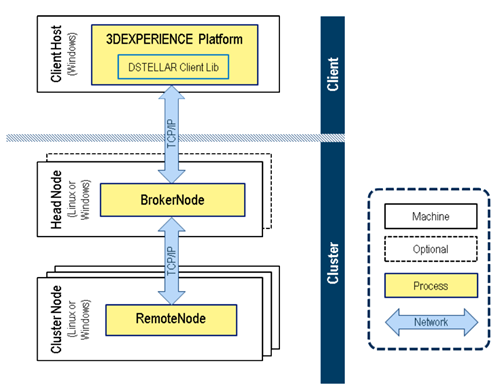
Client: a computer with 1 network card connected to the server.Technical Architecture behind Distributed Live Rendering (DIR-M). "DSTELLAR" stands for "Distributed Stellar", which is the name of the technical
component
Install the DStellar package on every remote node and on the broker node.
The "RemoteNodes" folder containing the executables is in the installation path.
A remote node service is used for distributed computation on cluster nodes. It turns
a cluster node into a distributed computer that processes tasks that operate on
distributed data as specified by the ray tracing client.
Create a temporary directory to store dependencies.
Set the environment variable TMPDIR to point to it.
For example:
export $TMPDIR= ~/temp
Important:
Each of the nodes (head node and worker nodes) must have their own Temp folder
and the TMPDIR variable defined to it.
Have the Temp folder in the local disk space of each node rather than on a
shared file system since it degrades performance in the latter case.
Cluster Startup
The distributed rendering system starts on a cluster by launching first one remote
node as bridge node. The remote node starts on all remaining worker nodes that connect to the
bridge node. The cloudgate server starts and connects to the bridge node.
Start a first remote node as bridge node.
remote_node [OPTION]
For example:
remote_node -1 9000
Program Options
Description
--help
Produces a help message.
-v [ --version ]
Displays the version information.
-l [ --localport ]
Is the local listening port.
-h [ --host ]
Is the hostname of the bridge node used to connect to the
cluster.
-p [ --port ]
Is the port of the bridge node used to connect to the cluster. The
default is 0. This does not connect to bridge node.
The system is using the default network interface. If multiple network interfaces are
provided, you need to specify the following options.
Advanced Options
Description
-i [ --interface ]
Is the local network interface to listen on.
-w [ --worker ]
Is the flag telling if the node executes work package (true by
default).
-m [ --monitoringport ]
Is the monitoring port (limited feature). The default is 0.
-L [ --logging_config_path ]
Is the path of the config file for the logging. The default is
logging.conf.
-d [ --dist_config_path ] arg
Is the path of the config file for the distribution service. The default
is node_config.json.
Start remote_node on all remaining worker nodes, and specify the bridge node as an
entry for joining the cluster.
For
example:
remote_node -l 9000 –h <bridge_node hostname or IP address> –p 9000
Option
Description
-1 9000
Configures the port remote_node listens on for connections from other
remote_node services and the cloudgate_server.
-p 9000
Configures the port for initial connection to the cluster - use the
bridge node port.
-h <Bridge Node host name or IP address>
Configures the host for initial connection to the cluster - use the
bridge node's host name.
Start the broker node.
broker_node [OPTION]
For
example:
broker_node -l 5000 –i <host name of head node external interface> -H <Bridge node host name or IP address> -P 9000 –I <host name of head node internal interface> –L 0
Program Options
Description
--help
Produces a help message.
-v [ --version ]
Displays the version information.
Originator Interface Options
Description
-l [ --originator_port ]
Specifies the port the originator listens on.
-i [ --originator_interface ]
Specifies the network interface the originator listens on.
-h [ --originator_bridge_host ]
Specifies the host name of the bridge node the originator connects
to.
-p [ --originator_bridge_port ]
Specifies the port of the bridge node the originator connects to. The
default value is 0. In this case, no connection to the bridge node takes
place.
Substitute Interface Options
Description
-L [ --substitute_port ]
Specifies the port the substitute listens on.
-I [ --substitute_interface ]
Specifies the network interface the substitute listens on.
-H [ --substitute_bridge_host ]
Specifies the host name of the bridge node the substitute connects
to.
-P [ --substitute_bridge_port ]
Specifies the port of the bridge node the substitute connects to. The
default value is 0. In this case, no connection to the bridge node takes
place.
Advanced Options
Description
-w [ --worker ]
Specifies the flag defining if the broker node executes work packages or
not. The default value is "False".
Recommendation:
Do not define
this option to "true" for low-performance workstations.
-m [ --originator_monitoring_port ]
Specifies the monitoring port for the originator. The default value is
"0".
-M [ --substitute_monitoring_port ]
Specifies the monitoring port for the substitute. The default value is
"0".
-o [ --logging_config_path ]
Specifies the path of the configuration file for the logging. The default
value is logging.conf.
-c [ --originator_config_path ]
Specifies the path of the configuration file for the originator
distribution service. The default value is
originator_interface_config.json.
-C [ --substitute_config_path ]
Specifies the path of the configuration file for the substitute
distribution service. The default value is
substitute_interface_config.json.