Overview
The following is an overview of the feature and the usage.
To create and edit variable selections according to the code description here, but with a graphical user interface, see Creating and Editing Variable Selections.
Defining Selections and Tags
You can define selections and tags using annotations.
You can put the annotations in the actual model, but you can also put them in separate
models, enabling reusability.
Usage
You can use variable selections to control display and storage of variables.
You can create a number of selections, using a graphical user interface or writing code. For details of the graphical user interface, see Creating and Editing Variable Selections. You can include selection annotations in several models, not only on the top level. The override attribute in the Selection constructor (see below) determines if selections with the same name found on lower hierarchical levels of the model should be overridden or merged. By default, if a model has any variable selections, variables not present in any variable
selection are not stored in the result file; resulting in a decrease of file size,
valuable for large models. Such nonselected variables are considered protected, which
means that the setting to store protected variables can be applied if you want to also
store nonselected variables in the result file when having selections. For more about the
Output tab, see Simulation Setup Dialog Box. When simulating, you can select what selections to display, by commands in a panel in the Variable Browser. See Displaying Variable Selections in the Variable Browser.
You can use variable selections to create variable lists for plotting. See Variable Selections for Plotting.
Annotations
You can use two annotations, one for defining selections and one for defining
tags.
Selections
The annotation for selection is: annotation(__Dymola_selections={Selection(...),...})where the selection constructor is: record Selection
parameter String name;
parameter Boolean override=false;
parameter MatchVariable match[:]=fill(MatchVariable(),0);
end Selection; and the matching constructor is: record MatchVariable
parameter String className="" "Regular expression for classes to look in";
parameter String name="*" "Regular expression for variable name";
parameter String description="" "If non-empty, regular expressions that should exactly match description";
parameter String tag[:]=fill("",0) "If non-empty, regular expressions that should exactly match any tag";
parameter String newName="" "For storing under different name";
end MatchVariable;Tags
The annotation for tags is: annotation(__Dymola_tag={"Tag2","Tag3"});If a tag is attached to a component, it is also attached to subcomponents and variables. Matching can then be made on tags as well.
Rules for Matching and Substitution
There are some rules for the matching and substitution. For illustration, see the example section below.
All matches must be exact, and only scalar variables are considered for the matching; however, tags (see below) are inherited by subcomponents. Regular expressions can be used in all fields in the MatchVariable constructor. Special symbols in the regular expressions are: | Symbol | Meaning |
|---|
| * | Match everything. | | ? | Match any single character. | | {ab} | Match characters a or b. | | {a-z} | Match characters a through z. | | {^ab} | Match any character except a and b. | | E+ | Match one or more occurrences of E. | | (ab|cd) | Match ab or cd. | | \d | Match any digit. | | \w | Match any digit or letter. | | ^ | Match from start. | | $ | Match at end. |
The name, description, and tag parameters in the MatchVariable constructor support leading "!" for selecting non-matches. The parameter newName in the MatchVariable constructor can use %componentPath%, %name%, %path%, %componentName%, and %i%. The %name% corresponds to the part matching the regular expression and %componentPath%Name% is the full path of the variable - and %componentName% the last part of %componentPath%. If you use %componentPath% as the final part of the pattern, the ending "." is automatically removed. An example of the use of %i% is that %1% is the part matching the first parenthesis-enclosed part of the regular expression. Local pattern matching in certain classes is supported, see the last selections example below.
Examples
The following examples illustrate some features.
To easily change the selections, they are put in separate models, for example, Selection1. Note:
In the model code examples below, the annotations for preserving aspect ratio for the diagram and icon layer have been removed for clarity reasons.
To test the below examples, do the following: - Create a new empty library
TestingVariableSelections. See Create a Modelica Library. - Open the robot demo. See Accessing Model Examples.
- Extend the robot demo to a new model
MyFullRobot in the library TestingVariableSelections. See Extend from the Present Class. - Create, in the library
TestingVariableSelections, a new empty model for each example below, with the corresponding name, for example Selection1 for the first example. See Create a New Class or Extend from an Existing Class Using the New Class Command.
- For each example, open the corresponding model and add the variable selection annotation. You can do this in two ways:
Note:
Variable selections built on tags can only be applied by working with Modelica text in the Modelica Editor.
- To test a certain variable selection, do the following:
- Open the model
MyFullRobot. - Use the Modelica Editor to add extending from the certain example model.
As an example, extending to apply the variable selection in the model Selection1: model MyFullRobot
extends Modelica.Mechanics.MultiBody.Examples.Systems.RobotR3.fullRobot;
extends Selection1;
end MyFullRobot; - Simulate the model and inspect the Variable Browser to see the result. See
Running a Virtual Execution
and Working with the Variable Browser.
Selections
The following models are examples that can be used to illustrate variable selections. You
can use the above description to create and test them.
Basic Functionality
Example 1
A selection of all variables called "phi" in a model can be made using the following annotation: model Selection1
annotation (__Dymola_selections={Selection(
name="MySelection",
comment="Selecting all variables \"phi\"",
override=true,
match={MatchVariable(name="*.phi")})});
end Selection1;Activating this selection by extension results in the following principal content of the Variable Browser Note:
See the note above about the difference between these principal images and the actual content in the Variable Browser.
: 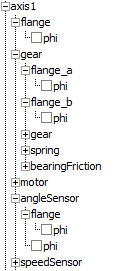 Example 2a
Including several variables in the selection can be made using "|" in the regular expression for name. In this example "phi" and "tau" are selected. model Selection2
annotation (__Dymola_selections={Selection(
name="MySelection",
comment="Selecting all variables \"phi\" and \"tau\"",
override=true,
match={MatchVariable(name="*.(phi|tau)")})});
end Selection2;resulting in:
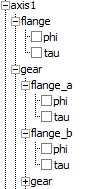
Example 2b
Alternatively of using "|", several matches can be used. They are or´ed. The code is the same as in previous example, except the match part of the annotation, that one is here: match={MatchVariable(name="*.phi"),MatchVariable(name="*.tau")})});Matching within a Scope
Example 3
Note that the annotation in the model Selection1 in Example 1 gives the result:

that is, the local variable phi of angleSensor is present. The reason is that
the search pattern given is "*.phi", that is, any prefix to .phi. The
pattern matching is performed from the top-level model so the path
"axis1.angleSensor.phi" was found. It is possible to make the
pattern matching locally in certain classes only, by providing a (pattern for the)
class name. In this case, the pattern is just
"phi". model Selection3
annotation (__Dymola_selections={Selection(
name="MySelection",
override=true,
match={MatchVariable(name="phi", className="Modelica.Mechanics.Rotational.Interfaces.Flange*")})});
end Selection3;The result is then (note the angleSensor part):
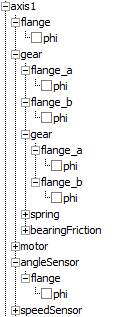
Tags
Variables can be tagged using the tag annotation: Real w annotation(__Dymola_tag={"Mechanical"});Several tags can be associated with a variable: Real w annotation(__Dymola_tag={"Mechanical","Rotational"});
Displaying Variable Selections in the Variable Browser
Below an example displaying variable selections in the Variable
Browser.
See Filter the Content by Type and Variable Selections
for more information about displaying selections in the Variable
Browser.
In the Variable Browser, it is possible to get a list of all selections and marking of which of those selections that should be included in the variable tree. Example 4
As an example, consider the below model where two selections have been defined: model Selection4
annotation (__Dymola_selections={Selection(
name="Angles",
override=true,
match={MatchVariable(name="*.phi")}),Selection(
name="Torque",
override=true,
match={MatchVariable(name="*.tau")})});
end Selection4;This corresponds to the following items in the advanced filter dialog box in the Variable Browser: - Parameters and States
- Angles
- Torques
The selection Parameters and States is predefined corresponding to the interactive fields for setting parameters and initial conditions of states. Note:
All the other examples are also displayed in the advanced filter dialog box in
Variable Browser, but we only gave m the name "MySelection".
Creating Additional Content the Variable Browser
You can create additional section in the Variable Browser.
The MatchVariable constructor has an attribute newName. When newName is used, the variable is included in a new subtree in the Variable Browser with the name of the selection. It is also possible to build subtrees. Example 5
As an example, consider Example 1 above, but to create a new section in the Variable Browser with the same variable name as already selected, you can use newName="%componentPath%%name%" or alternatively newName="%path%". Using the former alternative gives: model Selection5
annotation (__Dymola_selections={Selection(
name="MySelection",
override=true,
match={MatchVariable(name="*.phi", newName="%componentPath%%name%")})});
end Selection5;This gives the same result in the Variable Browser as Example 1 above, but also the following additional content: 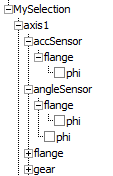 Example 6
To build subtrees, you can include the subtree name in the newName path. As example, extending Example 2a above with newName parameters: model Selection6
annotation (__Dymola_selections={Selection(
name="MySelection",
override=true,
match={MatchVariable(name="*.phi", newName="Angles.%componentPath%%name%"),
MatchVariable(name="*.tau", newName="Torques.%componentPath%%name%")})});
end Selection6;This gives the same result in the Variable Browser as Example 2a above, but also the following additional content: 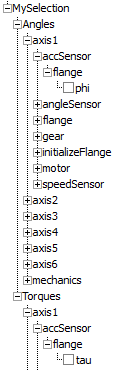
Variable Selections for Plotting
You can use variable selections to create variable lists for plotting.
For more information, including an example, see Plotting Variable Selections.
|


