Purpose
The System Assignment Assistant allows you to assign items (such as Provided
Parts and Fasten steps) to operations.
The assignment assistant box appears when you select System Assignment
Assistant
 . .
The assistant comprises the following main areas: System/Operation, 3D Preview, and Products.
Click the image to enlarge it:

A Fasteners area is also available for managing fastener
assignments. The Fasteners area can be hidden or shown using the Hide
Fasteners/Show Fasteners command.
Click the image to enlarge it:

The assistant is a tool for defining assignments through a manipulation of
products or fasteners, but the created links are
actually between items and operations. It provides a way to visualize items through
products and fasteners.
A item can be realized by a unique operation. An operation can realize one or
several items.
Products are implemented by Provided Parts and Loading operations.
Fasteners are implemented by Fasten steps and Point Fastening
operations, or by Remove Material steps and Remove Material operations.
Manufacturing Assemblies are not displayed in the assistant.
Required Data
The minimum data required for using the System Assignment Assistant is an item
and a system. As well as a scope between the item and the system products and/or fasteners defined as "requirement for items."
The scope must be defined on a Manufacturing Assembly on the item side and on a
System on the system side.
Once the scope is defined, only the items and systems under the scope are candidates
for assignment.
Principles of System Assignment Assistant
The System Assignment Assistant allows you to manage the assignment of items to
operations.
Basically, an item can be assigned to:
- A system (that is, All operations in the
Select Operation list). The result is that a new
operation is created as child of the selected system. This operation realizes
the item.
- An operation through the Select Operation List. The
result is that the operation realizes several items: the selected item and the
items it previously realized. There is an additional item assigned to the
operation.
- No operation. In this case, no operation realizes the item.
In most cases, if an operation is the only one that realizes an item, then this
operation is removed.
The System Assignment Assistant command does not behave
exactly like the Assignments Manager command. Indeed, the
System Assignment Assistant can be used to delete operations.
The System Assignment Assistant is a modal dialog box: no selection can be made
outside the dialog box. Once it is active, it is no longer possible to click the
System Editor or Gantt Chart until the assistant is
closed.
Displayed Names
The names listed in the System Assignment Assistant obey simple rules to present
all the required information about products and fasteners.
Products are displayed in the Products column. The name and
type of the implementing item are also given.
In some cases, the "item output" is indicated in the Products
column (for example, a Provided Part that is output from a Manufacturing Assembly).
Fasteners are displayed in the Fastener
column. Fastener category and number of fasteners is also given. If there are
several fasteners, they are displayed separated by a comma between their names.
The ability to assign one or more fasteners to an item is provided
in the Assembly Assignment Assistant in Fastened Item Definition.
Manufacturing Assemblies are not displayed.
There is no display of the operations in the assistant, even if an operation realizes
an item. The information associating an operation to an item is retrieved through
the Select Operation list in the assistant.
If an item is not associated with a product or fastener,
then this item does not appear in the assistant, even if an operation realizes the
item.
Center Tree and Reframe on Selection for Products
A menu is available for the left and right product lists. The menu consists
of two menu items Center Tree and Reframe On
Selection.
Clicking Reframe On Selection reframes the selected product in
the 3D viewer of the appropriate list.
Center Tree contains the following submenu items:
- On Selected Part centers the selected part in the
tree.
- On Selected Item centers the selected item in the
tree.
- On Selected Operation centers the selected
operation's implemented parts in the tree.
Only Reframe On Selection is available when the selected
object in the list is an output of the previous system.
Multi-Assignment of Items in the System Assignment Assistant
The Multi-Assignment capability enables a manufacturing item that is already
assigned to a system to be also assigned to another system.
You can
select an assigned item in the assistant and click the Multi-Assign command. As a
result, a new implementing operation is created under the target system, and the
existing implementing operation kept.
Assign Behavior
Multi-Assign commands enable Multi-Assignment of provided parts and fasten steps
to the right and to the left.
Typical scenarios are:
- Multi-Assigning Provided parts and Fasten steps in context to a target
system.
- Multi-Assigning an item from a source system to a target system.
- Multi-Assigning an item assigned from a source system when a specific
operation is clicked in the list of a target system.
Note:
Only assigned items can be Multi-Assigned to the target system. Otherwise the
Multi-Assign commands are disabled.
Unassign Behavior
Consider the following case: the item Provide.031A is assigned to GeneralSystem.1
and later Multi-Assigned to GeneralSystem.2.
To unassign the item from GeneralSystem.1, you must select the Provide.031A from
GeneralSystem.1 and push the right to left Multi-Assign command. Though
unassignment is successful, Provide.031A is not listed on the target side. This
is because there is another assignment of the same item.
To unassign all the assignments, you can go to each individual system and
unassign.
To unassign all the assignments in single shot:
- Select the Assignable Provides/Fastens in the
context in the source list and Not
Assigned in the destination list.
- Select all the items to unassign (in this case select the entries of
Provide.031A implemented by GeneralSystem.1 and GeneralSystem.2).
- Click the right to left Multi-Assign command.
Fastener Management
The System Assignment Assistant offers a number of capabilities for fastener
management when Fastener Planning is installed.
These include:
- Finding links between products and fasteners (joining products, joining
fasteners, linking fasteners, fastener assignment status)
- Capacity to assign fasteners from the current scope to an upper scope
(Dispatch Fasten step option), and from a lower
scope to the current scope (Assign Previous Fasten
option)
- Filter to show only assignable fasteners (joining fasteners).
Find Fasteners Options
A number of options are available to find fasteners.
Find Fasteners Joining Selected Parts
The
Find Fasteners Joining Selected Parts
option allows you to identify the fasteners
that join selected parts. It highlights these fasteners in the lists and 3D
viewers.
Find Fasteners Linked to Selected Parts
The
Find Fasteners Linked to Selected Parts
option allows you to identify the fasteners
that are directly linked to selected parts. It highlights these fasteners in
the lists and 3D viewers.
Find Parts Options
A number of options are available to find parts.
Find Parts Joined by Selected Fasteners
The
Find Parts Joined by Selected Fasteners
option selects and highlights the parts
that are joined by one or more selected fasteners.
Find Parts Linked to Selected Parts
The
Find Parts Linked to Selected Parts
option selects and highlights parts that
are linked to the selected parts by at least one fastener.
Check the Status of Assigned Fasteners
The Check the Status of Assigned Fasteners option verifies the
validity of the assigned fasteners.
It verifies if the
fasteners assigned to a destination assembly join all products assigned to the
same assembly (or item):
- If a fastener is valid, a green check mark is displayed next to the
fastener name in the fasteners list.
- If a fastener is not valid, a red cross mark is displayed next to the
fastener name in the fasteners list.
The fasteners list can be sorted by status.
In addition to the fastener names and status, the following information is also given in the
corresponding lists:
- The implementing Fasten step
- The fastener type, which is user-defined.
- The diameter, type and depth of the fastener.
Toggle Fastener Axis Representation
The Toggle command lets you display or hide the
fastener axes in the 3D viewers.
The arrow on the axis representation shows the orientation of the fastener.
Manage Fasteners with Same Diameter, Type, and Depth
You can filter the fasteners displayed in the fasteners lists by
diameter, type and/or depth.
The fastener lists display the available diameters and categories of fasteners
according to the selected Diameter,
Type, and Depth filter
criteria.
Assignable Provided Parts/Fastens in Context
The Assignable Provided Parts/Fastens in Context
option allows you to list the fasteners linked to or joining a group of parts.
It also allows you to list parts joined by a group of fasteners.
The
fasteners or parts are listed within the scope of a selected item.
The Assignable Provided Parts/Fastens in Context option is
available in the left-hand and right-hand system selection lists.
When this option is clicked in a system selection list, the products/fasteners
lists are updated according to the system selection on the opposite side.
For example, when a system is clicked in the right-hand side list, the right-hand
viewer displays several things. It displays the Provided Parts and Fasten steps
(and the implemented parts and fasteners) directly assigned to this system. It
also displays the input assemblies (listed as Output of:
in the parts list).
Then in the left-hand side, all the available Provided Parts and Fasten steps
(assigned and not yet assigned) in the scope and lower scopes of the right-hand
system are displayed.
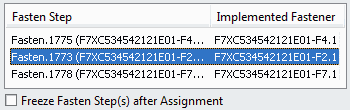
Freeze Status of Fasten Steps
A Freeze Status column is available in the
fasteners list. An icon  in the column shows the Freeze status of the Fasten step implementing the
corresponding fastener. in the column shows the Freeze status of the Fasten step implementing the
corresponding fastener.
If the implementing Fasten step is frozen, the icon appears in the column.
If the Fasten step is not frozen (Released, default status), no icon is shown.
To change the Freeze status on a Fasten step implementing selected fasteners, two
commands are available in the context menu of the fasteners list:
Freeze
Selected Fasten Step(s): Freezes all the Fasten steps
implementing selected fasteners, and the Freeze Status
column is updated.
Release
Selected Fasten Step(s): Releases all the Fasten steps
implementing selected fasteners, and the Freeze Status
column is updated.
If no fasteners are selected or if Not Assigned is
selected, these two commands are not available.
Dispatch Fasten Step
The Dispatch Fasten step contextual command allows
you to move a Fasten step to an upper item.
The selected Fasten step is unassigned and moved to a selected upper item.
Hence, you can move a fastener from its current item to an upper item.
- Right-click a fastener and select Dispatch Fasten
Step. The dialog box that appears shows Manufacturing
Assemblies that have an upper scope.
- Select a Manufacturing Assembly and click OK. The Fasten step is
moved under the selected Manufacturing Assembly.

- If the Freeze Fasten Step(s) after Dispatch check box
is selected, all dispatched Fasten steps are frozen after the dispatch
command is finished. This avoids having to switch to Manufactured Item Definition so you can freeze the dispatched Fasten steps.
- If the check box is not selected, no change is made to the Freeze status of
the dispatched Fasten steps: already frozen Fasten steps remain frozen and
not frozen Fasten steps remain released.
Assign Previous Fasten
The Assign Previous Fasten command allows you to
assign a Fasten step from a lower scope to the current scope.
Hence, you can move a fastener from a lower scope to the current scope.
- Right-click in the fasteners list and select Assign Previous Fasten
Step. The dialog box that appears shows fasteners assigned
on Fasten steps from a lower scope.
- Select a fastener to be assigned under the current scope.
- If the Freeze Fasten Step(s) after Assignment check
box is selected, all assigned Fasten steps are frozen after the command is
finished. This avoids having to switch to Manufactured Item Definitionso you can freeze the assigned Fasten steps.
- If the check box is not selected, no change is applied to the Freeze status
of the assigned Fasten steps: already frozen Fasten steps remain frozen and
not frozen Fasten steps remain released.
Center Tree and Reframe on Selection for Fasteners
A menu is available for the left and right fastener lists. The menu
consists of two menu items Center Tree and
Reframe On Selection.
Clicking Reframe On Selection reframes the selected
fastener in the 3D viewer of the appropriate list.
Center Tree contains the following submenu items:
- On Selected Fastener centers the selected
fastener in the tree.
- On Selected Fasten Step centers the selected
Fasten step in the tree.
- On Selected Operation centers the selected
operation's implemented fasteners in the tree.
Only Reframe On Selection is available when the selected
object in the list is an output of the previous system.
Assign Under Selected General Operation
You can group operations under a General operation using an option.
This is done by selecting the Assign under selected
Header/General operation option in
.
When this option is selected, the Operations list in the
System/Operation area at the top of the System
Assignment Assistant is replaced by an Operations list in the
Products area. Then another Operations list in the
Fasteners area. Only General operations are shown in
these lists. Operations created during assignment are instantiated under the
selected General operation in the Operations list.

Using a business logic, you can differentiate between General operations that are
dedicated to loading and General operations that are dedicated to fastening in
the System Assignment Assistant. For more information, see CATRule to Specify General Loading and General Fastening Operations.
Bead Fasteners
A bead fastener is a specific type of fastener that connects two or more
parts and whose location is defined by a 3D curve. Bead fasteners are widely
used in the automotive industry.
A bead fastener comprises the following entities:
- Fastener reference and instance
- 3D part, which defines the location of a 3D curve.
The 3D part linked to a bead fastener is not supported in the Systems Assignment
Assistant. These parts are not listed in the product lists. However, their 3D
representation is used to represent the bead fastener.
When a bead fastener exists, to visualize it in the Assignment Assistant viewer, the
representation of its linked 3D part is shown in the viewer:
- Selecting the bead fastener in the fasteners list highlights the visible
representation of its 3D part in the viewer.
- Selecting the 3D part representation in the viewer highlights the bead
fastener linked to it in the fasteners list.
Bead fasteners are managed in Assignment Assistants as follows:
Column-Based Filtering
A Filter editor and a Clear
command are available in the bottom frame of the assistant to manage column
filtering.
You can filter the left products frame with the parts containing a character string
(for example, F7X).
Enter the filter string in the Filter editor then click the
column header.
The left list then displays only parts with the name containing the characters F7X.
The left 3D viewer is updated to display only products satisfying the applied
filter.
The same filter string can be applied to any column in the four available lists.
Click appropriate column header in the list.
Clicking the Clear command clears the
Filter editor and all the filtered lists are reset as if
there is no filter applied in the four available lists.
If you manually clear the filter string in the Filter editor,
and then click the column of a list, only that filtered list will be reset to its
original state.
If a filter is applied on any column, that column title is prefixed with the string
(F) to indicate that a filter is applied on that specific column.
Rules for Operation Deletion
When an operation is unassigned by the assistant and the operation does not
realize an item, the operation may be deleted.
Items displayed in the assistant are realized by an operation. Such an operation can
be unassigned by the assistant.
Link with Resources
If the operation does not have a link with a resource (executing, localization or used
resource), the operation is deleted.
However, the operation is not deleted in the following cases:
- The operation is executed by one unique working resource.
- The operation is localized on one unique localization resource.
- The operation uses one or several resources.
Time Constraint
If the operation has time constraints, the operation and the
corresponding constraints are deleted.
|


