Modifying Activities with Tracks or Repeatable Sequences

You can use the USETOOL activity with selecting an existing track, creating a new track or defining a repeatable sequence.

This task shows you how to:


Before you begin: Have a scenario with a manikin and objects.

Select an Existing Track

You can select an existing track while using the USETOOL activity.

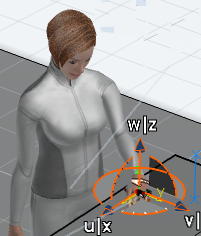
  1. Select any existing track in 3D, which defines the tool grabbed by the manikin.
    1. The tool snaps to the first trajectory point and the hand resolves to this position. If the hand cannot resolve to the first trajectory point, it provides feedback by displaying a red line between the hand and the tool.
    2. By default, the entire track selects and the start and end trajectory points on the track display in green and red color respectively. You cannot specify part of the track for USETOOL.
    3. If you select any trajectory point in 3D, the tool snaps to the selected point and the hand resolves to this position.
  2. Specifying only part of the track for USETOOL activity.
  3. Select any trajectory point in 3D, the tool places at that point and the hand resolves to the new position. Use the previous/next icons to navigate the track and delete the trajectory points in the track that you do not need. The track used for USETOOL is not part of assembly operations. So, it dedicates to defining the path of the tool and the simulation engineer has rights to modify.

Define a New Track

This describes how to define a new track for the USETOOL Activity.

  1. Drag the robot handle snapped on the tool if the robot handle is not already there. The tool moves to the new robot handle location and the hand resolves to this position. Click Insert trajectory point icon to record the trajectory point. Use the Regrasp icon to fine-tune the hand postures if required. Inserts a new trajectory point and defines the starting point for the track.
  2. Define as many trajectory points as required. Use the Previous/Next options to navigate the trajectory points. Whenever a new point inserts, it gets recorded after the current trajectory point, a line creates to represent the track.
  3. Use Cumulative Snap in the context toolbar to precisely define the final position of the tool. The tool moves to the new robot handle location and the hand resolves to the new position. Use Regrasp to fine-tune the posture if required.
  4. Click Finish.

Define a Repeatable Sequence

You can create a repeatable sequence.

  1. Click Define Repeatable Sequence .


    Note: In certain USETOOL scenarios, the same sequence of postures has to repeat at multiple locations. For example, if the manikin has to tighten 4 fasteners in a car wheel using a torque wrench. The sequence of postures is identical for all the 4 fasteners. This constitutes a Repeatable Sequence. The Repeatable Sequence may involve postures with regrasp or reposition. In other scenarios like, using a screw driver or a spanner, the Repeatable Sequence may have to execute more than once. This is the Number of repetitions. See Creating a Track Using Cumulative Snap.

  2. Use Previous or Next in the context toolbar to browse to a particular trajectory point or directly select a point in 3D.
  3. The context toolbar and the 3D Simulation panel displays. This context toolbar is associated to track points and comes up only when the Repeatable Sequence option is invoked. Here you can select the Repetitions and Delay.
  4. Select the start and end trajectory points and key in the repetitions/delay.
    1. Initially the second icon (in the first image; icon with red box) is gray and you must first define the starting point for the repeatable sequence.

      If selecting the first icon (with green box), the current trajectory point’s color is green and this indicates the starting point for the repeatable sequence.
    2. After selecting the starting point, the first icon (first image, icon with green box) is gray and the second icon is available. Similarly, select another trajectory point in 3D and from the context menu, select the icon with the red circle. The trajectory point is red in color indicating the end of the repeatable sequence.

    Note: The same trajectory point cannot be the used as start/end point. The index of the start trajectory point in the track must be less than that of the end trajectory point. The navigation of the track is not available beyond the Start/Stop limits that you defined.


  5. Specify the number of repetitions and the delay between each in the Define Repeatable Sequence panel.
  6. Click Finish to save what was done in the previous step.
    The context toolbar associated with the track appears.