Configuring and Activating a Standalone License Server | ||
| ||
-
Connect the License Administration Tool to the server.
You must connect to the server to be able to use it. If you point to the
 icon in the status column, next to the computer name, a message like this will be displayed:
server xxx not connected
To connect to the server:
- Select the Servers - Connect command and select the server name from the list.
- Or, select the Servers - Connect all command.
-
Or,
point to the icon, right click and select the Connect
command.
- Or, double-click on the icon.
Note that you can connect the tool to several license servers simultaneously. To disconnect from one license server, select the Disconnect command.
If you did not enroll a license during the installation, the
 icon appears over the computer icon like this
  .
.If you did not enroll a license during the installation, the
icon displays the following message:
no license enrolled
.The columns available in the Server Definitions tab are:
- Status
- Status of the license server.
- Computer Name
- Name of the machine hosting the license server.
- Computer ID
- Computer id of the machine hosting the license server.
- Version
- Software version number.
- Build Date
- Software version build date.
- Operating System
- Operating system on which the license server is running.
- Comment
Contains an optional comment enabling you, for example, to distinguish one license server from another when several server definitions are displayed in the list.
To edit a comment, point to a line containing a server definition line, under the Comment column, and double-click: an editable field with a cursor is displayed. Enter the text, then click ENTER to validate.
The comment field supports NLS characters, including DBCS. A comment can be added and modified even if the connection to the license server is not established or is established in restricted mode. Editing comments does not modify the license server itself, but only the license administration tool user settings.
When several lines are present in the Server Definitions tab, you can select multiple lines (using Shift or Control keys and left-clicking) to connect several servers at the same time, for example.
When you select then copy (using Ctrl-C) one or more lines, the fields copied can be pasted together in any other text processing program (for example, Excel). You can also simply drag lines from the License Administration Tool and drop them into another program, without the need to copy then paste.
You can also sort the lines in ascending or descending order, by clicking on the appropriate column title.
Note: Both techniques work also in any tab containing table-formatted data, such as the Administration tab, Usage Per Feature tab, Usage Per User tab, or Detailed License Usage dialog box.When the Server Definitions tab contains several lines, by default, the lines are displayed in the order according to the time at which the lines were added. The first line contains the first license server added. You can change this default order by dragging and dropping a line:
- click anywhere on the line you want to move to select it
- click the line again, and hold then move the line to the appropriate location
- release to drop the line at its new location: the next time you start the License Administration Tool, the line will be displayed by default at its new location.
Note: You can only move one line at a time.When you add a new server in the Server Definitions tab, by selecting the Servers > New... command or right-clicking in the tab and selecting the Add new server command, it is added to the server list bar and automatically pre-selected. This bar is displayed at the top of the following tabs: Administration, Usage Per Feature, Usage Per User, Statistics and Geolocation.
-
Configure the license server.
- Select the Servers - Properties command and select the server name from the list.
-
Or,
point to the icon, right-click and select the Display properties command.
- Or, double-click the line containing the computer name.
The Server Configuration dialog box appears:
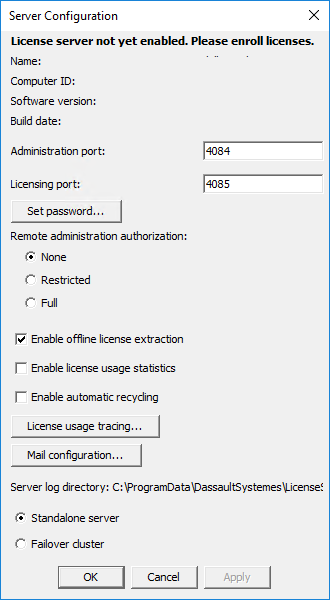
You do not have to set any other options for the moment, but for information purposes here is a list of the information and options in the dialog box:
- Name:
- Name of the machine hosting the license server.
- Computer id:
- Computer id of the machine hosting the license server.
- Software version:
- Internal software version number.
- Build date:
- Internal software version build date.
- Administration port:
- Listening port for the License Administration Tool.
- Licensing port:
- For the Licensing port, you can either accept the default port number (4085) or set another port number.
- Set password...
- Clicking this button opens the Administrative Credentials dialog box which lets you set passwords required to administer your server using the License Administration Tool. When the passwords are already present, the button name is Change passwords....
If needed, you must set the password by clicking the Set password... button and typing the new password for full access mode:
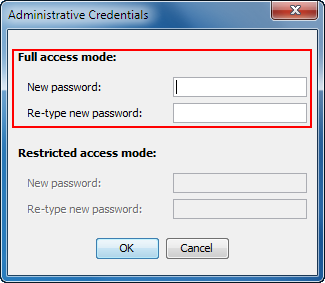
Warning: if the password has been lost, the only possibility to recover administrator access is to re-install the license server from scratch.
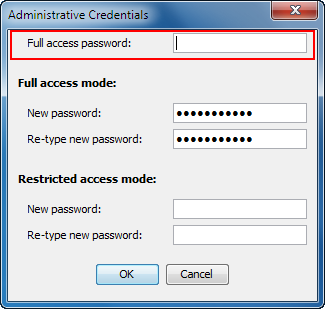
Once you have set the password, an additional field appears in the upper area allowing you to enter the current password for full access mode before modifying it. The field for entering the password for restricted access mode is also activated, allowing you to set or modify the password for restricted access mode, as illustrated:
- Remote administration authorization
- Allows you to deny access, or grant restricted or full access to a license server from a remote License Administration Tool installed on a remote computer.
Several License Administration Tool instances can be connected simultaneously to the same license server. Only one License Administration Tool instance can have full administration access to the license server: either the local License Administration Tool or the first one that connects to the license server remotely.
Furthermore, a local License Administration Tool takes priority over one started on a remote computer. When a local License Administration Tool connects to a local license server, if another administration tool is already connected in full mode, it is disconnected. This happens even if the License Administration Tool already connected is also a local one, irrespective of whether the tool is running in GUI or CLI mode.
- full: a remote License Administration Tool can connect to the license server and act with the same privileges as if it was running locally. This mode allows you complete control of the license server. Even if you have the right to fully administrate the license server, you may decide to connect to the server in restricted mode if you do not intend to make any modifications to the server. You connect to the server in this way using the Servers - Connect restricted command.
- restricted:
This mode enables a remote License Administration Tool to connect to the license server but only in restricted mode, even if no other administration tool is connected to this license server.
You can only set the password for restricted access mode if the password for full access mode has already been set.
Restricted mode features the following limitations:
- no modifications are allowed in the Server Configuration dialog box
- no actions from the contextual menu can be performed in the Usage Per User tab
- creation and/or modification operations in the Authorizations tab are not allowed
- the dump buttons in the Monitoring tab are disabled.
- none: remote administration is denied.
The following table summarizes which passwords are requested at connection time when administering a local server or a remote server, and remote administration is fully authorized:
Connect Command Connect restricted Command No password set No password requested No password requested Only password for Full mode set Password for Full mode must be entered No password requested Both Full and Restricted mode passwords set Password for Full mode must be entered If password for Restricted mode is entered, connection is forced in Restricted mode
Password for Full or Restricted mode must be entered The following table summarizes which passwords are requested at connection time when administering a remote server, and remote administration is restricted:
Connection from remote tool using Connect Command Connection from remote tool using Connect restricted Command No password set No password requested Connection is forced in Restricted mode
No password requested Only password for Full mode set No password requested Connection is forced in Restricted mode
No password requested Both Full and Restricted mode passwords set Password for Full or Restricted mode must be entered Connection is forced in Restricted mode
Password for Full or Restricted mode must be entered The following table summarizes which passwords are requested at connection time when administering a remote server, and remote administration is denied:
Connection from remote tool using Connect Command Connection from remote tool using Connect restricted Command No password set Connection denied Connection denied Only password for Full mode set Connection denied Connection denied Both Full and Restricted mode passwords set Connection denied Connection denied Mode is only taken into account at connection time. For example, if the mode is changed from restricted to none, the remote tools already connected in restricted mode will stay connected.
Checkbox status is only taken into account once the license server has been activated. Before activation, remote administration is allowed.
The License Administration Tool level must be higher than or equal to the license server level.
Note: If a network problem occurs or if the License Administration Tool runs from a laptop which disconnects, or if no action is performed from the License Administration Tool for 30 mins, the connection between both processes is broken and the status in the Server Definitions tab returns to. Once disconnected, the License Administration Tool doesn't automatically reconnect to the license server(s). - Enable offline license extraction
- Check this box to enable offline license extraction when configuring the license server. This box is checked by default. Uncheck it to forbid offline license extraction.
- Enable license usage statistics
- Enables license usage statistics using the Statistics tab.
If you check this checkbox, the license server collects statistical data. If you uncheck it, the license server will NOT collect statistical data, and data already collected will not be deleted.
- Enable automatic recycling
- Enables automatic recycling of all named user licenses which have not been used for at least 30 days.
Using the Usage Per User tab, you can manually recycle a named user license tied to a named user if this license has been used by this user for more than 30 days, and if the terms of the license contract (user retirement, etc.) allow you to do so. Enabling automatic recycling avoids manual license recycling.
Irrespective of whether this option is activated, the license server stores and displays the last usage date of a given named user license in the
Last used atfield when detailed license usage information is requested: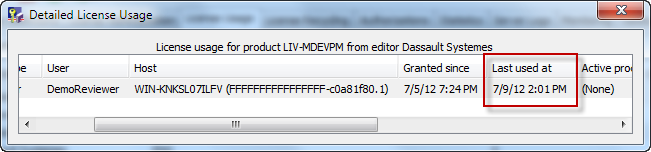
As soon as it is granted to a named user, the last usage value is set. The value is updated every time the named user logs in or logs out (and also when internal heartbeats occur).
If you manually recycle a license, the last usage value is emptied.
The license server initiates automatic recycling every day at 00h00 UTC.
A license cannot be recycled if a given process is still using the license.
Casual usage named user licenses are not managed by this process: casual licenses are already automatically recycled at the beginning of every month.
The last usage value of offline named user licenses is initially set to the date of the extraction. The date is updated:
- at the exact time when the end of offline duration occurs
- at the exact time the user extends the offline license
- at the exact time the user manually returns the offline license.
If you install on top of a V6R2013x version or lower, the last usage value of all tied named user licenses is initialized with the new installation date, and the last usage value of all non-tied named user licenses is initialized to an empty value.
When a License Administration Tool manages a V6R2013x or lower license server, the
Last used atfield normally displayed when detailed license usage information is requested will not be displayed.Note: Note the following limitation: if the license server is not running at 00h00 UTC, automatic recycling of named user licenses is not postponed until the license server restart, but to the next 00h00 UTC. - License usage tracing...
- Displays the License Usage Tracing dialog box allowing you to select the licenses for usage tracing:
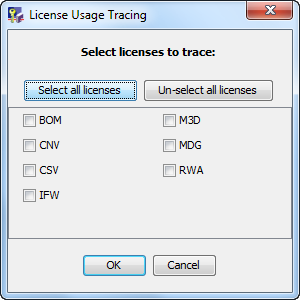
This dialog box is only useful after importing licenses.
You have to select at least one license to activate usage tracing. You can select individual licenses by checking the box next to the license(s), or select and unselect all the licenses using the Select all licenses and Un-select all licenses buttons respectively.
If activated, license usage tracing events are logged and can be viewed using the Server Logs tab.
If the Select all licenses button is checked, then you enroll licenses for new features, the new features and checkboxes will be added automatically, and the boxes will be checked, which avoids having to access this dialog box again and click the Select all licenses button again.
If another License Administration Tool is already connected, the dialog box is in restricted mode and the contents are grayed out.
- Mail configuration...
- Displays the Mail Configuration dialog box allowing you to send license server event notifications to specified mail addresses:
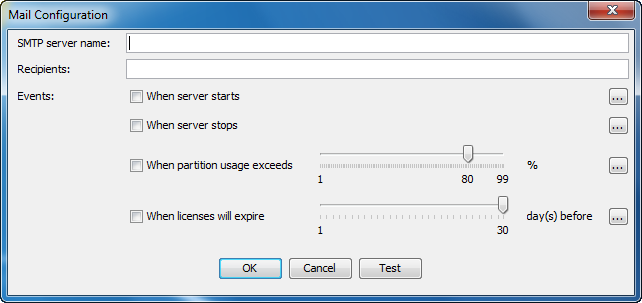
The fields are as follows:
- SMTP server name: specify the name of the mail
server to which the license server will send notifications.
By default, the SMTP port number is 25. But the port
number can be set to a different value, separated from the name by a colon (:). For example:
MySMTPserver:26. Note that SMTP servers requiring authentication and/or SSL are not supported. You might use an SMTP relay in this case. - Recipients: specify the e-mail addresses to which to the notifications will be sent. You can specify several e-mail addresses, each separated by commas (,).
- Events: Mail notifications are available for the following types of events:
when server starts: a notification is sent when the license server starts-
when server stops: a notification is sent when the license server stops when partition usage exceeds: the license server needs to regularly write data in its data folder (C:\ProgramData\DassaultSystemes on Windows, or /var/DassaultSystemes on Linux). When there is no more space in the data folder, the license server stops. Even if disk space may typically already be monitored by other tools, you can configure your e-mail server to send an e-mail to the license server administrator when the disk space is below a given percentage. By default, this event is not triggered. The administrator has to activate it, with an appropriate percentage value. The default is 80%. An event is sent once this percentage has been reached, and every time an incremented or decremented percentage exceeding the limit has been reached (for example, at 81%, 82% etc...).when licenses will expire: a notification is sent when a license is about to expire. When several licenses are about to expire, only one notification is sent. Notifications are sent at 1:00H AM server local time, each day the condition is still valid. You can set the number of days prior to license expiration by adjusting the slider to set a value between one and thirty days.
Every time a notification is sent, the information is also added to the server log.
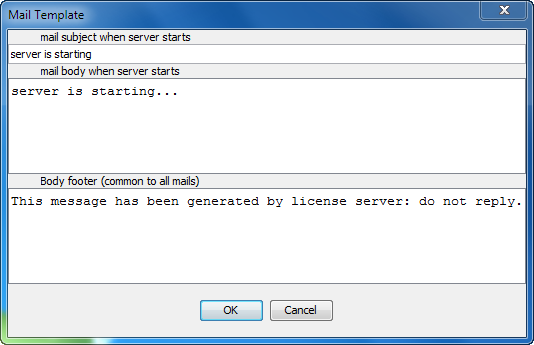
The subject, content and footer in the notification of each event type can be customized by clicking the ... button which displays the Mail Template dialog box, for example:
Click the Test button to send a mail notification to validate the SMTP server name and e-mail addresses.
- SMTP server name: specify the name of the mail
server to which the license server will send notifications.
By default, the SMTP port number is 25. But the port
number can be set to a different value, separated from the name by a colon (:). For example:
- Server log directory
- Point to this option to display the path of the directory containing license server logs. The full pathname is displayed in a tooltip, and can also be selected when clicking on it (or double-clicking or triple-clicking). The path may be located either on the local machine or on a remote machine. The server log directory path can only be set in command line mode (using the -logDir option of the DSLicSrv batch command).
- Standalone server
- This option is checked by default and signifies that you are configuring a standalone server, not a server belonging to a failover cluster.
- Failover cluster
Refer to Configuring and Activating a Cluster in Failover Mode.
- Set the licensing port number, then click the Apply button, then click OK.
Pointing to the
icon now displays the following message:no license enrolled
For the moment, the license server is configured but not activated. You cannot use the license server until it has been activated. To activate the license server, you must enroll a special license: the Activation license. However, this license is typically embedded in the .LICZ file containing the product licenses, so you don't have to manage it in a special way. If you have licenses for several editors, you will need several activation licenses.
- Enroll the license as follows:
- Select the License - Enroll command.
The Open dialog box is displayed.
- Select the appropriate .LICZ file containing your licenses, then click the Open button.
License keys and their activation key are provided in the form of archive files named something like this (with the .LICZ suffix):
DLD-430814856494DBA7_7KLXM-UVSBG-8VFDL-GPMGS-V1ED3_0001_1The License Enrollment dialog box opens, containing messages confirming that the licenses have been enrolled on your server:
License enroll starting
LP5-SES-DSY : License enroll starting
Sending files to server LP5-SES-DSY
	E:\Licenses421\DLD-430814856494DBA7_7KLXM-UVSBG-8VFDL-GPMGS-V1ED3_0001_1.LICZ\FEAT-1-of-13.LIC
	E:\Licenses421\DLD-430814856494DBA7_7KLXM-UVSBG-8VFDL-GPMGS-V1ED3_0001_1.LICZ\FEAT-10-of-13.LIC
	E:\Licenses421\DLD-430814856494DBA7_7KLXM-UVSBG-8VFDL-GPMGS-V1ED3_0001_1.LICZ\FEAT-11-of-13.LIC
	E:\Licenses421\DLD-430814856494DBA7_7KLXM-UVSBG-8VFDL-GPMGS-V1ED3_0001_1.LICZ\FEAT-12-of-13.LIC
	E:\Licenses421\DLD-430814856494DBA7_7KLXM-UVSBG-8VFDL-GPMGS-V1ED3_0001_1.LICZ\FEAT-13-of-13.LIC
	E:\Licenses421\DLD-430814856494DBA7_7KLXM-UVSBG-8VFDL-GPMGS-V1ED3_0001_1.LICZ\FEAT-2-of-13.LIC
	E:\Licenses421\DLD-430814856494DBA7_7KLXM-UVSBG-8VFDL-GPMGS-V1ED3_0001_1.LICZ\FEAT-3-of-13.LIC
	E:\Licenses421\DLD-430814856494DBA7_7KLXM-UVSBG-8VFDL-GPMGS-V1ED3_0001_1.LICZ\FEAT-4-of-13.LIC
	E:\Licenses421\DLD-430814856494DBA7_7KLXM-UVSBG-8VFDL-GPMGS-V1ED3_0001_1.LICZ\FEAT-5-of-13.LIC
	E:\Licenses421\DLD-430814856494DBA7_7KLXM-UVSBG-8VFDL-GPMGS-V1ED3_0001_1.LICZ\FEAT-6-of-13.LIC
	E:\Licenses421\DLD-430814856494DBA7_7KLXM-UVSBG-8VFDL-GPMGS-V1ED3_0001_1.LICZ\FEAT-7-of-13.LIC
	E:\Licenses421\DLD-430814856494DBA7_7KLXM-UVSBG-8VFDL-GPMGS-V1ED3_0001_1.LICZ\FEAT-8-of-13.LIC
	E:\Licenses421\DLD-430814856494DBA7_7KLXM-UVSBG-8VFDL-GPMGS-V1ED3_0001_1.LICZ\FEAT-9-of-13.LIC

LP5-SES-DSY : 13 licenses received
- Click OK.
The
 icon confirms that your server has been activated:
If you point to the
icon, a tooltip like this will be displayed:server LP5-SES-DSY (10.237.169.69) connected
confirming that your license server is up and running.
Note: Once you have configured and activated your server as a standalone server, you can no longer change your mind and configure it as part of a failover cluster. That is why the corresponding options are grayed out.
Warning: the Activation license included in .LICZ files with the product licenses is valid for only 30 days. You must activate the license server within 30 days after having received the license file. If you need to activate the server a second time, after the first 30 days, the original activation license included in the original .LICZ file will no longer be valid, in which case another activation license included in another .LICZ file is required. You only have to activate the license server once. The 30 days apply to the life of the activation license, not to how long the license server remains active.
Furthermore, after activation, if the license server is stopped more than 60 days, then another activation license included in another .LICZ file is required.
- Select the License - Enroll command.