Mono-instantiate an Item
You can instantiate a Group from the catalog browser.
- From the Tools section of the action bar, click Catalog Browser
 .
. - In the Catalog Browser dialog box, click More... to search a catalog.
For more information about the dialog box see Design IP Classification User's Guide.
- In the Object Selection dialog box, type a name for your research, and then click Search.
The search results are displayed.
- Select a catalog from the list and then click OK.
The Catalog Browser dialog box displays the catalog structure content.
- Expand the catalog structure and select a chapter.The content of the chapter appears in the right window.Note: You can determine the display of the content or how the content should appear by clicking any of the various formats from the top right corner: Thumbnail View, Tiles View, Details View.
- Double-click a group from the list.
- Place the pointer anywhere in the active sketch to position the group instance.Notes:
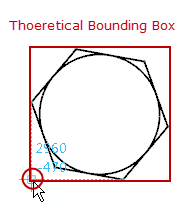
- The lower left point of the theoretical (virtual) bounding box is used for positioning the Group instance.

- You can position the Group instance with the help of SmartPick assistant. For more information about SmartPick, see Using SmartPick.
Important: - If you select a point in the active sketch for positioning the Group instance, no constraints are created between the point and the Group instance.
- However, if the Group item contains internal or external constraints (with sketch absolute axis, i.e. the origin, H direction and V direction), they are transferred to the Group instance. For more information about internal and external constraints of Group, see Internal and External Constraints of a Group.
- If you try to instantiate a group into a part without first activating the Sketcher app, following informative message is displayed:
Selected item could not be instantiated in current editor.
- The lower left point of the theoretical (virtual) bounding box is used for positioning the Group instance.
-
Click to validate and finalize the position of the Group instance.
appears.
-
In the Tools Palette, select one of the following:
Explode
 : This option is active by default.
Group
 .Note: You can select either of the above options before ending the instantiate command.
Change Group Origin
 : Define another origin in the sketch.
Change Group Position
 : Define another position in the sketch.
Change Group Angle
 : Rotate group instance around its origin.
Flip Group Horizontally
 : Flip the group instance around its Y axis.
 Flip Group Vertically
 : Flip the group instance around its X axis.
Instance angle: Change the angle of group instance by typing the desired value.
- Click Close in the Catalog Browser dialog box when you are done.
Tip: You can also instantiate the Group item by one of the following methods: - Click a Group and on the context toolbar, click Instantiate Group
 .
. - Right-click an existing group instance and select Xxx.Object > Instantiate Group.
- From the Sketch section of the action bar, click Instantiate Group
 .
.
- Click a Group and on the context toolbar, click Instantiate Group