-
From the Refine or the Essentials
section of the action bar, click Chamfer
 .
.
The Chamfer.x dialog box appears. The default parameters to be
defined are Length and Angle.
- Select the objects to be chamfered.
You can select edges or faces. If you select a face, the edges of the selected face are
chamfered.

Notes:
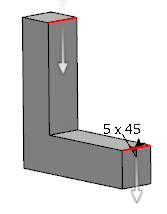
- To switch the orientation of an edge of a chamfer independently, click the corresponding
arrow in the 3D area. If you select more than one edges from the same propagation,
then only one arrow for the first edge is displayed.
- To switch the orientation of all the edges of the chamfer, click
Reverse All.
- Select a Mode.
The parameters defining the chamfer differ according to the mode you
select. - Define values for the parameters in the selected mode.
- Select an option under Propagation list.
-
Based on the selected mode, you can also select the options:
Reverse, Corner Cap, and
Symmetric Extent
 . .
|