Displaying the Tree | ||||
|
| |||
-
From the standard area of the action bar, click City
Experience
 (by default, the City Experience
panel is displayed each time a City widget is started).
Assets can be organized into sub-categories. By default, all categories are collapsed but you can click the black arrow before the category name to expand it.
 -
To load or unload, select or clear the corresponding box in the
tree view.
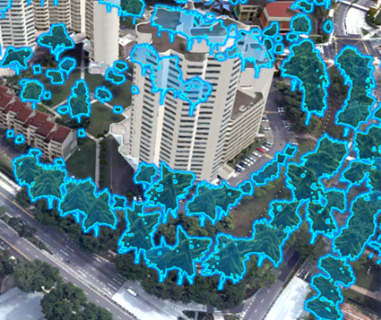
In the example below, small and big trees are loaded and are now visible in the 3D view:

If we clear BIG Trees in the tree view, the biggest trees are not visible anymore:

Tip: You can also set an element as visible through the Properties panel. To do so, click Properties  from the standard section of the
action bar,
expand the Attributes area, and then clear the
visible option.
-
Click an object in the tree view.
The selected object is highlighted in blue in the 3D view:

-
To move an object in the tree view, drag and drop it to its new
location.
Tip: Press Ctrl to select multiple objects and reorganize your hierarchy more easily. -
Right-click an object and select the appropriate context command.
Option Description Move to Viewpoint Moves to the camera position stored through Set Viewpoint. This command is available only when at least one viewpoint as been created for the selected object.
Tip: You can achieve the same effect by clicking  next to the object name.
 Remove Viewpoint Removes the related viewpoint. Set Viewpoint Saves the current camera position. To create a view for a given object, position the camera on the area of interest, select the object to be associated with this viewpoint in the hierarchy, and then click Set Viewpoint.
When a viewpoint is created, the
 symbol is displayed next to the object name
in the hierarchy.
 Important: You can only create one related viewpoint per object. As soon as you click Set Viewpoint, the corresponding camera position replaces the one you may have previously saved. You can also create viewpoint objects. See Creating Viewpoints for more information.
Move to Loaded Items Positions the camera on objects that have already been loaded in the 3D view. If objects are not loaded (and thus, not visible in the 3D), the command is grayed because it is not relevant.
Note: This command is not available for all dataset types (for instance, images).Move to Extent Positions the camera so that the whole extent of a dataset (loaded or not, visible or not) in the tree view can be seen, as long as this dataset has a bounding box. This means that this command is not relevant for folders or bookmarks, for instance. Remove Removes the object from the hierarchy. Add Group Creates a new group. Export Group Exports a group to a collaborative space. Tip: To quickly change the dataset name, double-click the dataset in the tree to make it editable, then type the new name and press Enter. -
To hide the tree view, click
City Experience
 .
.