Creating a Branch

You can create a new branch within a revision family, copying the content from the object you select.

You may need to create branches to study an alternative design, for example. Starting a new design involves creating the required objects. Using a previous design as a starting point facilitates the process of creating a new design.

While revisions are derivations of the same object, a branch is a new object with a new identification.

Notes:

Required access role: Contributor, Author, Leader. For more information, see Collaborative Lifecycle Access to Content.


Before you begin: Select all connected objects together to duplicate the connections and move them to the new objects. Otherwise, the new objects will remain connected to the initial object. For more information, see Relation Management.

Context: The following diagram shows examples of branches:

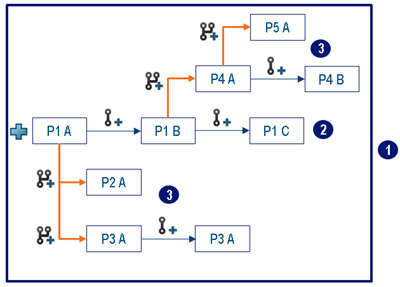
  • 1: The revision family, containing all the revisions and branches of the initial object.
  • 2: The initial P1 branch.
  • 3: Derivative P2, P3, P4, and P5 branches. The P2 and P3 branches might represent alternative studies, the P4 branch represents another version of the object, and the P5 branch might represent a fix of the P4 branch.

  1. Select one or several objects you want to create a branch from.

    Important: If the object you select is a structure, only its aggregated representations are added to the selection and will be part of the new branch. Reusable representations and other children are not taken into account if you do not select them..

  2. From the Compass, click Collaborative Lifecycle.
  3. From the Lifecycle section of the action bar, click New Branch .

    The New Branch command can be run from a navigation tab, from an authoring tab, or from a Search Result tab.

    The New Branch dialog box appears. If you selected only one object, it displays the revision ID of the new branch, and of the object the branch is created from. If you selected several objects, it displays the selected objects and all required content automatically added to the scope. It also displays their type, title, revision ID, and maturity state.
    Note: Only 3D shapes are displayed in the dialog box. Other representations (for example, representations of a 3D part) are not displayed, but they are also taken into account.
  4. Optional: If you selected only one object, in the Title box, enter the title for the new branch. If you selected several objects, in the Duplication String box, enter the prefix for the new branches.
  5. Click OK to create the new branch.

The new branch is created. No further save actions is required.

Depending on the type of the initial tab, a new Navigation tab, a new Authoring tab or a new Search Result appears, and shows the new branches. Multiple tabs can be displayed if you initially selected unconnected objects.