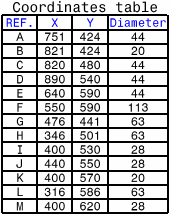
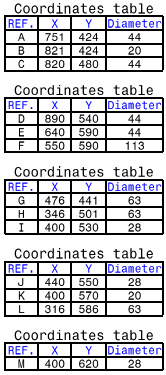
- Right-click a table row and choose Split Table.
The Table Split dialog box contains the following
options:
-
Maximum number of rows: If you want to
split the table so that each new table contains a maximum number
of rows, select this option and enter the desired number of rows
in the associated field.
-
Maximum height: If you want to split
the table so that each new table has a maximum height, select this
option and enter the desired value in the associated field.
Options:
-
Horizontally: Select this option to position
the new tables one next to the other, then indicate the distance
you want between each new table.
-
Vertically: Select this option to create
the new tables one below the other, then indicate the distance you
want between each new table.
-
Duplicate header rows: Select this option
if you want to duplicate the first rows in each new table.
-
Duplicate footer rows: Select this option
if you want to duplicate the last row in each new table.
-
Reversed table: Select this option if
your table is reversed, i.e. if your header rows are below and your
footer rows are above.
- Select Maximum number of rows, and enter
5 in the corresponding field.
- Select Vertically and type 5 mm in the distance
field.
- Select Duplicate header rows and enter 2
in the corresponding field.
- Click OK.
The table is split into several tables, according to the criteria you
specified. | Before | After |  |  |
|