About Editing View Filters | |||||
|
| ||||
You can define or edit the visual filters by selecting the elements directly in the work area and also with the help of a context toolbar. The Restore Show State button, the Visualization Chooser, an immersive dialog box, and the Edit Filter dialog box are used to edit a filter.
Note the following points for selecting the elements when defining or editing a filter:
- If you select one or several elements, and if those elements are not included in the filter yet, they are automatically added to the filter (in standard visualization for display filters or hidden for mask filters). Note that auto copy is available only for the first selection. If you select an element which is already filtered, the properties are displayed in the context toolbar and the auto copy of the property is stopped.
- If at least one of the selected elements belongs to the filter, or if the current visual property is selected, no object is added to the filter. And the context toolbar displays the overloaded properties of all the selected elements.
- If the selected elements are not yet added to a filter, all properties which are possible with the filter are available in the context toolbar. Activating one of them adds that element in the filter.
- Display filter
 : Elements that are not filtered are not displayed until at least one of the visual property is activated:
 - Mask filter
 : Elements that are not filtered are displayed normally until at least one of the visual property is activated.
- Display filter
- The corresponding property appears as undefined (icon appears with a question mark) in the context toolbar.
- Clicking on an undefined icon restores the default value of the visual property.
The Context Toolbar
The context toolbar appears near the pointer when you select one or several elements in the work area to define or edit a filter. Its content changes depending on the current selection. You can modify the following visual properties using this context toolbar: 
- Display selection/Hide selection
 : (Used for Display filters). Toggles between display and hide. When clicked, shows the selected elements in both the 2D and 3D area backgrounds. The selection is displayed in half transparent bright green depending on the related visualization option in the Visualization Chooser. By default, this property is activated for display filters.
 - Hide selection/Display selection
 : (Used for Mask filters). Toggles between hide and display. When clicked, masks or hides the selection, and clears all other properties. However, the selection is displayed in half transparent red in the 3D area when editing the filter, depending on the related visualization option in the Visualization Chooser. By default, this property is activated for mask filters.
 - Activate low intensity property/Deactivate low intensity property
 : Toggles between activate and deactivate low light property. When clicked, displays all the elements in low intensity in both the 2D and 3D area backgrounds and clears the display or the mask property. By default, this property is deactivated.
 - Activate the unpickable property/Deactivate the unpickable property
 : Toggles between activate and deactivate unpickable property. When clicked, prevents selecting elements in both the 2D and 3D area backgrounds, even
though you can see them. Clears the display or mask property. By default, this property is deactivated.
 - Activate the Uncut property/Deactivate the uncut property
 : Toggles between activate and deactivate the uncut property. When clicked, prevents the selection from being cut by sections and clears the display or the mask property. This does not affect the preview in the 3D area. By default, this property is deactivated.
You can apply this property on elements of a filter and this filter can be applied on every type of view. However, this property only affects the elements of a filter when the filter is applied to a section view. When this property is applied through a filter, all the visible background elements cut by a section plane, become uncut.
This property is not taken into account for the following:
- The clipping frame
- The clipping view
- The back clipping plane
- Boundaries clipping of offset or aligned 2D layout section views
- Color chooser
 : Applies a color to the selected element. You can also apply transparency to the element.Note: When a material is applied to a part and the Shading with Material
 mode is selected, then the applied color is not shown.
 - Activate color and transparency overload property/Deactivate color and transparency overload property
 : Toggles between activating and deactivating the color and transparency. This option is only available if a color is applied to an element.
The context toolbar provides the following functions:
- When an element is selected, its visual properties are displayed in the context toolbar.
- When you modify the properties of the selected element through the context toolbar, they are memorized to be applied to the next selections. It also allows you to copy the selected property and apply to the next selection. Clicking in an empty area or interacting with the Edit Filter dialog box stops the auto copy on the selections and displays the visual properties of the next selections.
The Visualization Chooser
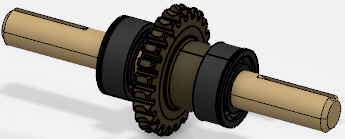
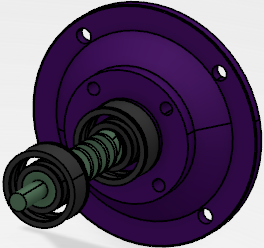
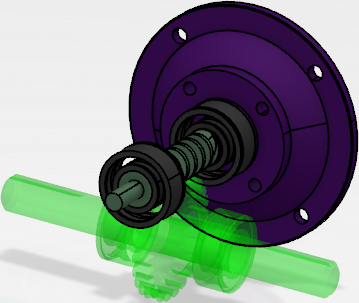
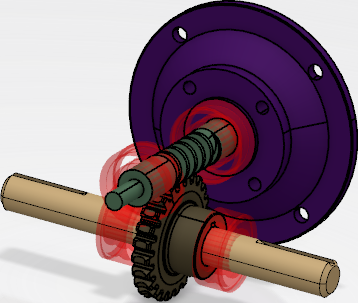
While defining or editing a filter you can choose the type of visualization you want in the 3D area. The Visualization Chooser is displayed at the upper right corner of the active tab and provides the preview options as depicted in the following table:
| Type of Visualization | Example | |
|---|---|---|
 Standard previsualization mode: Shows the content of the filter. |  | |
 Reversed previsualization mode: Shows all the elements that are not contained in the filter. |  | |
 Combined previsualization mode: Display filters: Shows all the elements that are not contained in the filter in standard visualization, and the elements that are contained in the filter in half transparent and in specific color as follows:
Unpickable elements cannot be selected. |  | |
 Combined previsualization mode: Mask filters: Shows all the elements that are not contained in the filter in standard visualization, and the elements that are contained in the filter in half transparent and in specific color as follows:
Unpickable elements cannot be selected. |  | |
The Visualization Chooser is not displayed:
- If the Edit Filter command is used after you closed the 3D area tab.
- If you close the 3D area tab during the command.
The Visualization Chooser is displayed in the current tab and it is moved, whenever you switch between the 2D and the 3D area tabs.
Immersive Dialog Box
The immersive dialog box appears when you define or edit a filter. It displays the name of the filter and allows you to change it if required. 
Click in the name box, enter the required filter name, and save filter modifications.

Edit Filter Dialog Box
The Edit Filter dialog box contains:
- The list of object filters: You can select one or several elements using the object filters.
You can reorder the list of object filters by dragging and dropping a row to the required position in the list. The visualization of the 2D and 3D area is based on the first object filter till the last one. Changing the order modifies the 2D and 3D area scenes.
The objects filters list is contains:
- Run filters
 : It appears when at least one object filter needs to be replayed or when you request to replay the object filter. It replays the queries defined by the object filters of the list which have not yet been executed. This enables retrieving the objects they defined and which are already saved.
 - Rows representing the object filters: Each row of the list is considered as a set of filtered objects and it contains the following columns:
- The icon representing the object filter
- The name of the object filter
- The number of elements contained in this object filter: (N/A) indicates that the filter is not related to the current product context.
- Update: Updates the filter. It is available when you explicitly request an update or when a filter is added and not executed.
- Visual properties: The same visual properties are available as that of the context toolbar, except the undefined state.
- Remove element: Removes the corresponding object filter from the list and all selected elements of the list. The visual filter is updated accordingly.
- Run filters
- Click here to retrieve filters related to your context: Retrieves the object filters related to the current product context. When clicked, it opens the Search - Filters related to XXX dialog box. You can select the filters from this dialog box which are then added to the object filters list.
- The list of filtered elements: It is composed of:
- A header line with various sorting options:
- Sort filtered elements by type of element
- Sort filtered elements by alphabetical order: Ascending (A to Z) and descending (Z to A).
- Sort filtered elements by visibility: Ascending (elements with the visual property activated first and the others) and descending (elements with the visual property deactivated, and the others)
- Sort filtered elements by color
- Sort unpickable and pickable filtered elements
- Sort uncut and cut filtered elements
- Rows representing filtered elements: Each row contains the following columns:
- The icon representing the type of element
- The name of the element
- Visual properties: The same visual properties are available as that of the context toolbar, except the undefined state.
- Remove element: Removes the corresponding element from the list and all selected elements of the list. The visual filter is updated accordingly.
- A header line with various sorting options:
- A label displaying the number of selected elements and the number of selected object filters. When no object filter and no element filtered are selected, it displays No element selected.
- A check box allowing tilling the 3D area and 2D tabs.
When this check box is selected:
- The 3D area and 2D tabs are tiled whenever you start defining or editing a filter.
- The 3D area is reframed on the geometry.
- After you complete editing or defining the filters, the 2D layout tab is restored according to the Tile section when activating Layout check box selected in section, under Layout Widget.
Using the Edit filter dialog box you can:
- Modify the visual properties of the selected elements in the same way as with the context toolbar.
- Remove the elements from the filter.
- Get a visual feedback: When you select a filtered element in the 3D area, the corresponding row in the filtered element list is highlighted (but not in the object filters list). Conversely, if you select a row in the filtered element list, the corresponding filtered element in the 3D area is highlighted. The entire scene appears in white half transparent, and the element appears highlighted in blue. Also, note that if you select a row in the object filters list, the elements returned by the object filter are highlighted. However, if that object filter is never run, then in that case, no element in the 3D area is highlighted.
Lists in the Edit Filter Dialog Box
You can select one or several rows in the lists by pressing Ctrl or Shift.
- When one or several elements or object filters are selected, the 3D area scene appears in white and half transparent. The selected elements are highlighted and can easily be seen in blue.
- When a visual property is modified on a selected element, the same value is applied to all the other selected elements of that list.
- When one or several elements are selected in a list, the context toolbar is hidden. In this case, you can perform the modifications of properties through the lists.
- You can reframe on an element of the filtered elements list by selecting the row, right-clicking it and selecting Reframe on selected elements.
The following operations are available in Undo/Redo:
- Modifying a visual property of one or several elements.
- Removing one or several rows from one of the two lists.
Restore Show State
The Restore Show State button appears during editing the filter if some elements which must be displayed by the visual filter are in no show mode. Click Restore Show State to permanently restore the show state of elements visualized through the visual filter.