About Cameras | |||||
|
| ||||
You can create a new camera, or you can create a camera pre-populated with settings from an existing camera. When you create a camera, you specify the projection type, position, and sight attributes.
The projection type can be either perspective or parallel. The perspective projection type corresponds to a standard conical camera with a nonzero focal length. In the 3D Viewer, lines in the camera line of view intersect at the same point. These cameras are close to human vision. The parallel projection type corresponds to a cylindrical camera. In the 3D Viewer, parallel lines in the camera line of view never intersect. These cameras define architectural viewpoints.
For the parallel projection type, you can modify the scale of the view by specifying a zoom value. For the perspective projection type, you can modify the view angle, which has the same effect as a zoom value.
Position attributes define the camera's position in space. You can specify the position by coordinates, nodes, or an axis system. For native simulations, you can also specify the camera position by selecting a vertex. In addition, you can add an offset value to the X-, Y-, or Z-axis.
After establishing the position, you can create a line of sight. The sight values direct the camera to follow an entity, such as a point, a node, a vertex, or an axis system. You can also specify the direction manually by entering X-, Y-, and Z-coordinates in relation to the camera position.
A preview window helps you visualize the modifications. 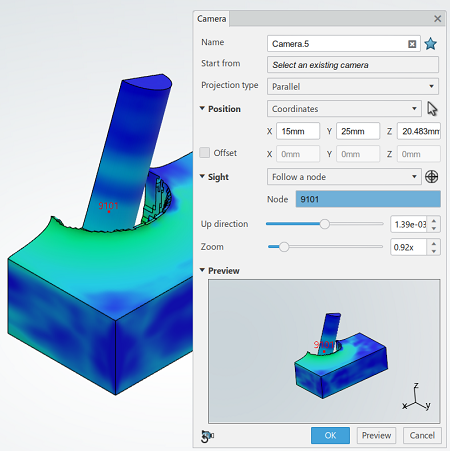
If you are satisfied with
the preview, you can apply the camera view to the model in the work area.
After creating a camera, you can activate it at any time from the action bar or from the tree. You can also apply a camera, edit a camera, or delete a camera from the Feature Manager.
You can also monitor several cameras at once or filter your view of cameras to a subset or a
single camera view.
You can also apply any camera view to the model in the work area.