Use Clash Detection
You can quickly compute impacts by detecting clashes between
visible components.
Notes:
- Assembly impacts cannot be created if linked to a representation that is not loaded in the
context:
- The line in Impact Result is disabled.
- A message is displayed.
- You can improve performances by deactivating Technological
Results, either from the
Preferences
or from the
context menu
of the
tree.
-
From the Mold Design section of the action bar, click Components
Impacts
 and
select the impacting products containing Assembly Features. and
select the impacting products containing Assembly Features.
- Structured components, non-Tooling components and non-Tooling Assembly Features are supported.
- Only impacted representations found under the UI Activated product
are taken into account.
- When required, select multiple occurrences of an impacting product
before starting Impacts.
-
Expand Options and select Preselect
shapes impacted by clash detection.
The number of impacting products and impact result are displayed.
The impacts are computed from the automatic detection of clashes between
visible elements.
Use Clash Detection with Additional Manual Edition
You can manually enhance the automatic clash detection described
above.
-
Start as described above.
-
Expand Impacting Products to access the table for
editing.
The table lists the Assembly Features, one per line.
- From left to right, each line is made of a check box, the name of
the impacting product, the PLM type of the product, the name of the
impacting element, and the type of impact.
- By default, all the check boxes are selected.
-
Select additional impacting products.
Select Impacting Products is selected by
default.
- They are added to the table, with their
Assembly Features.
- Their check boxes are selected.
- Corresponding Assembly Impacts are added to
Impact Result, with their check boxes
selected.
-
Place the pointer over the name of an impacting product.
The complete path is displayed.
-
Select
Select Impacted Representation check box and
select representations to add.
The
Impact Result table is updated.
-
Click the arrow in one column header to filter the impacting products
respectively by name, PLM type, impacting element or type. The header
expands.
-
Either select the check box corresponding to your choice.
-
Or enter a text (for example a prefix).
The filter applies to all lines, with a selected or cleared check box.
Only the result of the filtering is listed in Impacting
Products.
-
Expand Impact Result to access the table for
editing.
- This table lists possible Assembly Impacts, one per line.
- From left to right, each line is made of a check box, the name of
the impacted product, that of the impacted representation, the name
of the impacting product and that of the impacting element.
- Filtering, selection by check box or pointer works as described
above.
- Only Assembly Impacts with a selected check box are taken into
account when computing impacts.
Use Only Manual Selection
You can skip the automatic detection of clashes and add impacted
representations manually.
-
From the Mold Design section of the action bar, click Components
Impacts
 and
select the impacting products containing Assembly Features. and
select the impacting products containing Assembly Features.
-
Make sure that Preselect shapes impacted by clash
detection is cleared.
Only the impacting products are listed. The Impact
Result table is empty.
-
Add impacted representations as explained above.
You can select
- A 3D Shape Representation from the 3D area.
- A 3D Shape Representation, or a 3D Part, or a Product with one
single representation.
-
Filter, select by check box or pointer as explained above.
Define Clash Detection Options
You can control how the clash detection works.
-
Expand Options.
By default, Process also invisible
representations is cleared. Clashes are detected only
between visible elements.
-
Select Process also invisible representations to
extend the search for clashes to all hidden elements and the geometry of
impacting products and impacted representations.
This is useful for opening components with only Assembly Features definitions.
-
From the list, select an option to apply ordered rules.
- Skip Ordered Impact Rules
- Apply Ordered Impact Rules to All
- Apply Ordered Impact Rules for Fixing
Components.
-
Select the Create new Assemble at each computation
check box to override the Preferences option Optimize grouping of
Solid Impacts into Bodies.
- When selected, creates an Assemble of Solid Impatcs at each impacts
creation, independantly of the status of Optimize
grouping of Solid Impacts into Bodies.

- When cleared, takes the status of Optimize grouping of
Solid Impacts into Bodies.

Note:
The status of Create new Assemble at each
computation is saved
Assembly Impacts are created for all the selected check boxes of Impact
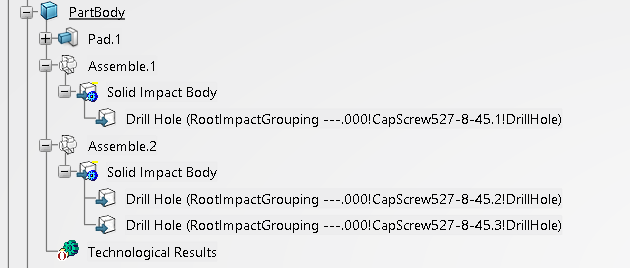
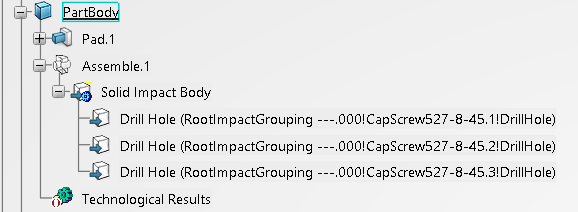
Result. Modified Impacted Representations are visible in the 3D area.
For Mold Tooling Design Only
You can activate and take advantage of the captured events (Only for components
with Assembly Features), and delete impacts of created products.
-
Select an option from the list.
- No automatic preselection
- Automatic preselection of created
Products
- Automatic preselection of created or moved
Products
- The status of this option is taken into account and remembered when
you exit Components Impacts by OK or
Cancel.
- Any event associated with the new instantiation or replacement (or
move) of an impacting Component is memorized during the current session, until it is used the
next time you start Components Impacts.
- The captured events feed the automatic preselection of impacting
components the next time you start Components
Impacts.
- The option you have selected from the list is taken into account,
provided you have not previously selected impacting components. Any
occurrence of a component instance of the list that belongs to the
UI active product structure is added to the selection of impacting
products. Their impacts are computed.
-
Proceed as explained above.
- When you exit with OK, all the component instances for which an
occurrence was taken into account are removed from the list, the
events are seen as consumed.
- When you exit with Cancel, the list of events is kept.
- If you had entered Components Impacts with a
manual preselection, the automatic selection occurs the next time
you enter Components Impacts. However, if an
occurrence of a component of the list is manually selected and its
impact computed, the corresponding component instance is removed
from the list and no longer proposed in the preselection.
Notes:
- When an automatic preselection is selected, the events are
captured and stored in a list.
- The events are removed from this list when their impact is computed
- Either by Components Impacts
- Or by the context Impact command
- Or by the placement of a component with impact (The
newly instantiated component is first added to the list,
and immediately removed when applying the impact).
- If a component was automatically preselected, but manually
removed from Impact Result, the impact is not computed, the
event is not consumed and is kept for a future use.
- The list is persistent only within the session (not stored in
the database). It is completely erased when you exit the
session, or when you select No automatic
preselection.
- The list is partially erased when you go from
Automatic preselection of created or moved
Products to Automatic preselection of
created Products.
- Undo/redo is not supported in the list.
- If an event was consumed by an impact that is undone,
the event is not restored. The component is not proposed
again for automatic preselection.
- If an event was captured for a move operation, which is
undone, the event remains in the list, the component can
be proposed again for automatic preselection.
-
If required, select Delete Impacts of selected
products.
Notes:
- Existing impacts are deleted and new impacts computed in the
current context of the design. This is not an update of the
existing impact in the context where it was computed. This may
lead to alteration of the design intent.
- If the product is not up-to-date, the deletion fails. Cancel
Components Impacts, update the
product, restart Components Impacts.
When a component with impacts is moved, several cases may occur
depending on the other components it encounters in the Product context after
the move:
- The same Parts in clash lead to the same impacts.
Update updates all the impacts to their
correct geometry.
- Some impacted parts are no longer in clash.
Update makes the previous impacts
ineffective but they remain in the model.
- Some new parts are now in clash. Update does
not add them.
- The application of the ordered impact rules may keep the same parts
in clash, but the condition changes and the type of impact needs to
be changed, for example, a Cap screw is now going through the plate
after a design change. Update only updates
the previous impact type.
- With the application of the ordered impact rules for Assembly
features of type Pad and Pocket, the order of the objects in clash
(following the Component axis) may change the object to be impacted
by the Assembly feature.
All these reasons require that the existing impacts are deleted
before a new computation.
For every selected component (no matter how it was selected),
existing impacts are deleted. New impacts are computed and displayed for
every selected component. If you exit with Cancel, the deleted impacts are
restored.
|

