Creating Auto Drafts for Casting | |||||
|
| ||||
-
From the Refine section of the action bar, click Auto Draft
 .
.
-
Select Add Material
 or
Remove Material
or
Remove Material
 .
.
- Add material: Adds the minimum amount of material to the 3D shape to perform the draft operation. This implies that the 3D shape will be enlarged on the parting element. The neutral faces are automatically computed in this case, detected among the body faces, on the side defined by the pulling direction.
- Remove material: Removes the minimum amount of material from the 3D shape to perform the draft operation. This implies that the 3D shape will be kept unchanged on the parting element. So the neutral elements contain the parting element.
Help images reflect the computation mode you select. For the purpose of our scenario, keep Add material.
-
In the Pulling direction box, specify the pulling
direction as Z Axis. The pulling direction defines the side of the parting
element you want to draft.
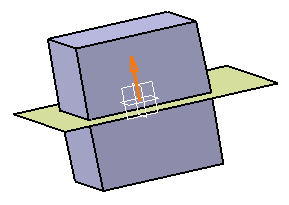
The Functional Faces box lists the manufactured faces that are not to be drafted. The selected faces turn purple, indicating that they will not be drafted.

-
Check
OK to confirm. A new dialog box appears,
indicating the operation progress. In case you want to interrupt the operation,
just click
Cancel.
The draft features are created and visible in the work area:
