Placing a Part or a Route on a Route

You can place a part or a route on a route. The route is considered as part if the instantiation rule value of its reference is Reuse Reference. After the placement, the route is split into two routes, and connections between the part and the routes are maintained.


Before you begin: Open a product containing the route on which you want to insert a part.
See Also
About Placing Parts
  1. From the Fluidic Design section of the action bar, click Place Part .
  2. In the context toolbar, click Piping > Placement methods > Place on segment .
  3. Click the route on which you want to insert the part.
    The last part selection option that has been used is activated to let you choose the part you want to insert.
  4. Select a part.
    For more information, see Selecting a Part.
    Notes:
    • The part can be selected before activating the Place on segment option.
    • The Table Browser may appear to let you choose a directional length. For more information, see Directional Point.

    The part is inserted on the route and new commands are displayed in the context toolbar to let you position the part.
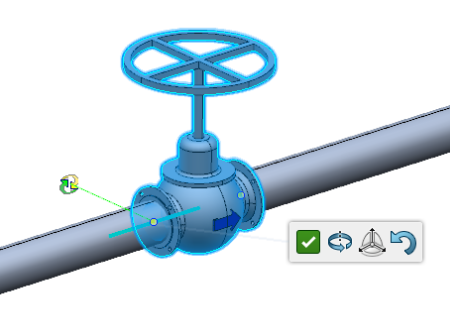
  5. Position your part using the different options available:
    • Orient : allows you to change the angle position of the part by manipulating the axis.
    • Move : allows you to move the part on the route.
    • Flip : allows you to change the direction of the part.
    • Select port for Context : allows you to align the port of the part to the port of your choice
    • Select Point or Line or Plane for Context : allows you to align the port of the part to:
      • a point: the selected point is projected on the center line of the route and the part is moved to this point
      • a line: the shortest distance is retrieved between the selected line and the center line of the route and the part is moved to the point on the route where the distance is the shortest to the selected line.
      • a plane: the intersection point between the selected plane and the center line of the route is retrieved and the part is moved to that intersection.

    For more information, see Positioning Parts.

    Notes:
    • Nominal size must be defined for route filtering.
    • If the option Perform compatibility checking is not selected then the application filters on the nominal size only. However, a part with any nominal size can be placed.
    • If the part is a reducer, the following options are available in the context toolbar:
      • No resize if you do not want to resize the network.
      • Only Pipe to propagate changes through the connected routes only.
      • Until Next Junction to propagate changes up to the next junction.
      • All Network to propagate the changes to the whole network.
  6. Click Commit to validate the position of the part.
    The route is cut into two segments and connections are created.
    Important: When you click Commit after selecting a part, the placement method and the segment location for placing a part, space for placed part is checked. If the placed part is overlapping with the existing node of the route or if it is impossible to create a directional point, select another location for the part placement.