Routing an Existing Pipe

You can route a pipe in diagram view from an existing reference in session or catalog.


Before you begin: Open an existing diagram view containing:
  • A logical reference under the Logical node
  • A pipe reference under the Logical node
  • Two components to be branched


See Also
Routing a Route with an Unconnected Extremity
  1. In the tree, right-click the logical reference and select Insert Existing Logical Component.
    The Select an existing logical component dialog box appears.
  2. Click From Session tab, and click Retrieve Loaded Data.
  3. Select the pipe reference in the list.

    Important: You can select a pipe reference from a catalog, or in session.

  4. Click OK to close the Select an existing Logical Component dialog box.
    The Create Pipe dialog box appears. The name of the pipe previously created appears in the Pipe Reference box.
  5. Select the Duplicate option to duplicate the selected reference.

    Note: You can select this option only if you have first saved your system.

  6. In the Piping Line ID area, select one of the following options:
    • Current line ID: the previous line ID is selected as the new one.
      Note: Click Filter to display the Select line ID panel and choose another line ID.
    • From selection: the line ID of the component connected to the first end of the pipe is selected.
    • New line ID: a new line ID is created.
      Note: For new line IDs, additional attributes can be defined by selecting Launch line ID properties after creation.
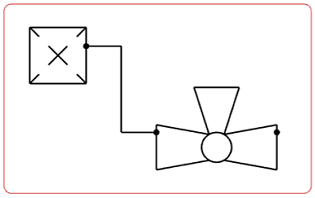
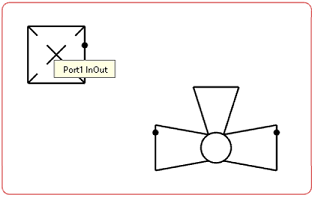
  7. Select the first component.

    A context toolbar appears, containing commands to create an elbow or a straight route.

    Your pointer turns to a hand when a port is selected:

    Important:
    • Ports on a component can have a visible representation or not.
    • If no existing port is selected, a new one is created.

  8. Select one of the three commands according to the type of route to be created:
    Type of RouteDescription
    Single-Step Line Route To create a route line without defining its path.
    Straight-Line Route To create a straight route line or a route line with intermediate points.
    Note: Routes are kept neither horizontal nor vertical.
    Angled Line Route To create a route line with a defined angle (90 or 45 degrees). The route ends with a horizontal or vertical segment.
    Notes:
    • To not end the route with a horizontal or vertical segment, press Ctrl before selecting the target component.
    • The angle remains the same even if the path of the route is modified afterward.

    Note: Intermediate points can be manipulated when routing with Angled Line Route and Straight-Line Route.

  9. Select the second component.

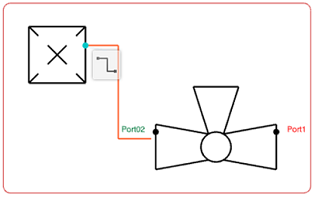
    The pipe route is created.