Default Item
The software automatically creates a default root item under the PPR Context when
you enter your app. This root item is usually a Manufacturing Assembly. However, you can also use other item types as a
root item.
It is possible to add other root items, using contextual commands under the PPR
Context.
At a lower level of the tree, it is possible to insert new and existing objects.
All created items have a type. This determines aspects of the item, such as what the
item does and the type of allowed parent.
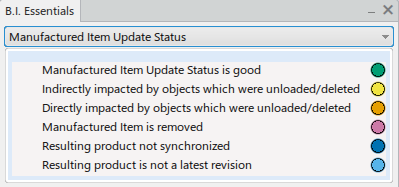
Manufactured Items and B.I. Essentials
Configuration Effectivity and B.I. Essentials
Manufacturing Assembly
The Manufacturing Assembly creates an assembly.
The Manufacturing Assembly allows creating a
manufacturing assembly structure. It is usually the owner of at least one Provided Part.
You can insert all item types as predecessor.
Provided Part
The Provided Part consumes products, and has an implement link to the
consumed product.
It is possible to create a Provided Part as a predecessor of a Manufacturing Assembly. In this case, the tree marks the Provided Part as the child.
It is also possible to create a Provided Part as a predecessor of a Transform or Remove
Material type step. However, in this case, the tree marks the Provided Part not as the child but instead as the sibling.
This item type cannot have a predecessor: no creation is possible from a Provided Part.
Transform Step
The Transform step transforms the state of the input without adding or removing
any parts. For example, cleaning or painting a part.
A Transform step does not implement anything.
You can insert all item types as predecessor.
In addition, when predecessors are continuous provides, you can define multiple continuous
provides as predecessors to single or multiple transforms.
Note:
You cannot insert a Transform step as a root under a PPR Context.
Fasten Step
The Fasten step consumes fasteners, and has an implement link to the consumed
fastener.
It is possible to create a Fasten step as a predecessor of a Manufacturing Assembly. In this case, the tree marks the Fasten step
as a child.
It is also possible to create a Fasten step as a predecessor of a Transform or a
Remove Material type step. However, in this case, the tree marks the Fasten step not
as a child but as a sibling.
This item type cannot have a predecessor: no creation is possible from a Fasten step.
Remove Material Type Steps
The Remove Material type steps transform the state of the input by removing part
of the product.
For example, such a step could involve drilling holes or machining a part.
Remove Material type steps are as follows:
- Pre Drill
- Drill
- No Drill
- Cut
- Grind
- Bevel
You can insert all these types as predecessor.
Manufactured Part
The Manufactured Part implements a design part and realizes a Manufactured Part. The Manufactured Part does not belong to the product structure.
For example, a Manufactured Part can produce a drilled part from a design part.
You can insert Provided Part, Transform, and Remove Material type steps as
predecessor.
Manufactured Part and B.I. Essentials
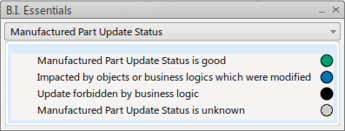
You can view the update status of a Manufactured Part with B.I. Essentials. B.I. Essentials computes the status of the selected Manufactured Part and its Resulting Product.
The Manufactured Part Update Status menu option in the B.I.
Essentials panel contains the following information only
about a Manufactured Part:

| Color |
Information |
 Green Green |
The Manufactured Part and its Resulting Product fit the specifications.
|
 Blue Blue |
The Manufactured Part or the Resulting Product do not fit the
specifications because of the modified objects or business
logics. |
 Black Black |
The business logic prevents the update of the selected Manufactured Part. |
 Gray Gray |
The Resulting Product of the selected Manufactured Part is not present, so B.I. Essentials cannot compute the status.
|
Note:
Update forbidden by business logic status is only
displayed by the B.I.
Essentials panel if you define the
DELMA_ElementaryEndItemValidation_ID open ID.
Manufactured Material
The Manufactured Material conceptualizes the creation of a product out of
nothing.
The Manufactured Material conceptualizes the item of
creating an all-new product from its children to give an output with the correct
semantic.
Compared to a Transform function, it has no input. Compared to a Manufacturing Assembly, it modifies its children to create its output.
You can insert all item types as predecessor.
Manufacturing Kit
The Manufacturing Kit provides a group of items. The resulting kit is not
an assembly because there is no physical link between its constituent elements: they are
independent from one another. However, a kit is required to execute the next assembly
stage properly.
The aim of the Manufacturing Kit is to deliver the group of items
together and unsorted.
You can insert the following item types as predecessor: Manufacturing Assembly, Provided Part, Manufactured Part, Manufactured Material, and Manufacturing Kit.
Installation
The Installation provides the capability to manage the
installation of components on a larger assembly.
A Manufacturing Installation usually has one input item
and one or more output items. It can also contain one or more items. It is usually
created between the input item and the output item and can also be created without
any input item.
For more information, see About Manufacturing Installations.
Continuous Items
Continuous Manufactured Material and Continuous Provided Material items have quantities such as length, mass, area,
and volume.
There are two families of continuous items:
- Continuous Manufactured Material with:
- Length magnitude: the created quantity measures as a length (m, mm,
inch, and so on)
- Mass magnitude: the created quantity measures as a mass (kg, pound,
and so on)
- Area magnitude: the created quantity measures as an area (m2, cm2,
and so on)
- Volume magnitude: the created quantity measures as a volume (m3, liter, and so on).
- Continuous Provided Material with:
- Length magnitude: the provided quantity measures as a length (m, mm,
inch, and so on)
- Mass magnitude: the provided quantity measures as a mass (kg,
pound, and so on)
- Area magnitude: the provided quantity measures as an area (m2, cm2,
and so on)
- Volume magnitude: the provided quantity measures as a volume (m3, liter, and so on).
You can insert all item types as predecessor for both Continuous Manufactured Material and Continuous Provided Material items.
For more information, see Creating Continuous Manufactured Items.
Creation of New Root Items
You can create root items under the PPR Context using the New
Content dialog box that appears when you select .
The Item section of the New Content dialog box
lists the available root item types.
If you right-click an item type, the Set attributes at creation command
enables you to specify an explicit or implicit creation mode for each item type.
User Preferences stores this information. Note:
The Administrator can define the explicit or implicit creation mode for each item type.
When the creation mode for the item type is explicit, an attributes dialog box
appears. You can define attributes for the item and configuration in the tabs of the
dialog box. For a Continuous Provided Material item, you can define the magnitude in a
dedicated tab.
When the creation mode for the item type is implicit, the attributes dialog box does
not appear and the creation mode creates the item directly.
Implicit creation of items occurs in the following cases:
- Enter Manufactured Item Definition with creation of a root item
- Create and update item structures
- Create and update Manufacturing Assembly structure
- Assign parts using the Assembly Assignment
Assistant, Drag and drop, Smart Zoom, or an assignment command.
For more information, see 3DEXPERIENCE Platform: Creating New
Content.
Items and Libraries
You can create and store items as well as access them
through libraries.
You can enrich a Manufacturing Assembly using a template, which you must make using a copy from a
library.
Create the template and store it in a library. Then, you must use the Copy from
Library command to enrich the service assembly with the content of
the template.
Template reuse cannot be done using the Insert
Existing item command. This is because the command requires that the service
item you plan to insert has a scope compatible with the scope of the service item
you plan to complete. This is to avoid violation of encapsulation rules.
This functionality exists for the insertion of a Manufacturing Assembly that possibly has links to implemented parts and a scope.
For more information, see the Design IP Classification User's Guide.
Hide/Show Behavior for Items
When the tree hides/shows an item, then the tree also hides/shows the
products implemented by the item.
If the tree hides/shows an item that has multiple child items, then the tree
hides/shows all the products implemented by the selected item and its children.
The possible Hide/Show statuses for item occurrences are:
- Shown: the tree node icon displays normally
- Partially Shown: the tree node icon is partially gray
- Not Shown: the tree node icon is fully gray.
When you hide an item using the
Hide contextual command:
- The tree hides the selected item
- The tree hides the children of the selected item
- The tree hides the products linked with the selected item
- The tree hides the products linked with the children (and their children).
When you show an item using the
Show contextual command:
- The tree shows the selected item
- The tree shows the children of the selected item
- The tree shows the products linked with the selected item
- The tree shows the products linked with the children (and their children)
- The tree shows the parents of the selected item with the tree node icon partially
grayed
- The tree shows the products linked with the direct parents.
Drills
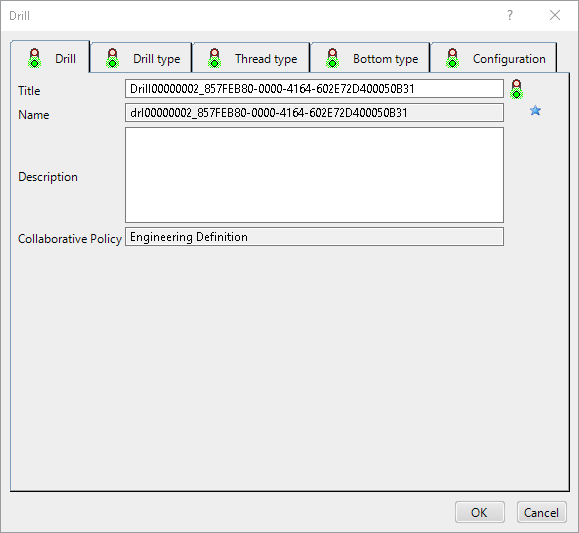
The Drill dialog box lets you define a drill's drill type,
thread type, bottom type, and parameters.

The following types' values and parameters are available:
| Type |
Values |
Parameters |
| Drill |
Drilling |
- Diameter of Feature
- Depth of Feature.
|
| Counterboring |
- Counterbored depth
- Counterbored diameter
- Anchor point.
|
| Countersinking |
- Countersunk depth
- Countersunk diameter
- Countersunk angle
- Countersunk mode.
|
| Counterdrilling |
- Counterdrilled depth
- Counterdrilled diameter
- Counterdrilled angle
- Sunk diameter
- Counterdrilled mode
- Anchor point.
|
| Tapered |
- Tapered angle
- Anchor point.
|
| Thread |
Threaded, Not threaded |
- Thread depth
- Thread diameter
- Thread pitch
- Thread mode.
|
| Bottom |
V-Bottom, Flat bottom |
Bottom angle. |
Notes:
- The default values are: Drilling for Drill type,
Not threaded for Thread type, and V-Bottom for
Bottom type.
- The types' values cannot be changed after the item reference is
created.
- The thread and bottom parameters are generic and available for all
drilling types.
|


