Create the First Loop
You must create a first loop to initialize the network of curves.
-
From the Wireframe section of the action bar,
click Digitization to Curve Network
 ,
and select a mesh. ,
and select a mesh.
-
Click
 Add Loop. Add Loop.
-
If required, adapt the view to your needs.
You need to pick points on the mesh. Those points are projected on the mesh to
create the edges of the loop. This projection is done along the view direction. You
can change this view direction according to your needs as you work.
- Pick a first point on the mesh.
- The Curve on Mesh context toolbar is displayed.
- The point you have picked is displayed as a dot.
- The red cross is the possible next pick, that follows the cursor, along with the constraint symbol.
-
Continue picking points on the mesh:
- Pick a second point at the next angle, without clicking OK in the Curve On Mesh context toolbar.
This point is an internal point of the curve on mesh. - Pick a point at the next angle, but this time, click OK in the Curve On Mesh context toolbar.
This creates a curve on mesh, that is, an edge of the curves network. - Pick a point at the next angle and validate it.
You can choose the required continuity for any point from the context toolbar. - Pick a point at the next angle without validating it.
- Pick a point at the next angle and validate it.
- Pick the first point again and click OK in the Curve On Mesh context toolbar.
It is highlighted as the closing point of the loop.
The Curve On Mesh context toolbar disappears and the loop is validated and displayed.
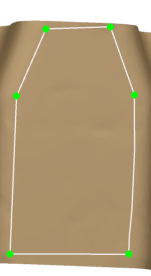
Note:
The points you have picked and validated are displayed as green dots. They are nodes of the curves network. The other points are not displayed. When you create a loop, create several chained curves on mesh (4 in our example) instead of a single one, resulting in the following advantages: - No need to split the edge again to create nodes.
- Better quality of the curves, with a better respect of the mesh.
For a better quality of the curves network, do not hesitate to add split points on the curves with Curve on Mesh.
A Digitization To Curve Network.x feature is created.
Manage Edges
You can edit, split, or remove an edge.
-
Drag the cursor over an edge.
-
Click Edit Edge
 . .
Note:
When the cursor is on a node, the dominant portion of an edge is displayed as a dotted line, the other portion as a solid line.
The Curve On Mesh dialog box
appears.
- As you drag the cursor along the edge, a dot follows the cursor. It represents the candidate node. Position it as required and click Split Edge
 . .A node is added to the edge, which is split in two. - Click Remove Edge
 . .The edge is deleted: - If the edge was common to two loops, the two loops are merged into one.
- If the edge belonged to one loop, the loop is deleted too.
Manage Nodes
You can edit or remove a node.
- Drag the cursor over a node.
-
Click Edit Node
 . .
- Drag the node to move it to the required position.
-
Click Remove Node
.
The node is removed.
Manage Loops
You can validate or cancel a loop, or add or remove loops, or split a loop, or display statistics.
Add Loops
You can enrich the network by adding loops, preferably outside existing loops.
- Create a first loop as explained in Creating a Curves Network from a Digitization.
- Add a second loop.
Remember to verify the view direction! Note:
When adding a loop, you can pick a node or an
edge as the start point. However you cannot pick another edge to close the loop. You
can pick only a node as closing point.
-
Repeat those steps as many times as required to create the network.
- Click Surfaces Network and create a surface with this network and the mesh as inputs.
Split Loops
You can enrich the network by splitting loops. This reverts to adding loops inside an existing one.
- Split a loop.
- Split edges to create two nodes.
- Right-click the loop and select Split Loop
 . . -
Click the first node you have created.
- Click the second node.
The initial loop is split in two. Note:
When splitting a loop, you can pick a node or an edge as the start point. However you cannot pick another edge to close the loop. You can pick only a node as closing point.
- Edit the edge you have created. Click OK in the Curve on Mesh dialog box when done.
You cannot move the last point. - Edit this node to move it to the required position.
-
Repeat as many times as required to complete the network.
- Create a surfaces network as explained above.
Include an Existing Curve in a Loop
You can add a loop on an existing curve.
- To include this curve into a loop:
-
Click
Add Loop .
- Pick a first point, then one extremity of the curve and validate this point in the Curve on Mesh dialog box.
- Pick a point (no need to pick the second extremity of the curve).
The curve is included in the loop. - Complete the loop.
Manage Continuity at Nodes
You can manage various continuities at nodes of chained curves.
The scenario below is an example. The context toolbar changes automatically according to the actual
continuities.
|
 to validate the loop.
 .
.  to display or hide information.