-
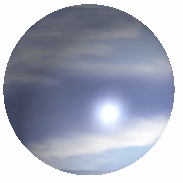
From the Rendering Scene Design section of the action bar,
click Create Sphere
Environment
 . .A sphere environment is displayed in the
3D area and in the action bar with a Top and Bottom wall. 
-
In the tree, right-click the environment and then select Properties.
The
Properties dialog box appears. - In the Dimensions tab, select 1 Face .
- Click OK.
The Top wall is extended to the whole sphere. The Bottom wall disappears from the tree.
- In the tree, right-click the Top wall and then select .
The Properties dialog box appears.
- To apply a texture to the top hemisphere, click
 in the Texture tab. in the Texture tab. - Search or import an image in the Texture Image Chooser.
- Click OK.
- To save your modifications, click OK.
The image is mapped continuously onto
the whole environment.
- To switch back to two faces, follow Step 2
and then select 2 Faces in the Dimensions tab.
The Bottom wall
appears in the tree. The image is only applied to the Top wall.

|