Customizing the Action Bar

You can customize the way the action bar is displayed.

Commands are organized into sections ordered from left to right by frequency of use or workflow. Sections can be made up of a primary area (always visible), and a secondary area (visible on demand) that contains actions intended to be used less frequently than those of the primary area.

This task shows you how to:


Before you begin:
  • Not all dashboard apps have action bars.
  • Depending on the app you are using, not all the capabilities detailed below are available.

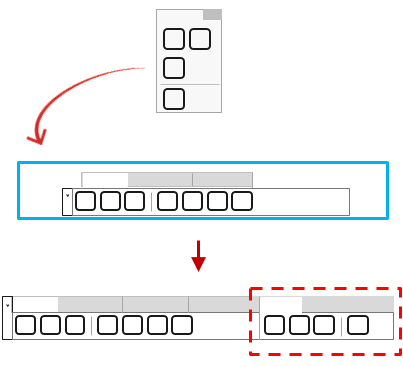
Collapse or Expand the Action Bar

You can minimize the action bar.

  1. Click on the left of the action bar.
    The action bar is minimized at the bottom of the app.
  2. To restore the action bar to its original state, move your mouse over at the bottom of the widget.

    Note: Click Pin to make the action bar always visible.

Scroll the Action Bar

When the number of action bar items reaches a certain threshold, you can use the action bar arrows to quickly switch between the available commands.

Do one of the following to scroll the action bar horizontally.
  • Use the scroll bar at the bottom of the action bar.
  • Press Shift + mouse wheel
The icons area is refreshed accordingly to display commands that were previously hidden.

Display Labels

Sections are only displayed with their associated label. You can also display labels for icons to identify commands. The state you define for labels is kept across apps and sessions.

  1. Right-click anywhere in the action bar, and then select Display Commands Name.
  2. To revert to the previous state, right-click anywhere in the action bar and then select Hide Commands Name.

Move Sections

You can change the position of sections in the action bar.

Click the section name, and then drag it to its new position.

Manage Favorite Sections

You can use the multiselection to see your favorite sections at a glance.

Before you begin: The standard area is defined as favorite by default. You cannot define it as nonfavorite.
  1. Move your mouse over the section name, and then hold Ctrl + click.
    • Section commands are added to the right of the already displayed commands. A separator is inserted between each section.
    • A visual feedback indicates which section you have defined as favorite.


  2. Repeat the previous step as many times as required.

    Tip: While holding Ctrl, click several sections to define them all as favorites in one go.

  3. To remove a section from the group of visible sections, move your mouse over the section name, press Ctrl + click.
  4. Click a section (whether favorite or not).
    The commands available in favorite sections are not visible anymore.
    Note: To make a section and the commands it contains always visible whatever the active section, you must pin it.

Pin or Unpin Sections

You can make one or many sections always visible by pinning them. By default, the standard area area is pinned.

  1. Double-click the label of the section you want to pin.
    A visual feedback indicates that the section is pinned.

  2. Repeat the previous step as many times as required to pin multiple sections.
    Important:
    • You can have pinned and favorite sections at the same time.
    • Pinned sections persist for each app across sessions.
  3. To unpin a section, double-click its label.

Flyout

You can use the flyout to run similar commands that are grouped together.

Click to expand the flyout, and then click the command you want to run.


(1) Flyout zone on nontouch devices

(2) Action zone where you can left-click to run the main command on nontouch devices

(3) Flyout zone on touch devices

Important: Two taps are required whatever the command you want to run (main or not). The first tap expands the flyout, and the second one lets you run the command.

When a command is active, it is displayed on a blue background.


If a command has been used, the collapsed flyout displays the most recently used command.

Extract Sections from the Action Bar

You can extract sections from the action bar. When extracted, the sections behave as immersive panels.

Before you begin: See Immersive Panels for more information about how to group or dock immersive panels.
  1. Drag the section from the action bar, then drop it anywhere in the work area.
    The section is now an immersive panel that you can move, resize, or dock to another immersive panel, or to a docking area.
  2. Repeat the previous step to extract other sections.
  3. To group an extracted section with another section, or with another app panel (if applicable), drag the section's title bar to the title bar of the section, or app panel.
    The Release to drop window content area is displayed.
  4. Drop the section onto this area.


  5. To insert a floating section in the action bar, drag the section, and then drop it onto the Release to drop window content area that is displayed in the action bar.
  6. To dock a floating section to the bottom docking area, drag the floating section, and then drop it onto the blue zone identifying the docking area.
    The section is in last position by default but you can move it to another position afterward.

    For example, you can group it to another section in the docking area, or dock it back to the action bar.

  7. Right-click anywhere in the action bar, or in any extracted section, and then select Reset Position.
    This restores all sections to their original position.

Responsive Display

When a widget’s width or height is below a specified threshold, the size of the elements contained in the action bar is lightened to leave more space to the 3D area.

Therefore, the look of the action bar differs depending on the device you are using:

  • Standard action bar when height > 280 pixels (S size) and width > 580 pixels (M size)
  • No action bar when height or width < 240 pixels.

Section names might also be truncated when the window size is too small.

  1. When section names are truncated, click List all items on the right of the action bar.
  2. From the sections list that is displayed, click a section name.
    The section is active and the command it contains are displayed in the action bar.