<DisplayName>
A name for this custom DRM system. This name will be selectable by end users from the Resource manager drop-down list (see DRM Custom UI Example).
<Description>
Tooltip text that will be displayed when the user moves the mouse cursor over this UI item.
<Attributes>
Use this special attribute to indicate which <Property> element refers to the number of cores requested for execution. In the example below, the <Value>-n</Value> element specifies the <Property id="2" name="-n" ...> element whose name attribute has the same value. See
DRM Custom UI Example.
<!-- Add optional attribute "cores" to specify which property refers to number of cores (or CPUs) -->
<!-- This property is handled specially in the UI -->
<Attributes>
   <Attribute name="cores">
      <Value>-n</Value>
   </Attribute>
</Attributes>
<Properties>
This element can contain any number of <Property> elements that describe the corresponding UI fields you want to present to users.
Each <Property> element can contain four child elements:
| Element |
Description |
| <DisplayName>
|
Text of the label that will be shown next to the field in the dialog box. If you do not include this tag with a value, the dialog box will fall back to using the value of the “name” attribute of this <Property> element. |
| <Value> |
Default value (string, integer, or real number) that will be prepopulated in this field in the dialog box. |
| <Description> |
Tooltip text that will be displayed when the user moves the mouse cursor over this option. |
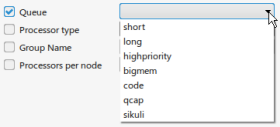
| <Limit> | Include this element with the type="choice" attribute to create a drop-down list of choices for the user. For example, the following XML generates the drop-down list shown below: <Property id="6" name="-q" required="false">
<DisplayName>Queue</DisplayName>
<Description>LSF queue</Description>
<Value></Value>
<Limit type="choice">
short
long
highpriority
bigmem
code
qcap
sikuli
</Limit>
</Property>

|
Each <Property> element can include several attributes:
| Attribute | Values Accepted | Required or Optional? | Description |
|---|
| name | String | Required | Command-line option to be passed to the wrapper script for the submit command or the Java DRM plug-in. For example, name="-n" for the number of processor cores in LSF. Be sure to include the dash "-" if it is required in your command-line syntax. |
| id | Integer | Required | Integer used by 3DOrchestrate to order the command-line options when formulating the submit command. The first <Property> element should have id="1" and should describe the first command-line option. Assign these numbers 1, 2, 3, etc. in your <Property> elements to tell 3DOrchestrate how to construct the command line. This ordering is unrelated to the order of UI options in the dialog box, which is determined by the position of the <Property> elements within the <Properties> block. |
| required | “true” or “false” | Optional | Indicates whether this option is required by your DRM system. All UI options have a selection check box in the dialog box, but the check box is grayed out and always selected if you set required="true"; the user cannot clear it. If you set required="false", the user can check or clear it. |
| type | "string" or "integer" or "real" or "boolean" | Optional | Indicates what type of value must be entered by the user in the UI. If set to "string", a type-in text box is shown in the dialog box. If set to "integer", a spin box containing integers is shown. If set to "real", a numeric field for entering a floating-point number is shown. If set to "boolean", a check box is shown. |
| ReadOnlyFlag | “true” or “false” | Optional | Set this attribute to "true" to display the option to users but not allow them to change the value. |
| VisibleFlag | “true” or “false” | Optional | Set this attribute to "false" to hide the field in the dialog box. |
Process workflow parameters such as ${JOBID} can be used in the custom DRM
system. For an overview of process key word parameters, see Automation Process
Composer: Expressions and Parameters.
Key word parameters used in the DRM UI will be evaluated and passed to the DRM submission script. Any parameter defined in the simulation process (workflow) can be passed to the submission script if it is entered by the user in the custom UI or if it is hardcoded as nonvisible input (VisibleFlag="false").
