Displaying Contact Points On Elements

You can display contact points on elements and modify their values.

These handles appear:

  • either by clicking the command in the App Options panel as illustrated in this task
  • or by selecting the option in Me > Preferences > App Preferences > 3D Modeling > Styling > FreeStyle Shape Design, General tab, Display section.
Once they appear, their behavior is identical regardless of the chosen interface style.


Before you begin: Open an existing 3D shape.
See Also
Displaying Continuities On Elements
Displaying Tensions On Elements
Displaying U and V Orders on Elements
  1. From the Creation section of the action bar, click Blend Surface .
  2. Select an edge on each surface.
    The blend surface is computed.


  3. In the App Options panel, click Contact Points .
    handles are displayed on the connection, allowing you to interactively define the blend limits by simply sliding them along the boundaries.
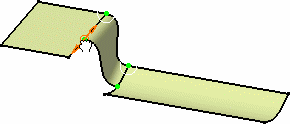


    You can edit the contact points by right-clicking them and selecting Edit. The Tuner dialog box opens to let you key in a new value, in percentage of the total boundary.