Retrieve Source Objects Using File Input
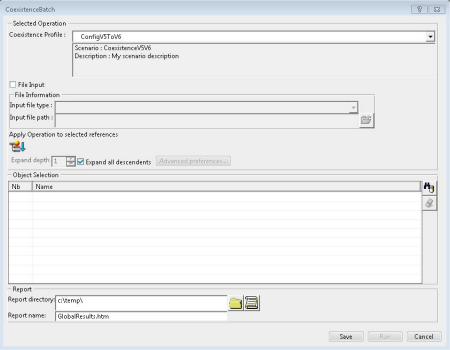
This task explains how to select a coexistence profile using the File Input option. This option builds a large scope of transferable data, accommodates the dynamic ENOVIAvpm configuration for the transfer of a resolved Product Structure and transfers data to 3DEXPERIENCE based on a choice of one of four file types.
-
Follow the procedure described in
Connecting to an ENOVIAvpm Data Source.
For a Publish/Subscribe file to be generated correctly, you must:
- use the Subscribe with action command in ENOVIAvpm.
- use, as an example, the script file named V6_coexistence.sh located in the ENOVIAvpm runtime view. This is important because the file contains the pubsub file format that must be kept as is. The script file can be modified to take account of the network configuration. A part of the script file must be configured in order to remotely launch the CATBatchStarter script if required.
- provide the file name in the Input file path field and make sure that the pubsub extension is specified because otherwise the batch interface will not recognize the file and will filter it out.
-
Click the
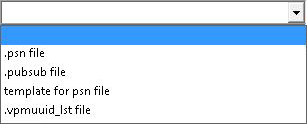
Input file type list and select one of the
following options:

- a psn file
for filtering purposes (for more information, see "Editing the Product Structure" and other appropriate sections in the ENOVIAvpm User Guide)
Note: The data will be transferred to 3DEXPERIENCE whether the psn file is stored in static or dynamic mode. - a
Publish/Subscribe-generated file
for event subscription purposes (for more information, see "Using Publish/Subscribe" in the ENOVIAvpm User Guide)
- a template for a psn
file
to be used for the MultiPDM CDM/VPM Plug-in (for more information, see "Transferring Data to 3DEXPERIENCE" in the MultiPDM CDM/VPM Plug-in User Guide)
- a vpmuuid_lst file
containing a list of VPM UUIDs, intended to avoid problems you may have with large structures (for more information, see Using .vpmuuid_lst Files with CoexistenceBatch).
Now that you have selected Input file type, the Input file path button is enabled.
- a psn file
-
In the
Input file path field, specify the location
of your input file using the push button on the right.
The Run button, in the bottom right-hand corner of the dialog box, is now enabled.
- If you are going to launch the batch immediately, provide the information regarding report generation in the Report directory and Report name fields.
-
You can now either:
- click
Run to launch the batch immediately
The input files are generated.
- or click
Save to
- schedule the launch (specifying time, day or frequency) or
- launch the batch remotely (from another machine, UNIX for example)
- click
Run to launch the batch immediately
