What You Should Know About Server Management
Before you begin:
- The server manager used is a Java servlet that can be integrated in a standard Apache TomEE application server. It can be addressed by the ENOVIAvpm connector using the standard http protocol. It starts and stops the connection to the ENOVIAvpm server on any remote machine required to access the ENOVIAvpm data.
- To be able to access ENOVIAvpm data, you must connect to an AIX or Windows machine hosting a SDAM (http dispatcher).
The SDAM daemon makes it possible for the clients to connect to a VPM machine and must therefore always be running.
- The server manager can be contacted by any ENOVIAvpm provider
using the same URL.
- No modification of any other software is
required to work with this version of the server manager, thus ensuring cross-compatibility of the server manager with any version
of the provider or ENOVIAvpm server.
- The ENOVIAvpm server authentication client with a local user i.e. a user
known only to the UNIX machine is not supported.
Install on Windows or Linux
Install and Deploy the WAR File in TomEE
This task shows you how to generate, from the 3DEXPERIENCE media ENOVIAAppSrvforENOVIAvpmandENOVIAVPMV5Connectors, a WAR file that you later deploy on the TomEE application server.
- Launch the installation of the product ENOVIAAppSrvforENOVIAvpmandENOVIAVPMV5Connectors from the 3DEXPERIENCE installation media. Click
Next >.
- Specify the target directory for installation. Click
Next >.
- Enter the name of the WAR file to be generated. The file name will be the root URI for web services, the default value is LPMServerMgt. Click
Next >.
- Select the option Generate war file only. Click
Next >.
- Enter either the 64-bit server JRE path or the 64-bit JDK path. Click
Next >.
Note:
The Java path is detected automatically if the required level is installed.
- Select ENOVIAvpm as the target server. Click
Next >.
- Provide the following information required for V4 installation purposes:
- the ENOVIAvpm remote server host name
- the ENOVIAvpm remote server port (the value must be between 1024 and 65535)
- the ENOVIAvpm remote server time-out value in milliseconds (default: 1h).
- In the dialog box that now appears, check to make sure that the displayed information matches the selections you have just made.
- To correct any of the information, click Back >.
- If the displayed information is correct, click Install >.
- Close the window when the installation is completed.
- Check to make sure that the file has been generated at:
<install_path>\<WAR name>\distrib\then, on any computer on the same network as your LPM server, enter the following url: http://tomEEServer:Port/<WAR name>/config and check the installation directory, the vault file directory and also the server name and port.
Download TomEE
This section tells you how to download TomEE from the Internet.
- Browse
http://tomee.apache.org. - Click Downloads and download the appropriate version of TomEE.
- Install TomEE following the recommendations.
Deploy the WAR File in TomEE
This section tells you how to deploy in TomEE the WAR file you have already generated.
- Start the TomEE server.
- In a web browser, connect to the application management page of the TomEE server, for example
http://localhost:8080/manager/html. - In the War File to Deploy section, browse to the WAR file created in step 3 above, $installpath/$WarName/distrib.
- Click Deploy.
Install the Embedded TomEE
This section tells you how to install the TomEE from the 3DEXPERIENCE media ENOVIAAppSrvforENOVIAvpmandENOVIAVPMV5Connectors.
You can install the TomEE:
Install the TomEE Embedded in the 3DEXPERIENCE Media with an Embedded JRE
- Launch the installation of the product
ENOVIAAppSrvforENOVIAvpmandENOVIAVPMV5Connectors from the 3DEXPERIENCE installation media. Click
Next >. - Specify the target directory for installation. Click
Next >.
- Enter the name of the generated WAR file. Click
Next >.
- Select the option Installation with TomEE. Click
Next >.
- Check the box Install the embedded server JRE. Click
Next >.
- In the next dialog box, you can, if you wish, change the TomEE port connection number. Click
Next >.
- A window now appears showing the Apache JServ Protocol (AJP) port and shutdown port numbers. Click
OK.
- Choose to start the TomEE at the end of the installation or not. Click
Next >.
- Select
ENOVIAvpm. Click
Next >.
- Provide the following information required for V5 installation purposes:
- the ENOVIAvpm remote server host name
- the ENOVIAvpm remote server port (the value must be between 1024 and 65535)
- the ENOVIAvpm remote server time-out value in milliseconds (default: 1h).
Click Next >. - In the dialog box that now appears, check to make sure that the displayed information matches the selections you have just made. Click
Next >.
- To correct any of the information, click Back >.
- If the displayed information is correct, click Install >.
- Close the window when the installation is completed.
- Check to make sure that:
- the WAR file has been generated at:
<install_path>\<WAR name>\distrib\
- the TomEE is installed with the relevant files at:
<install_path>\<WAR name>\<OS>\code\tomee
- a folder with the WAR name is present at:
<install_path>\<WAR name>\<OS>\code\tomee\webapps
- the TomEE server is running then, on any computer on the same network as your LPM server, enter the following url:
http://tomEEServer:Port/<WAR name>/config and check the installation directory, the vault file directory and also the server name and port.
Install the TomEE Embedded in the 3DEXPERIENCE Media with an External JRE
- Launch the installation of the product
ENOVIAAppSrvforENOVIAvpmandENOVIAVPMV5Connectors from the 3DEXPERIENCE installation media. Click
Next >. - Specify the target directory for installation. Click
Next >.
- Enter the name of the generated WAR file. Click
Next >.
- Select the option Installation with TomEE. Click
Next >.
- Uncheck the box Install the embedded server JRE. Click
Next >.
- Provide a valid Java path. Click
Next >.
Note:
The Java path is detected automatically if the required level is installed.
- Check the box Install the embedded Apache TomEE +.. Click
Next >.
- In the next dialog box, you can, if you wish, change the TomEE port connection number. Click
Next >.
- A window now appears showing the Apache JServ Protocol (AJP) port and shutdown port numbers. Click
OK.
- Choose to start the TomEE at the end of the installation or not. Click
Next >.
- Click
ENOVIAvpm. Click
Next >.
- Provide the following information required for V4 installation purposes:
- the ENOVIAvpm remote server host name
- the ENOVIAvpm remote server port (the value must be between 1024 and 65535)
- the ENOVIAvpm remote server time-out value in milliseconds (default: 1h).
Click Next >. - In the dialog box that now appears, check to make sure that the displayed information matches the selections you have just made. Click
Next >.
- To correct any of the information, click Back >.
- If the displayed information is correct, click Install >.
- Close the window when the installation is completed.
- Check to make sure that:
- the WAR file has been generated at:
<install_path>\<WAR name>\distrib\
- the TomEE is installed with the relevant files at:
<install_path>\<WAR name>\<OS>\code\tomee
- a folder with the WAR name is present at:
<install_path>\<WAR name>\<OS>\code\tomee\webapps
- the TomEE server is running then, on any computer on the same network as your LPM server, enter the following url:
http://tomEEServer:Port/<WAR name>/config and check the installation directory, the vault file directory and also the server name and port.
Install an External TomEE
This section tells you how to install the TomEE located in the 3DEXPERIENCE media.
- Launch the installation of the product
ENOVIAAppSrvforENOVIAvpmandENOVIAVPMV5Connectors from the 3DEXPERIENCE installation media. Click
Next >. - Specify the target directory for installation. Click
Next >.
- Enter the name of the generated WAR file. Click
Next >.
- Select the option Installation with TomEE. Click
Next >.
- Uncheck the box Install the embedded server JRE. Click
Next >.
- Provide a valid Java path. Click
Next >.
Note:
The Java path is detected automatically if the required level is installed.
- Uncheck the box Install the embedded Apache TomEE +.. Click
Next >.
- Provide a valid TomEE path. Click
Next >.
- Click
ENOVIAvpm. Click
Next >.
- Provide the following information required for V4 installation purposes:
- the ENOVIAvpm remote server host name
- the ENOVIAvpm remote server port (the value must be between 1024 and 65535)
- the ENOVIAvpm remote server time-out value in milliseconds (default: 1h).
Click Next >. - In the dialog box that now appears, check to make sure that the displayed information matches the selections you have just made. Click
Next >.
- To correct any of the information, click Back >.
- If the displayed information is correct, click Install >.
- Close the window when the installation is completed.
- Check to make sure that:
- the WAR file has been generated at:
<install_path>\<WAR name>\distrib\
- a folder with the WAR name is present at:
<install_path>\<WAR name>\<OS>\code\tomee\webapps
- the TomEE server is running then, on any computer on the same network as your LPM server, enter the following url:
http://tomEEServer:Port/<WAR name>/config and check the installation directory, the vault file directory and also the server name and port.
Edit Installation Parameters
This task shows you how to edit the installation parameters you set when first implementing the server manager.
- It is possible for an administrator to edit
the configuration file VPMV4ServerManager.properties, located amongst the generated WAR
or EAR files. To do this, type the following URL
in any web browser:
http://<esm_host>:<esm_port>/<WAR name>/config
The following web page is displayed: 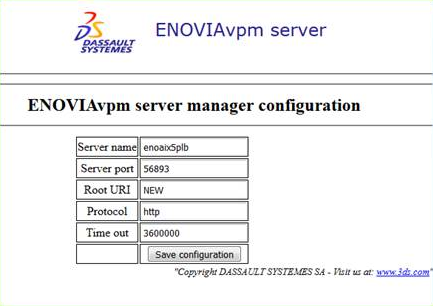 - Modify the parameters then click the Save configuration button.
Deploy Manually on AIX
This section tells you how to manually deploy the WAR file generated on Windows or Linux then transfer it to an AIX computer. No other method is possible using AIX.
- On an intermediate Windows computer, Install and Deploy the WAR File in TomEE.
- Transfer the WAR file from the Windows computer to the target AIX computer using the binary mode (and not the ASCII one).
- Complete the manual deployment i.e. Download TomEE from the Internet yourself then Deploy the WAR File in TomEE.
- Make sure the
TomEE server is running, then, on any computer on the same network as your LPM server, enter the following url:
http://<AIX computer:port>/<WAR
name>/config
. - In the Installation Directory and Vault File Directory fields, replace the dummy paths you entered earlier with the correct UNIX ones.
Monitor the Server Manager

This
task shows you how to obtain information regarding the status of the ENOVIAvpm server
manager and the processes launched on the ENOVIAvpm server.
- Using any web browser, enter the following url:
http://<esm_host>:<esm_port>/<WAR name>/vpm/Status
The server manager requests status information from the SDAM daemon. The SDAM daemon runs a monitoring script (getSDAMChildStatus.sh) stored at a predefined location to collect the information on the SDAM processes. The server manager then adds its own information to the script output before returning it all to the user. In this way, information from both the SDAM daemon and the server manager is combined resulting in a report containing the following information:
-
from the SDAM daemon:
- the memory size and processor usage of the SDAM daemon process
- the number of SDAMChild processes launched on the machine
- the number of SDAMChild processes currently active on the machine
- the memory size and
processor usage of each SDAMChild process (default categories of getSDAMChildStatus.sh).
-
from the ENOVIAvpm server manager:
- the version and install parameters of the server manager
- the number of requests received by the server manager along with the bytes sent and received.
Notes:
- You can modify the monitoring script getSDAMChildStatus.sh so as to receive the type of information you choose. However, the output must comply with the delivered xsd file.
- While the SDAM daemon is waiting for the output of the script, it cannot service any incoming request. The script must therefore avoid performing time-consuming operations.
- You can now analyze the results of your request
which might look something like this: <ESMStatus time="2018-02-01T14:45:34">
<ENOVIAServerManager build="B214D09" bytesReceived="198K" bytesSent="144K"
requests="14" uptime="0 03:25:22" version"V6R2018x" />
<SDAMDaemon childRunning="3" childStarted="10" cpu="00:00:00" mem="12000K"
uptime="2 22:44:18">
<SDAMChild cpu="00:00" mem="1552K"/>
<SDAMChild cpu="00:00" mem="1528K"/>
<SDAMChild cpu="00:10" mem="1696K"/>
<USERDATA>...</USERDATA>
</SDAMDaemon>>
</ESMStatus>Note:
This report is an xml file that you can format using an xsl style sheet.
Meaning of the tags and attributes in the report
Output will be empty if no current SDAM child is running.
The
default monitoring script is delivered in: <InstallPath>/samples/code/bin/getSDAMChildStatus.sh
Example of output: <SDAMChild cpu="00:00" mem="1552K"/>
<SDAMChild cpu="00:00" mem="1528K"/>
<SDAMChild cpu="00:10" mem="1696K"/>
- You can reset the counters of the ENOVIA Server Manager using the argument reset=true. For example:
http:// <esm_host>:<esm_port>/<WAR name>/vpm/Status?reset=true The output returned looks like this: <ESMStatus reset="true" />
|

