Using a Zoning Filter | |||||
|
| ||||
- To open your product including several elements (spheres for example) almost positioned at the same place, click Search > My Content.
- Explore the product you have found. It opens in the Navigation experience tab, in ENOVIA Product Finder.
-
Click the Compass and click Product Performance Assessment.
Product Performance Assessment displays in the dashboard.
-
From the Data Authoring section of the action bar, click Weight and Balance
 .
.
- Optional: To predefine a zoning filter, do the following:
- Click User Preferences
 to display the Selection mode tab.
 - Select a zoning type: Classic, Cubic, Spherical or Space.
Once a zoning label is selected, it becomes blue. Close User Preferences and your selection is kept. You can choose a Selection mode at any time, even before clicking Weight and Balance . Preferences are persistent when the app is closed.
 - Click User Preferences
- Select the root product in the 3D area.
- To activate a filter selection, click Filters
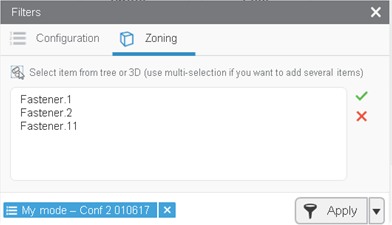
 . The Filters dialog box is displayed at the bottom of the Weight and Balance web page.
In the Configuration tab, there is the list of the applied configurations. When a configuration filter has already been chosen, the button reflects the information:
 .
. - To filter several elements by zone, select the Zoning tab. Four buttons corresponding to the four zoning types are available:
- Classic for a basic selection mode
- Cubic for selection with a cubic shape
- Spheric for a selection with a spherical shape. With the spherical mode, you select everything belonging to the sphere. The sphere will be surrounded by a cube, and this cube will intersect the parts.
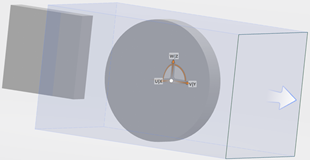
- Space for a volume selection. You can select a predefined space as a volume selection. If the 3D predefined space has an irregular shape, the space is approximated by its surrounded cube. For example, in a ship structure, select a deck. The bounding box of the deck will be taken into account as the volume to filter. Note: When you explore a space, add a space root under the Navigation Experience node at the root level and create space cells under the space root, the Space zoning button is not available.
- For example, to select a portion of the product by using a box trap, click Cubic and drag the mouse to draw a box in the work area.
This is the same command as selecting several parts by clicking them in the 3D area or in the tree. If the selected space does not contain the selected initial geometry, a warning is displayed within the Weight and Balance window.
A bounding outline appears as you drag. All the elements inside the box are selected. - Drag the bounding outline until the objects you want to select are completely inside it.
If some objects are not inside the bounding outline, they are not selected.
- Release the mouse. The objects are highlighted to indicate that they have been selected and their names are added in the filter list.

Notes:- You can validate your selection by clicking
 . In the Zoning tab, a message
informs you that a zoning filter is already set and a blue
label indicates the zoning type, for example cubic, with
 to delete it.
 - To remove an element from the list, select it and click
 . To delete the filter, click
Clear. The four zoning buttons are
greyed out until you clear the filter because you can apply
only one zoning filter. If you want to select another zoning
filter, click Clear before.
- You can validate your selection by clicking
- Click Apply. The web page displays the consolidated KPIs that take the zoning filter into account. Only the weight KPI is available for volume filtering.
- To create another zoning filter, click Clear as a zoning filter is already set and select another zoning trap, for example Cubic.
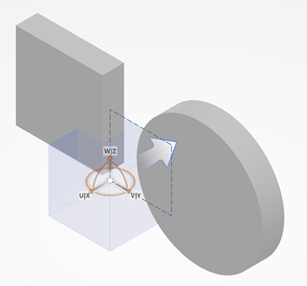
- Click the 3D area to create a zoning cube on the geometry.

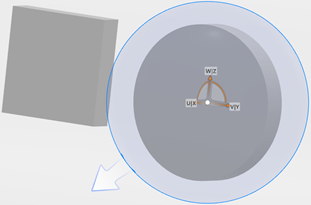
With the spherical mode, select geometry in the 3D area to create the sphere.
- Adjust the position of the box with your cursor.
The trap is displayed in the xyz plane.
With the spherical mode, adjust its radium to bring it to the desired dimensions. You obtain:

- To modify the size of the trap, drag the arrows that appear on the edges of the box.

When you stop editing the box, the information about the zoning position and volume appears in the Filters window. The name of the cubic selection is displayed at the bottom of the dialog box.
With the space mode, the list is also updated in the Filters dialog box with the name of the space allocation.
To withdraw this selection, click
 next to the filter type.
 - To apply all the declared filters, click Apply.
The dashboard computation runs and the number of applied filters is updated (3 instead of 1) if necessary. The web page displays the consolidated KPIs for the selected elements.
The list of elements under the selection are given to Semantic Graph Index to consolidate all of them, and present them in the web part of the Business Value Assessment command.
Warning: The Snapshot command  is disabled when a zoning filter has been defined.
 - To compare the weight of a structure having a filtered volume with the weight of another structure without filter, select these two items. Note: You can compare the same element filtered in different manners. For example, you can compare the weight of two decks of the same ship. For more information, see Compare two Items .