Item & Resource Panel | ||
| ||
When activating views, you can see the panel; otherwise, it hides automatically.
You can show the panel by right-clicking in the work area and
selecting , View Authoring Options then clicking Show Item and Resource Panel
![]() . Selecting Hide Item
and Resource Panel
. Selecting Hide Item
and Resource Panel
![]() hides the panel.
hides the panel.
![]() Show Preferences - Alters the preferences.
Show Preferences - Alters the preferences.
Name Display Options - for the object;
- Show Reference Name - Shows the reference name.
- Show Instance Name - Shows the instance name.
- Show Display Name - Shows the display name.
Selection Options - for the object;
- Center List on 3D Selection - Selecting this, you can then select the work area, and optionally recenter the Mfg Item & Resource. This also saves in your preferences.
- Cross Highlight with Dressup - Selecting this, you are able to
optionally cross-highlight between Mfg Items / Resources and their associated
dressup.
If selecting a dressup in the work area or in the Dressup panel, then
- All pointed Mfg Items / Resources prehighlight in the work areaNote: The Mfg Items / Resources is not in the CSO.

- The pointed Mfg Item / Resources prehighlights in the Item &
Resource panel.

If selecting a Mfg Item / Resource in the work area or in the Item & Resource panel, then the associated Dressup (pointing to it) prehighlights in the Dressup panel
 Note: There is no prehighlight of the dressup in the work area because the dressup does not have native highlight capabilities.
 - All pointed Mfg Items / Resources prehighlight in the work area
Select:
 Select/Deselect All - to select or cancel the selection all items
on the list.
 Invert Selection - to invert all selections that are visible in the
panel. This only affects those objects, which list in the panel. So if any objects filter
out using the Buildup Category filter or the
Name filter, then the selection inversion does not apply to these
objects.
 Sort by role - to
sort by role.
 Sort by Mfg Item Name - to sort alphabetically by the Mfg Items
name.
Sort by Mfg Item Name - to sort alphabetically by the Mfg Items
name.- Typing an Item name, Exhaust, in the list, filter by clicking
Use Filter
 and you can also search for list items.
The list contains:
- An icon on the left showing whether the object is an item or resource.
- The object name
- An icon on the right representing the role the object displays for the selected operation. By default, the list is sorted by role.
The roles and their associated icons are:
- Item implemented by the operation:

- Item implemented by operations occurring in parallel:

- Item implemented by operations that have occurred before. There are two types:
- Items of operations under the same item-system scope as the current operation:

- Items of operations under a different item-system scope from the current operation:

- Items of operations under the same item-system scope as the current operation:
- Resources implementing the newly selected operation
 .
. - Items that appear in the context of the operation, but you do not use in the operation
 .
. - Activating the views, Sub-Component-Mfg-Items (SCMIs)
 appear
and list in the panel. Capabilities like filtering are also applicable to SCMIs. They
might not list immediately after the parent item in the panel.
appear
and list in the panel. Capabilities like filtering are also applicable to SCMIs. They
might not list immediately after the parent item in the panel.- On mousing over the icon, a tooltip displays indicating the parent of the SCMI.
- Following snapshot shows behavior with Resource-Sub-Component.
If you have Defined
Resource Sub Components, you see this ![]() next to
the name to indicate they are Sub Components. On mouse over the icon, a tooltip displays
indicating the parent of the Sub Component.
next to
the name to indicate they are Sub Components. On mouse over the icon, a tooltip displays
indicating the parent of the Sub Component.
When you select an item in the work area it cross-highlights in blue in the list.
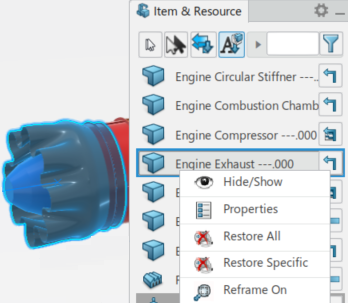
If you right-click an item in the list, you can choose among the following options:
- Hide / Show
- This changes the visibility of the object in the work area. Objects that are hidden in the work area are highlighted in gray on the panel.
- Properties
- This opens the standard Properties panel.
- Restore All
- This restores any position or visibility changes you make. These include:
- Color
- Transparency or Clarity
- Line Type
- Line Thickness
- Visibility (Hide/Show)
- Position changes effected with the Robot.
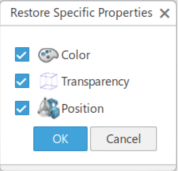
- Restore Specific
- This restores any specific changes you made. The properties that can be individually
(changed and) restored are:
- Color
- Visibility
- Transparency
- Position
Note: The following overloaded properties in the Restore functionality do not consider:- FTA Visibility (of Mfg Item).
- Posture (of Manikin Resource).

Similar to the current behavior, update a View (or create a new View) for the changes to be applied to that View.
Modifications are then persisted to the database when saving the session.
- Reframe On
- Centers a resource in the work area.
