Using Define Resource Sub Component | ||
| ||
Click Play to watch the video:
-
Click Define Resource Sub Component
 from the Instruction Authoring
action bar.
from the Instruction Authoring
action bar.
The command is always enabled:
- Whether there are Views or not
- Whether the existing Views (if any) are activated or not
The starts a panel listing all the Primary and Secondary Resources linked Header Operation. That can be located (as a direct or indirect father) from select the Operations Filmstrip. The subtree of the Resources displays along with check boxes next to each child. The check boxes allow you to specify if the child is to be used as a subcomponent in View authoring.
Note: On Usage:The Sub Component command is dependent on the display of the capable resources as buildup in the Work Instructions App.
- The Product Buildup Options must have select for Show All Resources or Show Assigned Resources
- An Active Operation must be active in the film strip to display the buildup calculation.
-
From the Specification
Tree (F3), select the Root System.
The Define Resource Sub Components panel appears to show the assigned Primary and Second Capable Resources with their subtrees.
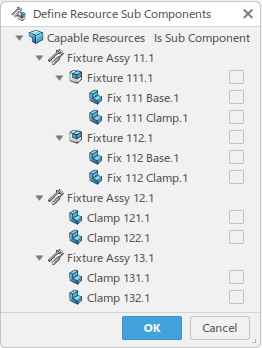
Primary and Secondary Capable Resources are linked to the Header Operation. The check boxes are displayed against each child of the linked Resource to indicate the current status. Checked = Child is a Sub Component and can be used for View Authoring.
-
Click OK to accept the changes.
The panel closed and the visualization is refreshed.
Views do not exist on the active (selected) Operation OR if Views exist but are not active. Then you do not see any noticeable difference in the 3D other than a temporary busy cursor.
If Views exist and are activated, then the Views are deactivated and reactivated to reflect the new (refreshed) visualization. The Mfg Item & Resource panel also refreshes to list the new sub components that are now available for manipulation (position and, or graphic property changes). In this particular example, the panel lists
- Fixture Assy 11.1
- Fix 111.1 Base
- Fix 112.1
- Fixture Assy 12.1
- Fixture Assy 13.1
Note: The Resources in the panel are not sorted in any particular order if the Sort by Role mode is active.
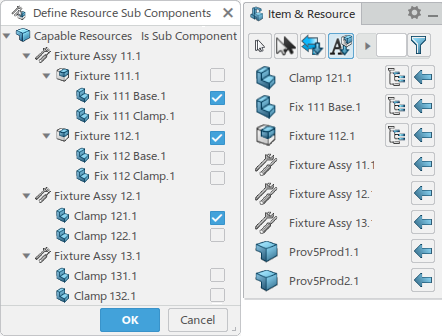
This indicates that the listed elements are Sub Components. On mouse over the icon, a tooltip
displays indicating the parent of the Sub Component.
indicates that the listed elements are Sub Components. On mouse over the icon, a tooltip
displays indicating the parent of the Sub Component. Check for Authored View Content before Sub Component removal.
Cancel the selection in the panel and select OK. A verification is made on all Views authored for the active Operation and all of its children Operations.If any View contains a position and, or graphic properties Overload or Marker pointing to the object being cleared, then a warning message displays. Choose to continue or rollback the change.
Check for Valid Geometry
This ensures that all Resources, either Capable or Sub Components, have geometry to display. This disables a check box if your selection of that box could result in a resource not having a leaf (either itself or a child). This is to provide geometry to display in the 3D. If Clamp 132.1 is already declared as a Sub Component under Fixture Assy 13.1, then you cannot select Clamp 131.1 as a Sub Component. Similarly, if Fixture 112.1 is already declared as a Sub Component under Fixture Assy 11.1, then you cannot also select Fixture 111.1 as a Sub Component.