Creating a Label

You can create labels on objects. The information and the properties of a label drives by the business logic.


Before you begin: Activate a View.
See Also
About Label Graphic Properties Modification
Graphic Properties Panel
  1. Click Label from the Instruction Authoring action bar.
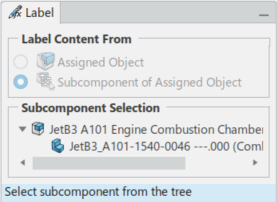
    The Label dialog box appears.

    Select either:

    • Assignment Object - Selects the Assigned Object in the View.
    • Subcomponent of Assigned Object - Selecting this expands the Subcomponent Selection section showing the objects to select.

    This improves usability by helping you to identify the items in the 3DViewer by highlighting the part on which you intend to create a dressup. That way you do not create dressup, which are pointing to the wrong object, or an empty space.


  2. Select the Object.


    The Label appears.

    Note: The object and the label highlight by the end of the command.
  3. Right-click and select Update in View.2


    The image updates with the label.