Strategy Parameters | ||
| ||
![]()
Strategy Parameters
- Tool Axis
-
The Tool Axis command in the Turning Operations dialog box is represented by an arrow when creating a part operation.

- Max Depth of Cut
- Specifies the maximum distance between passes.
- Min Depth of Cut
- Specifies the minimum distance between passes.
- Recessing Strategy
- Specifies recessing strategy as:
- One Way
- Zig Zag
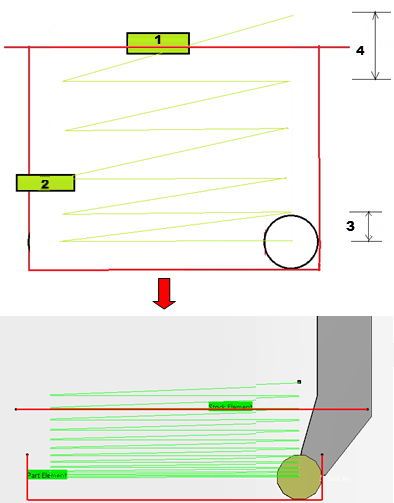
A Mill turn operation which allows machining a Recess in a One Way or Zig Zag Tool motion. This is basically suitable for machining hard materials using round ceramic inserts, thereby minimizing wear and cutting stress. Here you have the flexibility to define Minimum depth of a cut. This results in a behavior where machining is progressive with passes of different thickness varying between Maximum depth of cut and Minimum depth of cut.
Following is the progressive Machining behavior by defining Maximum depth of cut and Minimum depth of cut:
- One way Recessing strategy:

1: rough stock Element 2: Part Element 3: Minimum depth of cut 4: Maximum depth of cut
- Zig zag Recessing Strategy:

1: rough stock Element 2: Part Element 3: Minimum depth of cut 4: Maximum depth of cut
- Orientation
- Specifies the orientation.
You can specify:
The selected orientation defines the type of geometric relimitation to be done between the rough stock and part geometry in order to determine the area to machine. The following
- Machining Direction
- Specifies the machining direction.
You can specify:
- To Head rough stock or From Head rough stock for Internal and External orientation.
- To Spindle or From Spindle for Frontal orientation
- Right of Groove or Left of Groove for Other orientation.
When a part profile has multiple recesses (that is, a non-convex profile along the cutting direction), only the first recess along the specified direction is machined.
- Part Contouring
- Select this check box to specify part contouring, if contouring is
required.
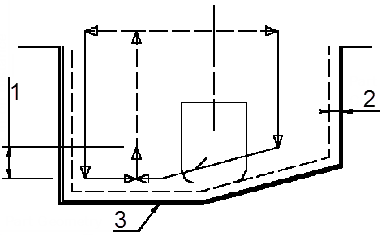
The part profile is followed at the end of recessing. This is done by machining down the sides of the recess in order to clear the profile (1 - Lift-off distance, 2 - Part Clearance, 3 - Part Geometry).

- Under Spindle Axis Machining
- Select this check box to request machining under the spindle axis. This option is available for Frontal orientation.
- Change Output Point
- Select the Change Output Point check box to
automatically manage the change of output point. Change Output
Point.
If the output point is consistent with the flank of the recess to be machined, the output point is changed when the other flank of the recess is machined. At the end of the Machining Operation, the output point is the same as it was at the start of the Machining Operation. For more information, please refer to the Tool Output Point Change.
- Tool Compensation
- Select a tool compensation number corresponding
to the desired tool output point.
The usable compensation numbers are defined on the tool assembly linked to the Machining Operation.
By default, the output point corresponding to type P9 is used, if you do not select a tool compensation number.
- Tool Axis Flip
- This flips the Tool Axis.
- Initial Depth of Cut
- This enables more flexibility in machining by entering the Initial and final depth of the cut. This gives you more control over machining through a variable depth of the cutting behavior. The Maximum depth of the cut is ignored in this case.
- Final Depth of Cut
- This enables more flexibility in machining by entering the Initial and final depth of the cut. This gives you more control over machining through a variable depth of the cutting behavior. The Maximum depth of the cut is ignored in this case.
Option
- Angle and Distance before Plunge
- Specifies the plunge vector before each new pass with respect to the cutting direction.
- Entry and Exit Flank Angles
- Specifies the entry and exit flank angles for Zig
Zag mode only.
The insert geometry is taken into account to avoid collision by reducing the maximum slope on which machining is done. Defining Entry and Exit Flank Angles on the Machining Operation allow you to further reduce the area to machine.
Leading and trailing angles can also be defined on the insert-holder to define the maximum slope on which machining is done. In this case and if the Insert-Holder Constraints setting is applied, the angles that reduce the slope most are taken into account.
- Flank Gouging Angle
- Specifies the flank gouging angle.
Flank gouging angle are for Zig Zag mode only. Angles of the insert are taken into account to avoid collision by reducing the maximum slope on which machining is done. Defining a flank gouging angle allows you to further reduce the area to machine.
A gouging angle can also be defined on the insert-holder to define the maximum slope on which machining is done. In this case and if the Insert-Holder Constraints setting is applied, the angle that reduces the slope most are taken into account.
- Plunge distance for 1st flank
- Specifies the plunge vector before each first pass with respect to the cutting direction.
- Plunge distance for 2nd flank
- Specifies the plunge vector before each second pass with respect to the cutting direction.
- Machining Tolerance
- Specifies the maximum allowed distance between the theoretical and computed tool path.
- Insert-Holder Constraints
- Specifies insert-holder constraints as:
- Ignore
- Apply
The following attributes (located on the Insert-holder Technology tab) may influence machining: See Creating and Editing Milling, Drilling, and Probing Tools:
- Trailing angle
- Leading angle
- Maximum recessing depth
- Maximum boring depth
These attributes take tooling accessibility into account and may reduce the machined area.
However, you can use the Insert-Holder Constraints option to either ignore or apply these tooling attributes. You can replay the Machining Operation to verify the influence of these attributes on the generated tool path.
The Insert-Holder Constraints setting does not influence the leading and trailing safety angles.
Rework
- Lift-off Distance and Lift-off Angle
- Specifies the lift-off vector at the end of the last pass with respect
to the cutting direction.
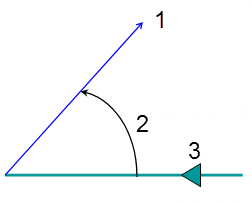
The figure below shows the effect of a positive lift-off angle for external machining (1- Lift-off vector, 2 - Positive lift-off angle, 3 - Cutting direction).

- Rework Mode
- Select this check box to make the following options available:
- Distance before Rework Plunge
- Angle before Rework Plunge