Add a Create Activity
You can add a create activity to an in zone.
-
From the Programming section of the action bar, click Add Create Activity
 , and select an in zone. , and select an in zone.
The in zone is highlighted and a context toolbar displays.
-
In the context toolbar, click Add Product(s) to define a Create Activity
 and select one or multiple products. and select one or multiple products.
-
Press Esc.
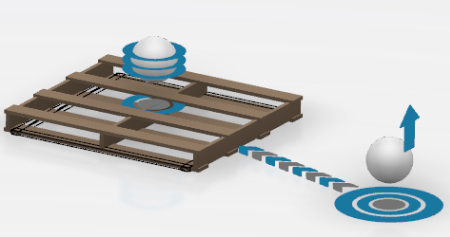 The create activity displays on the in zone, symbolized by an up-arrow.
The selected products are associated to the activity.
Add a Dispatch Activity
You can add a dispatch activity to an out zone.
-
From the Programming section of the action bar, click Add Dispatch Activity
 . .
-
Select an out zone.
The out zone is highlighted and a context toolbar displays.
-
In the context toolbar, click Add Product(s) to define a Dispatch
Activity
 and select a product. and select a product.
-
Press Esc.
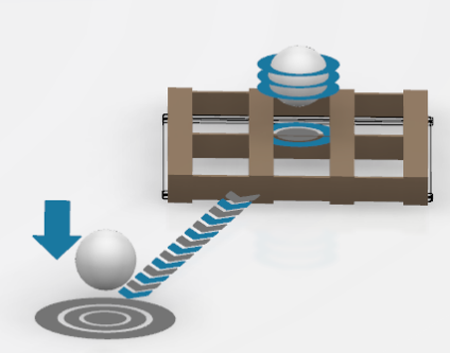 The dispatch activity displays on the out zone, symbolized by a
down-arrow. The selected product is associated with the activity.
Add a Transform Activity
You can add a transform activity to a resource such as an NC machine, part inside
a pallet, or a mobile storage.
-
From the
Programming section of the action bar, click Add Transform Activity
 . .
-
Select a product zone.
-
In the context toolbar, click Add Product(s) to define the Requirement(s) for the
Transform Activity
 and select an input product. and select an input product.
-
Click Add Product(s) to define the Output for the Transform
Activity
 and select an output product. and select an output product.
-
Press Esc.
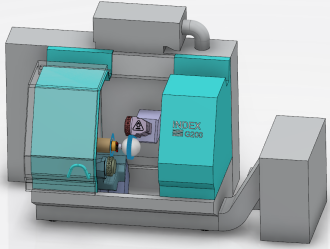 The transform activity displays on the product
zone, symbolized by a curved arrow. The selected products are associated
with the activity.
-
Click Simulation Options
 at the
right edge of the work area. at the
right edge of the work area.
The Simulation Options dialog box displays.
-
Go to the Flow Simulation
tab and check the Display inputs at design positions at start of
transform activity option.
You have displayed the parts at the design position at the beginning
of the transform activity.
-
Select the product zone with the transform activity and click
Edit SLA Resource to open the
Edit dialog box.
-
Assign or unassign a resource pool by selecting it from the list, then
click Assign or Unassign, then
specify the Quantity of workers.
-
In the Executing Position list, choose the required
home position associated with the resource pools.
You have defined the home position for the Robot and the machine by choosing a position from the list, which applies
during the activity's execution.
-
Select several transform activities in the Resource
Configuration panel, then right-click an activity and select
Create Common Inputs Group
 . .
-
Specify if the group is a Transform or an
Assembly type.
-
Select the common part for the input group and the output of the group
execution.
- If you choose Assembly, the command adds aux
parts to the common input.
- If you choose Transform, the command
transforms the common part and the aux part into a new part.
- During simulation, once the common part arrives on the machine, all
the transform activities of the group begin. The overall output is
generated once all the transform activities are completed.
Add a Buffer Activity
You can add a buffer activity to a resource such as a pallet.
-
From the Programming section of the action bar, click Add Buffer Activity
 . .
-
Select a product zone.
The product zone is highlighted and a context toolbar displays.
-
In the context toolbar, click Add Product(s) to define a Buffer Activity
 and select a product. and select a product.
-
Press Esc.
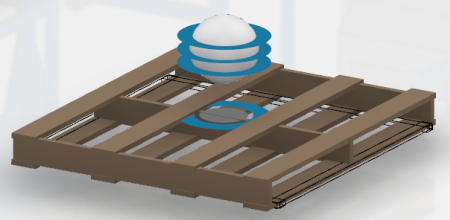 The buffer activity displays on the product zone, symbolized by a set of
rings.
-
Select the product zone with a buffer activity and click Edit
SLA Resource.
The Edit dialog box displays.
-
In the Waiting Time section, enter the required wait
time value.
You have defined the waiting time for a product before the buffer
reroutes it.
-
Enable Sequence Mode and set Flow Mode
Out to As Per Sequence.
During simulation, parts are routed from the buffer activity as per
the sequence you defined.
Add a Transfer Activity
You can add a transfer activity to a resource such as a conveyor.
Add a Load Activity
You can load products into a machine by adding a load activity to the
machine.
Before you begin: Make sure that the machine has a product zone assigned.
-
From the Programming section of the action bar, click Add Load Activity
 . .
-
Select a machine.
- Optional:
If the machine has several product zones, select the product zone to which
you want to assign the activity.
-
Assign or unassign a resource pool by selecting it from the list, then
click Assign or Unassign, then
specify the Quantity of workers.
-
Select the product you want to load.
- Optional: To edit the activity:
- Select the machine and click
Edit the SLA Resource Behavior and Activities
 . . -
In the dialog box, modify the parameters as required.
Add an Unload Activity
You can unload products from a machine by adding an unload activity to the
machine.
Before you begin: Make sure that the machine has a product zone assigned.
-
From the Programming section of the action bar, click Add Unload Activity
 . .
-
Select a machine.
- Optional:
If the machine has several product zones, select the product zone to which
you want to assign the activity.
-
Assign or unassign a resource pool by selecting it from the list, then
click Assign or Unassign, then
specify the Quantity of workers.
-
Select the product you want to unload.
- Optional: To edit the activity:
- Select the machine and click
Edit the SLA Resource Behavior and Activities
 . . -
In the dialog box, modify the parameters as required.
- Optional:
You can also edit the activity when you double-click the unload activity in
the Resource Configuration panel.
- Optional:
In the Edit dialog box that displays, activate the
Unload On Request to unload the activity on
request.
Notes:
- You can also add, create, dispatch, transform, buffer, and transfer activities on zones
that already have an activity assigned. Select a zone and, in the context toolbar that displays, select the activity to add.
- You can add a load or unload activity to a machine that is part of a
product flow. In this case, you can use the product associated with the
product flow can as an input product for the load activity, or output
product for the unload activity.
- To delete an activity, right-click the activity and select
Delete.
- The unload activity is only executed when there is a request for a part
in the downstream resources machine during simulation. If there is no
request, then the unload activity is not executed and the resource is
blocked while it goes into the wait for output state. Once there is a
request for the part, the unload activity is triggered and the machine
is un-blocked.
Add a Generic Activity
You can add a generic activity to an NC machine using the Resource
Configuration panel. Generic activities include actions such as
auto-eject, rotate, open/close door, and so on.
-
Click Resource Configuration
 from
the Programming section of the action bar. from
the Programming section of the action bar.
Note:
You can also add a generic activity with the Add Generic
Activity
 command in the Programming section of the action bar.
-
In the Resource Configuration panel that displays,
right-click a machine.
-
Click Add Generic Activity
 from
the context menu. from
the context menu.
-
In the dialog box that displays, enter a name, duration, precedence, and
position.
- Optional:
If the machine has several product zones, select the product zone to which
you want to assign the activity from the list
Products. Or you can select
 to add a new
product zone. to add a new
product zone.
-
Assign or unassign a resource pool by selecting it from the list, then
click Assign or Unassign, then
specify the Quantity of workers.
-
Click OK.
-
Click the product zone with the generic activity and click Edit
SLA Resource.
The Edit dialog box displays.
-
In the Executing Position list, choose the required
home position associated with the resource pools.
You have defined the home position for the Robot and the machine by choosing a position from the list, which applies at
the end of the activity.
- Optional:
Define a value in the Rejection Rate section and
enable the Quality Check option.
Note:
The value you enter determines which part is marked for rework or
good.
The generic activity displays under the Generic Activities tree in
the Resource Configuration panel.
Create an Activity by Dragging
You can create an activity using dragging in the Resource
Configuration panel. This activity is mainly for Planning
Integration.
-
From the Programming section of the action bar, click Resource Configuration
 . .
-
In the Resource Configuration panel that displays,
drag the required operation from the tree to the required destination in the
panel.
The activity has the same name as the operation from the tree.
Add a Pack Activity
You can add a pack activity to a resource such as a pallet.
Before you begin: Create a buffer resource to use as a pallet. This buffer contains the buffer
activities for all the products that the pallet needs to pack on the conveyor.
-
Click Define Mobile Storage
 in the Setup section of the
action bar then select the buffer resource. in the Setup section of the
action bar then select the buffer resource.
Note:
You can also add a pack activity with the Add Pack
Activity
 command in the
Programming section of the action bar. command in the
Programming section of the action bar.
You have defined the buffer resource as a mobile storage.
-
Click the product zone of the buffer resource.
This product zone is now the starting point of the selected mobile
storage.
-
Click Resource Configuration
 in the Programming section
of the action bar. in the Programming section
of the action bar.
-
In the Resource Configuration panel that displays,
right-click a product zone.
-
In the context toolbar that displays, click Add Pack Activity
 . .
-
Click a pallet resource from the tree or the work area, then select the products that need to be packed on the pallet
resource.
-
Optional: Create multiple instances of the same pallet and
declare them as a mobile storage with Define Mobile
Storage
 . .
You have defined one pack activity using a pallet. This supports
multiple instances of the same pallet without redefining respective pack
activities. During simulation, all instances of the pallet execute using the
same pack activity as reference.
-
Double-click the pack activity in the Resource
Configuration panel to edit it.
-
In the Edit dialog box, click Add context
for pack
 under Context for Pack
Activity. under Context for Pack
Activity.
-
In the Context for Pack Activity panel, select context
from the suggested context, then click OK.
The context is updated in the Edit dialog box
and all parts appear at the correct location based on the context you
specified for the pack activity during simulation.
You have added the pack activity. During simulation, axillary
parts are accepted only after the pallet has arrived. Note:
You can edit the pack
activity by double-clicking the activity in the Resource
Configuration panel.
Add an Unpack Activity
You can add an unpack activity to a resource such as a pallet.
Before you begin: Create a buffer resource to use as a pallet. This buffer contains the buffer
activities for all the products that the pallet needs to unpack on the conveyor.
-
Click Define Mobile Storage
 in the Setup section of the
action bar then select the buffer resource. in the Setup section of the
action bar then select the buffer resource.
Note:
You can also add an unpack activity with Add Unpack
Activity
 in the
Programming section of the action bar. in the
Programming section of the action bar.
You have defined the buffer resource as a mobile storage.
-
Click the product zone of the buffer resource.
This product zone is now the starting point of the selected mobile
storage.
-
From the Programming section of the action bar, click Resource Configuration
 . .
-
In the Resource Configuration panel that displays,
right-click a product zone.
-
In the context toolbar that displays, click Add Unpack Activity
 . .
-
Click a pallet resource from the tree or the main 3D, then select the
products that you need to unpack on the pallet resource.
-
To edit the activity, double-click the activity in the Resource
Configuration panel.
-
Optional: Create multiple instances of the same pallet and
declare them as a mobile storage with Define Mobile
Storage
 . .
You have defined one unpack activity using a pallet. This supports
multiple instances of the same pallet without redefining respective unpack
activities. During simulation, all instances of the pallet execute using the
same unpack activity as reference.
- Optional:
In the Edit dialog box that displays, activate the
Unload On Request to unload the activity on
request.
You have added the unpack activity. During simulation, axillary
parts are routed before routing the pallet. Note:
The unpack activity is
only executed when there is a request for a part in the downstream resources
machine during simulation. If there is no request, then the unpack activity is
not executed and the resource is blocked while it goes into the wait for output
state. Once there is a request for the part, the unpack activity is triggered
and the machine is un-blocked.
Duplicate a Mobile Storage
You can automatically create manual storages using a reference mobile
storage.
-
From the Setup section of the action bar, click Duplicate Manual Storage
 . .
The Mobile Storage dialog box
displays. 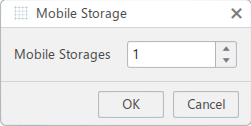
-
Select the quantity of mobile storages to create and click
OK.
-
Select the mobile storage to duplicate, then select the parent of the newly
created mobile storage.
-
Select a product zone to be used as the initial location.
The new mobile storages are created under the selected
parent.
|