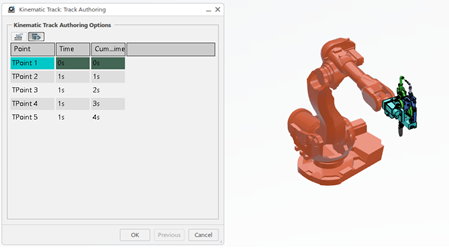
Create a Kinematic Track in Simulation Mode
You can create a kinematic Track within a manufacturing simulation.
-
From the Simulation
section of the action bar, click
New Kinematic Track
 .
If there is more than one possible mechanism to select, the Kinematic Track: Mechanism Selection dialog box appears. If there is only one possible mechanism, it is selected automatically and the Kinematic Track: Track Authoring dialog box appears directly.
 -
Select the mechanism.
The Kinematic Track: Mechanism Selection dialog box is updated.

- Click Next.
-
To create the Track, click Record
 to establish the first Trajectory point
(T-Point) in the Track.
-
To jog the mechanism, either use the handle in the 3D, move the sliders
under Kinematic Command Simulation or use the
spinner to refine the movement more precisely. When you get to the
T-Point you want to create, click Record
 .
.
Tips: You can specify the home position of the mechanism using the Use Home Position list. Click the list and select the required home position. Selecting a home position in the list overwrites the current values with the selected home positions' DOF. The mechanism is displayed in the 3D accordingly.
If a resource position with posture is defined on the operation, you can specify this posture as the first T-Point of the kinematic Track by selecting the posture indicated by an asterisk in the Use Home Position list combined with the use of the Modify
 command.
Note that actions such as recording the T-Point, moving the mechanism in the 3D, or using the slider to reposition the mechanism reset the list name to its default display, that is, Use Home Position.
-
Use the handle or slider and Record
 to create three or four more T-Points.
-
From the TPoint Properties tab:
-
Select a point in the list of T-Points, and use the handle,
slider, or spinner to modify the position of the selected point,
then click Modify
 in the context toolbar.
Note: You can modify the DOF of the first T-Point so that the simulation starts from this posture.
 -
Select a different point, and click Delete
 in the context toolbar.
Tips: - You can also right-click a point in the table, and click Delete Selected in the context menu. If there is only one T-Point for the Track, the Delete Selected and Delete All commands are not available.
- Deleting the first T-Point of the kinematic Track defines the subsequent point as the new first T-Point.
The point disappears from the list of T-Points.
-
Select a point in the list of T-Points, and use the handle,
slider, or spinner to modify the position of the selected point,
then click Modify
-
When you have finished creating and refining the kinematic Track, click
OK.
A Kinematic Track thumbnail appears in the Excitations panel.

