Creating a Legend Table | ||||||
|
| |||||
- Instantiate one or more labels in the layout views.
- Create a legend for each label instantiated in a view.
-
From the Annotation
section of the action bar, click
Legend Table
 .
.
- Select elements to define or redefine the scope of the legend table. Depending on the current selection, the following information messages appear at the bottom of the dialog box dialog box:
- If no selection is made, the scope of the legend table is taken considering the root of the current layout. Accordingly, a message appears that the legend table is created for all the layouts.
- If you select a sheet view, a message appears that the legend table is created for the selected layout.
-
In the Legend Table dialog box, under
Title, enter a title in the Table box.
You can also define the title or heading of the columns of the table in the Title area. These titles are displayed in the two header rows of the table.
Note: The Table box is empty, by default. However, once you enter the title, it is memorized (as a preference), and set as the default value for the next usage. - Optional: Enter a heading in the Image, Legend, and Count boxes or keep the default headings.
-
Under Count, select the Add
Total Count check box.
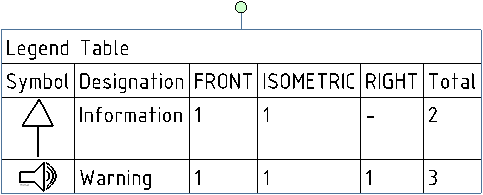
A column is added in the legend table to display the total legend count.
-
Select the Add Count per View
check box.
When this check box is selected, a column is added in the legend table for each view for the selected scope. The name of the corresponding column is automatically set according to each respective view name. If a view does not contain any symbol of a specific type, the corresponding cell contains the following symbol: "-".
-
Select the Consider attachments check box.
All the label leader attachments are considered while performing label counts in a drawing.
- Under Format, select a Table Style.
You can select a table style from the available styles.
-
Optional: To reverse the table rows from the bottom to the top, select the
Reverse Table check box.
This inversion is done after the actual creation of the table. This check box is cleared by default.
-
Optional: To split the table, select the Split Table
check box.
By default, this check box is cleared.
-
Click OK.
Note: If no label or symbol is found in the defined scope or there is no legend to be reported, an error message appears and the command ends without creating any table.
-
Select a reference element (a line or a table) to indicate
the table anchor point or click in the sheet to position the
table.
For more information, see Creating a Table .
The legend table is created.
