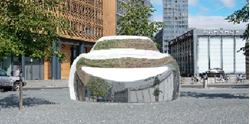
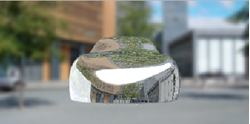
An ambience helps you create different scenarios around a scenery. It defines a dome
that surrounds your 3D object. A .hdr 360° image is projected on this dome.
This image contains the lighting information required to light the scene without placing
additional lights, which makes the rendering more realistic and consistent.
Ambiences created in
Rendering Scene Design either through:
Insert Ambience as Copy in
the action bar
Insert into product contextual command in the
Library panel
Save as new to product in the
General tab.
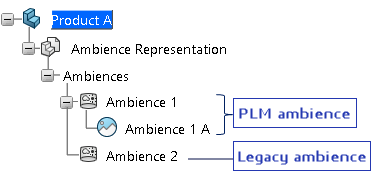
These ambiences are stored in a dedicated representation under the root
product.
Legacy ambiences are identified by the symbol.
PLM ambiences
Ambiences introduced with Ambience Studio.
You can insert them into a product or an experience through Insert
Ambience as Reference, and reuse them in your products.
PLM ambiences are
identified by the
symbol.
You can
override some parameters in a local or propagated way:
"Local" means that the PLM ambience is modified in the product where it is
used, without affecting its other uses. This is the case when changes are made
in Rendering Scene Design.
"Propagated" means that your changes apply to all the products using this
ambience. This is the case when you modify the ambience reference in Ambience Studio through the app-stacking mechanism (by double-clicking the ambience node in the
tree), or through Edit
Source.
Each data model is identified by a dedicated symbol in the tree:
General Properties
In the ambience editor panel, the General tab lets you
customize the lighting and background of the current ambience.
HDRi Lights
The preview displays an image of the ambience with lights created in Ambience Studio, if any.
Light Properties - Legacy Ambiences Only
The Light Properties area enables you to customize the lights of a legacy
ambience.
The following options are available:
Option
Description
Color
Adds a color filter to the light.
RGB: defines the color model of the light.
Temperature: defines the color temperature of the light.
Texture
This option is displayed when the light type is selected.
Click the icon to open the Content Chooser, then click Import a file and select the files to be imported. When the files are listed in the Content Chooser dialog box, select the appropriate files, then right-lick and select Accept: the selected files are displayed in the Texture area.
Note:
Multiselection is available to add several files in one step.
Lets you specify how the light is painted in the environment lighting map, also called Image-based Lighting (IBL).
Additive: light pixel values are added to the IBL pixel values. This lets you design fully transparent lights.
Alpha: light pixel values replace the IBL pixel values. This lets you design fully opaque lights as the part of the IBL that is behind the light does not contribute anymore to the global lighting.
Important:
The Brightness parameter has the same effect whether you are in Additive or Alpha compositing mode. The light color is defined as Red, Green, and Blue values, which are then multiplied by the brightness to obtain the output High Dynamic Range (HDR) pixel value.
The default is Additive.
Type
Defines the light shape.
Shadows
Displays shadows on the ground for the selected light.
When this option is cleared, the shadow of the corresponding light is not displayed anymore in the 3D but the light itself is still enabled.
Light ON - Shadow ON
Light ON - Shadow OFF
Light OFF (and thus) Shadow OFF
Longitude
Modifies the horizontal position of the light.
By default, the value is 0 degrees.
Latitude
Modifies the vertical position of the light.
By default, the value is 30 degrees.
Lock/Unlock Position
Lets you lock or unlock the light position.
When the position is locked, you cannot move the light in the preview.
By default, the position is locked.
Rotation
Enables a rotation of the light.
By default, the value is 0 degrees.
X Size
Defines the width of the light.
By default, the value is 3. The higher the value, the wider the light.
Y Size
Defines the length of the light.
By default, the value is 3. The higher the value, the longer the light.
Keep Ratio
Keeps the light size uniformly according to X and Y.
Blur Percentage
Defines the percentage of the blur.
Blur Distribution
Defines the distribution of the blur.
Blur Colorization
Defines a color filter to the blur.
Lighting
The Lighting area lets you customize some lighting properties for the current
ambience.
Option
Description
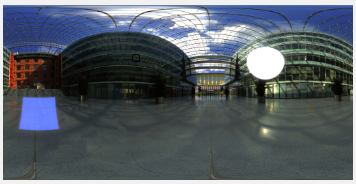
Source
Lets you select the image (in HDR format) used for
lighting through the Content Chooser.
By
default, the image specified for the lighting is also used for
the scene background. This means that the 360° hdr image used to
compute the IBL (Image-based Lighting) images is also displayed
in the background.
Rotation
Lets you define the lighting rotation around the object.
You can either use
the slider, or enter the appropriate value in the box on the
right.
By default, any modification you make to the
lighting rotation is automatically applied to the background
image as well.
Inclination
Lets you define the angle of inclination about the X and Y axes.
Exposure
Lets you define the brightness of the ambience for the lighting image.
By
default, any modification you make to the lighting exposure is
automatically applied to the background image as well.
Background
The Background area lets you customize the background of the current
ambience.
HDRI
The following options are available for the HDRI ambience
type.
Option
Description
Size
Infinite displays the ground texture. It is useful for static pictures.
Lets you resize the dome radius. It is useful for large models or pictures of
buildings to fit the background image.
Tip:
Specify an
estimated value between the center of the sphere and the first
object visible in the picture projected on the dome.
Position
Lets you define the dome position.
Color/Gradient
For the Color/Gradient ambience type, the following options are
displayed. These options vary depending on the type you select (Simple,
Gradient, or Horizon).
Important:
Color/Gradient options can be overridden.
Option
Description
Intensity
Defines the saturation.
Color
Defines the color of the background.
Top/Bottom Color
Available when Gradient is selected. This type applies
a graduated color background.
Lets you define a top and bottom
color.
Top/Bottom Sky Color
Available when Horizon is selected. This type
separates the background in two, creating a horizon.
Lets you
define a top and bottom sky color.
Top/Bottom Ground Color
Available when Horizon is selected.
Lets you define
a top and bottom ground color.
Horizon Altitude
Available when Horizon is selected.
Lets you modify
the horizon altitude.
Sun and Sky Properties
In the ambience editor panel, the Sun and Sky tab lets you
customize the sun and sky background.
Important:
Some Sun and Sky options can be overridden.
Option
Description
Location selection
Select a location on the globe by clicking the point of your choice directly on the map.
The clicked location is identified by a red dot. Latitude and longitude values are updated accordingly as well as the sun position and lighting in the 3D.
Calendar
Lets you change the date (month, day, and year).
To do so, click the icon,
and then enter your values in the appropriate boxes.
Time
Lets you change the time (hour, minutes, and seconds).
To do so, click the
icon, and then enter your values in the appropriate
boxes.
Tip:
Click to revert to the current time.
Time zone
Lets you select the appropriate time zone from the list.
If you select Custom, you can define your own values for the Longitude and Latitude parameters.
Longitude
Modifies the horizontal position of the light.
This option is available only if Custom is selected for the Time zone.
Latitude
Modifies the vertical position of the light.
This option is available only if Custom is selected for the Time zone.
Altitude
Defines the height of the horizon.
Ground Properties
In the ambience editor panel, the Ground tab lets you
specify how the ground is displayed.
Defines the origin of the HDR projection to fine-tune the mapping and avoid
distortions.
Offset
Offsets the ground up or down from the object.
Important:
This
option is not available for Sun & Sky
ambiences.
Reflectivity
Adapts the reflectivity from the ground on the object.
Glossiness
Adapts the glossiness of the ground.
Note:
Glossiness is activated when the Reflectivity value is different from zero.
Additional properties are also available for the Sun and Sky type:
Option
Description
Color
Select Automatic to use the default color (which cannot be customized), or Customize to tune the background color through the Hue option.
Hue
Available when Customize is selected for the Color option.
This option lets you define the background color through the color chooser. See Using the Color Chooser.
Backplate Properties
In the ambience editor panel, the Backplate tab lets you add a
fixed image that gives sharper results to the ambience.
Depending on the ambience type (legacy or PLM), not all options are available.
Option
Description
Use Backplate
Makes the preselected backplate the current one.
Important:
This
option is available for legacy ambiences only, and when a backplate has been
clicked from the Library.
Activate Viewpoint
Lets you activate in the 3D area the viewpoint defined for the current ambience.
Important:
This option is available for PLM ambiences
only.
The backplate is visible in the 3D area only when you are in the viewpoint it is associated with. As soon as you
change the viewpoint (by zooming, translating, or rotating), the backplate
automatically disappears. To display it back, double-click the camera node
in the tree, or the camera representation in the 3D area to go back to the associated viewpoint.
Blur
Lets you blur the backplate of the current ambience.Blur Off Blur On
The higher the value, the more blurry the
backplate.
Important:
This option is
available for PLM ambiences only and can be overridden.
Source
Lets you select a backplate from your folders.
Note:
This
option is available for legacy ambiences
only.
Size scaling
Adjusts the size of the backplate to the resolution of the
computed image.
Best fit: Lets you adjust the
size of the backplate to the best fit possible (in width
and height) so that there is no black stripes around the
image.
Fit width: Lets you zoom the
backplate so that it has the same width as the computed
image.
Fit height: Lets you zoom the
backplate so that it has the same height as the computed
image.
Note:
If you use the last two options, black stripes may
appear around the backplate.
Dome Visibility
Activates and defines the transparency intensity of the backplate. First,
click the box, and then define the intensity.
By default, the value is 60%.
Note:
Select an ambience first. The dome rotates and the lights adjust
accordingly.
 in
the
in
the  symbol.
 , and reuse them in your products.
 symbol.
 light type is selected.


 to revert to the current time.