Using the 3D Manipulator | |||||
|
| ||||
-
Select the material or the decal in the tree.
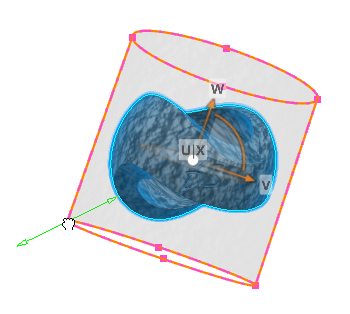
The 3D Manipulator is automatically snapped to the object to let you position it on the geometry and a drawing box appears around the geometry.

The drawing box (in orange) represents the bounding limits for the decal. It might prove very useful to control decal repetitions, for example.
The patch showing the material/decal image in semitransparency lets you stretch the material/decal on the geometry.
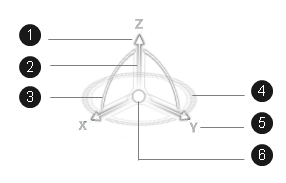
The 3D Manipulator has three axes, which are represented by the letters X, Y and Z. The z-axis is the default orientation and the base of the 3D Manipulator, the XY plane, is the privileged plane.

- (1) Arrow
- (2) Axis
- (3) Arc
- (4) Privileged plane
- (5) Axis label
- (6) Manipulation handle
-
Point to the 3D Manipulator.
The following parts are highlighted as you point to them:
- 3D Manipulator axes
- Arcs on the planes of the 3D Manipulator and the planes themselves.
The edges of the drawing box around a selected object always remain aligned with the 3D Manipulator axes.
-
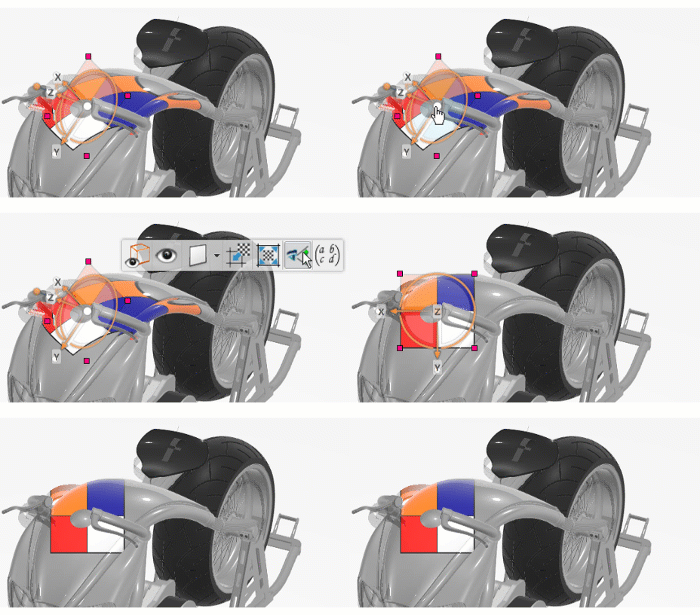
Drag the following elements on the 3D Manipulator:
Action Description Drag any axis. The material/decal is panned along the direction of the axis. Drag any arc. Rotates the material/decal in the plane subtended by the arc. Drag any plane. Moves the material/decal in the same direction on the same plane. Drag the privileged plane. Rotates the material/decal. A ruler is displayed to help you position more precisely the material/decal:

-
Use the drawing box handles to adjust the texture scale.

- Click the handle at the center to display the context toolbar.
-
Run the appropriate command.
Command Description  Drawing Zone
Hides or displays the drawing zone that lets you limit the application volume for the decal. Important: This command is available only for decals.  Manipulator
Hides or displays the context toolbar and the drawing box.  Planar Mapping
Applies a planar mapping.  Cubical Mapping
Applies a cubical mapping.  Spherical Mapping
Applies a spherical mapping.  Cylindrical Mapping
Applies a finite cylindrical mapping.  Infinite Cylindrical Mapping
Applies an infinite cylindrical mapping.  UV Mapping
Applies UV mapping.  Centering on Support
Centers the texture on the object.  Fit Texture to Support
Makes the texture fit the object. Note: The texture might not fit the exact dimensions of the object. Nevertheless, it gives you a good approximation that you can then adjust to the required size. Align with Camera View
Aligns the decal orientation with the camera. 
- This command is relevant for decals only.
- This command is also available in the Mapping Parameters area of the Appearance Domain dialog box.
 Absolute Position
Lets you translate or rotate the decal/material about the X, Y, and Z axes in increments. To do so, specify the appropriate values for position and orientation, and then click OK.
Important: To be able to use UV mapping with the Geometry UV mapping operator, you need to create UV coordinates for your model. Users who are not familiar with this can use Generative Shape Develop. For more information, see Generative Shape Design User's Guide: Working with the Generative Shape Develop App: Creating a Surface with UV Parameterization. Using the Geometry UV mapping operator without UV attached to the model may lead to unpredictable results.