Customizing the Data Model

OnePart stores all metas obtained from the source system and those extracted from the file. By default, only certain metas are configured in the OnePart Data Model and available as index fields and/or category facets. The rest of the metas are displayed in the Preview page under Explore > Other attributes.

If you have the Customization SDK, you have the option to add metas individually to the data model or use the Trace all metas features. For details on defining additional attributes and facets on Parts, see the OnePart Reference Guide.

Note: It is highly recommended to use the Elastic Datamodel approach that is intended for this purpose and does not require the SDK.

For details, see the OnePart Reference Guide: Data model.

This task shows you how to:

Add a new meta to the data model

If you want to use one of the 
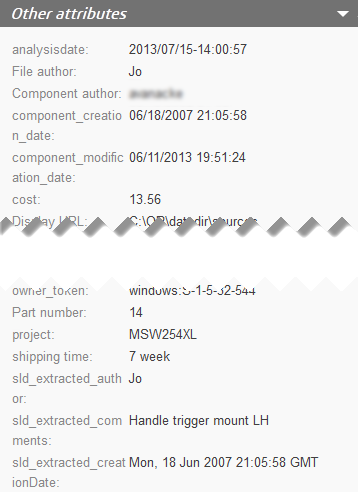
Other attributes (displayed in the Preview page) as a facet then you must first add the property to the data model as a category facet. Let’s add, for example, project.

Before you begin:
Note: If you have multiple metas to add, you might consider using the Trace all metas function that displays all the metas available in the index. However, you must clear the index and rescan the data. See Add new properties from traced metas
Important: Requires the OnePart Customization SDK
  1. In the Administration Console, go to Data Model.

    OnePart has a data model structured with CAD files in mind. The 2d3d class applies to all CAD specific files and drawings.

    Note: We recommend that you respect the organization for the new properties you create. For details on the data model, see OnePart Reference Guide.

  2. Select the 2d3d class and click Add property.
  3. Configure the property and click Accept:
    • Name: for example, project
    • Data type: Alphanumeric
    • Semantic type: metadata (or text to also benefit from semantic processing such as the language detection). For more details, see Exalead CloudView Configuration Guide: About the Data Model.
      Note: A semantic type defines the semantic processing to be applied when indexing or when searching the properties of this type.
    • Field type: Index Field and Facet (or Facet only if you want to limit this meta as facet).

    This will create the hit content meta and the facet in the search logic configuration.
  4. To change the UI label in the OnePart UI, go to 
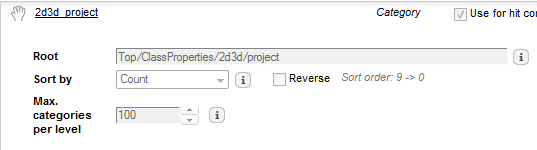
Search Logics > sl0 and select the new 2d_3d_project facet in the list of Facets from data model.


    • You’ll need to use the facet’s Root value: Top/classproperties/2d3d/project
    For more details, see To configure the UI labels.
  5. Click Apply to save the changes.
  6. Add this meta as a category facet. See the procedures:

Add new properties from traced metas

If you want to add one of the Preview page’s Other attributes as an index field and/or category facet you must first add it to the data model. Let’s add, for example, an unprocessed meta such as project. For details on the data model, see the OnePart Reference Guide.

  1. In the Administration Console, go to Index > Data Model.
  2. Select Trace all metas and click Apply.
  3. Go to the Home page, click Full Scan for your connector.
  4. Go back to Index > Data Model > Classes, click Add properties from traced metas.
  5. Filter by pro and select the project meta to be generated as properties as shown below.

    Note: Click the meta link to view sample values.


  6. Click Generate properties.
  7. Once you’ve finished adding properties, deselect Trace all metas.
  8. Clear the connector’s documents and rescan.
  9. Click Apply.