Work Instructions Layout

The Work Instructions app opens with the Global Operations Sequencer. It shows the operations to which you are adding work instructions. You also have a work area, which shows the products implemented by the operations to which you are adding work instructions. In the center of the right edge of the app, the Product Buildup Options panel is minimized into an icon. Once you add a work instruction to an operation, a Textual Instructions panel opens, which lists the work instructions associated with the operation.

The following topics discuss:

This page discusses:

Active System or a General Operation

The active System / General Operation is the parent of the Operations displayed in the filmstrip in Work Instructionsapp.

It is the same System / General Operation that you either:

  • Selected in the tree in another app before switching to Work Instructions app OR
  • Selected in the Select System panel in Work Instructions app


Global Operations Sequencer

The Operations Sequencer offers graphic cues about the operations with which your work instructions are associated.


The Operations Sequencer shows each operation in sequence in a frame as if it were film. If an operation has one or more work instructions associated with it, a work instruction appears in the right top corner. If an operation has views associated with it, a view appears in the left top corner.

If an operation implements a product, the operation stamp is a picture of that product. The lower right corner shows the icon associated with the operation type (for example, load). If you point to an operation, the name of the operation appears.

When you select an operation, a border appears within the film frame for that operation. Also, any work instructions appear in the Textual Instructions panel, and the product implemented by the operation appears in the work area.

When an operation is linked to a product without 3D part content, it appears on the Operations Sequencer as an icon representing its operation type.

Note: In Work Instructions, the Operations Sequencer helps you visualize the order of each operation. It prevents you to change the operation except by adding, modifying, or deleting work instructions, and modifying the Time Mode.

The PREVIOUS and NEXT is obtained based on Preferences, Display, Operation Filmstrip, Operation Sequence, Display sequence based on Time/tree order.

  • Tool-tip shows the name of previous/next when hovering the mouse over the navigation arrows.
  • If previous operation is unavailable, Previous is grayed-out/disabled.
  • If Next operation is unavailable, Next is grayed-out/disabled.

Geometry Window and Product Build Up

The geometry work area window helps you visualize the work steps you create as you are authoring the relevant instructions.

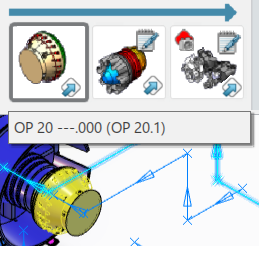
For example, the first operation, Op 20 contains the Engine Circular Stiffener:

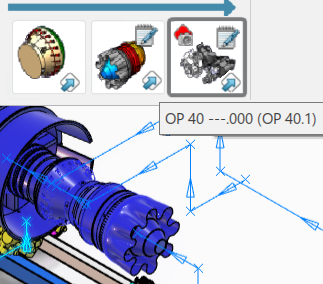
The third operation, OP 40 contains the build-up parts from the preceding operations (the Engine Circular Stiffener and the Engine Exhaust) and its implemented product (the Engine Gearbox).

When you create work instructions that are part of a Create Part Process, the 3D content shows the manufacturing view of the parts, not the design view. This uses the Item-Product process type to define the state and condition of a design part during the manufacturing process. In session, the Item-Product replaces the design part geometry with manufactured part geometry. Manufactured geometry is a result of manufacturing operations (for example, drilling or milling) done on the design part. When you capture an image of the 3D content for a work instruction, you capture the manufactured view.

This manufactured geometry is not part of the product structure and therefore is not visible when the design part open in Product Structure Design (and other similar apps).

Textual Instructions Panel

The Textual Instructions panel appears when you select an operation that has at least one work instruction associated with it. The panel lists the work instructions of the selected operation in the Operations Sequencer.
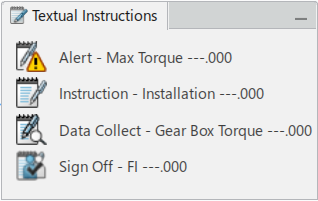


WI Types (textual Instructions)

  • Instruction: Basic textual description of work to perform. It can also have attached documents and images (snapshots of the 3D).
  • Alert: Text notification to worker.
  • Data Collect: A request for the collection of a data value as well as textual instructions for how to collect the data.
  • Data Collect Plan: A request for the collection of several data values as well as textual instructions for how to collect the data.
  • Data Collect Plan Checklist: Data Collect Checklist is a specialized kind of Data Collect Plan that can only have Rows of type Boolean.
  • Sign Off: A request for a series of actors to verify that the work has perform correctly. Includes textual instructions for these actors in term of what it inspects and by what standards.

Right-clicking on an instruction brings up the context menu.
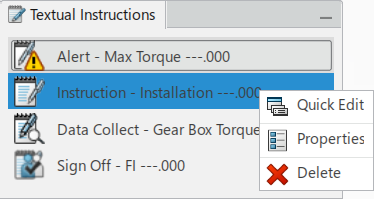
To see the contents of the work instructions instead of their names, you can define the Work Instructions Display preference. See Textual Work Instruction. Check the Show Instruction Text option, then the Instruction text for the instruction displays.

Note: Use the Quick Edit dialog box to edit the name and selecting OK or Apply, on the WI. When the name is not unique, the DELWKIUniqueNameCheck.CATRuleExit invokes to verify the uniqueness of the name. If it is not unique a message appears, and you have to re-enter a unique name. Changing the WI object name through the Properties dialog box is not verified by this functionality.

The data created in Work Instructions publish and import in Manufacturing Operation Management (MoM). The duplicate names cause an error in MoM importing and then necessitate rework: modification, re-export, and routing to MoM.

You can preview the contents of any work instruction by scrolling down the work instructions in the list. To edit a work instruction, click an instruction in the list.

The list shows the instructions in order. You can use drag to reorder the instructions. Under effectivity, when you use Replace by Version , only the new instance of a work instruction appears in the Textual Instructions panel. However, both instances are visible in the tree, but the older instance appears in gray to indicate that it is still valid for other effectivities.

You can open and edit any number of work instructions at the same time. Each dialog box remains open until you cancel it in the Textual Instructions panel.

To delete a work instruction, right-click the instruction and select Delete. When you are using effectivity and you delete a work instruction from the Textual Instructions panel, only the work instruction associated with the current instance is deleted.

Product Buildup Options

You can control how you see product buildup in the operation sequence.

In the middle of the right edge, click the minimized Product Buildup Options panel. This allows you to choose to see the product buildup in terms of other systems and previous operations. In addition to letting, you choose which aspects of an extensive product buildup you want to see, you can also select the color and transparency for previous systems' appearance. Similarly, you can define color and transparency for parallel operations.

When you select Color Options, you can show that the part builds up with more granularity by designating different colors for the parts. You choose different colors for the order of parts, providing, disassembling, or assembling.

Alternatively, you can also specify the colors in the Me > Preferences > App Preferences > Simulation > Digital Manufacturing Apps Common Services > Simulation and Planning Apps Common Services > Product Build Up tab.

Commands That Affect the Operation Sequence

Some commands affect the entire operation sequence.

  • In the secondary area of the Instruction Tools section of the action bar, use Update All Screenshots . This enables you to update all screen captures attached to Instruction work instructions throughout the operation sequence.
  • In the primary area of the Instruction Tools section, you can use Publish All Views , which publishes all views for an operation sequence.