Setting Data for Publishing Functional Tolerancing and Annotation (FTA) Requirements | ||
| ||
-
Select the part and right-click Open in New App.

Or select the 3DCompass. -
From CATIA 3D Tolerancing & Annotation
App, select Generate Manufacturing Requirements.

-
Right-click Annotation Set, select Generate
Manufacturing Requirements.
Click on the tree.
 Note: If the command is not active, go into Me
 > Preferences, Mechanical Systems, 3D Tolerancing and
Annotation, Administration, Annotations
Set, and make sure that the Disable Generate Manufacturing
Requirements is not selected.
> Preferences, Mechanical Systems, 3D Tolerancing and
Annotation, Administration, Annotations
Set, and make sure that the Disable Generate Manufacturing
Requirements is not selected.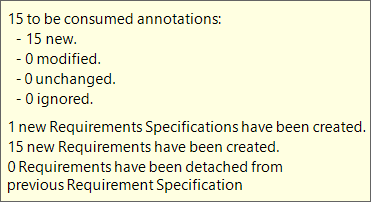
Surface information is not generated for nonsemantic FTA Requirements. So you cannot switch the display of surfaces for FTA Requirements of these types.
Note: Nonsemantic FTAs can be identified by red squiggly lines in the tree / 3D by selecting the following option, Mark Non-semantic annotations in the Me > Preferences, 3D Modeling, Mechanical Systems,
3D Tolerancing & Annotation.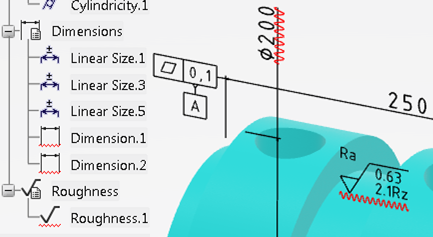
-
Select Share
 > Save > Save All.
Note: If FTA are edited after being published to Requirements, the Publish command can be run again. New Requirements (duplicated from the old) are created for each edited FTA. The assignment to the Mfg Item and Operation must be manually updated to remove the links to the old Requirements and to point to the new Requirements.
> Save > Save All.
Note: If FTA are edited after being published to Requirements, the Publish command can be run again. New Requirements (duplicated from the old) are created for each edited FTA. The assignment to the Mfg Item and Operation must be manually updated to remove the links to the old Requirements and to point to the new Requirements. -
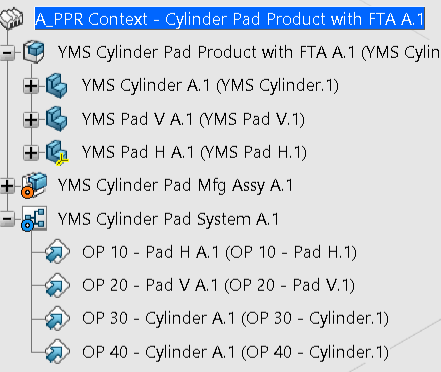
Go back to the original window where the PPR is highlights.
-
From the 3DCompass, select Manufactured Item Definition.

-
Create a Scope for each part.

This makes it easier to assign the product. -
Select the part, YMS CylinderA.1, then Assignment
Manager
 .
.

-
Select all the Items, and use the arrow for Assign Selected
Requirements
 .
.

All the Annotation types are assigned. -
Select Share > Save > Save All.
-
From the 3DCompass, select Process Planning.
Here you can assign the annotation types to each Operation.

-
Click
 , and select all the items in the Requirement
Browser, right-click, and select Attach
Requirement.
, and select all the items in the Requirement
Browser, right-click, and select Attach
Requirement.
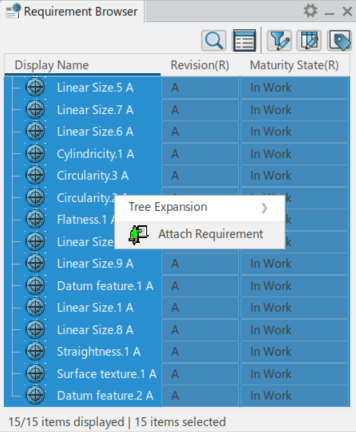
Once assigned, a message appears to confirm the assignment.If required, the next steps show how you can assign requirements to each operation.
-
Click
 , and an Operation, OP30.
We see all the assigned annotations.
, and an Operation, OP30.
We see all the assigned annotations. -
Click Assignment Manager.
The Assignment Manager opens for OP30 with all the Annotation enters assigned.

-
Select the requirements that are not required for this operation, and
Unassign Selected Requirements.

-
Assign Requirements to OP 40 using Assign Selected
Requirements
.

-
Select Share > Save > Save All
-
Select Product BuildUp options
 and make sure the Show FT&A
 is ON.
-
Select OP 30, then OP 40, see the
assigned Annotation types.

You can create views and see the FTA Requirements or hide them. -
Create views


The Annotation types appear in the view and the FTA Requirements dialog box appears. You can also select either from the window the annotation type, and hide. Or in the FTA Requirements dialog box, select the Annotation, right-click, and Hide.If the FTA Requirement display status (On / Off) inside a View is different from the status when Views are deactivated. Then an overlay icon
 displays over the FTA Requirement in the Product
BuildUp options dialog box.Note: If the position of a Mfg Item whose geometry is the source of some of the FTA Requirements changes. Then the position of all corresponding FTA Requirements changes accordingly. This is managed irrespective of the mechanism used change the position of the Mfg Item, by the Robot/Compass, Manipulate, Snap, Explode, and others.
displays over the FTA Requirement in the Product
BuildUp options dialog box.Note: If the position of a Mfg Item whose geometry is the source of some of the FTA Requirements changes. Then the position of all corresponding FTA Requirements changes accordingly. This is managed irrespective of the mechanism used change the position of the Mfg Item, by the Robot/Compass, Manipulate, Snap, Explode, and others.Display
All FTA Requirements assigned to a Textual Instruction (Text / Data Collect / Sign Off / Alert) display on the selection of that Instruction (if the FTA buildup option is turned ON).
To display, the FTA Requirements assigned to the Textual Instruction need to be also assigned to the parent Operation. This is usually the case.
All other FTA Requirements (assigned to the parent Operation, but not assigned to the selected Textual Instruction) are hidden.


