The second step of the Manufactured Part Assistant allows you to manage fastener components and the stock.
When you click Next at the end of Step 1: Fastener Reassignment, the Assistant
comprises a single 3D viewer, a Fastener Components tab, and
a Milled Part tab. It also contains the same set of commands
described in Docked Commands.
3D Viewer
The 3D viewer shows the part and fasteners relative to a selected Remove Material
step.
Fastener Components Tab
In this tab, the Assigned to Remove Material list contains all the
Remove Material steps relative to the currently edited Manufactured Part.

If you select the All option in the list, all the fasteners assigned
to all the Remove Material children of the current Manufactured Part are displayed. You can multiselect the fastener components by using the list
or the 3D.
The Edit Remove Material Properties icon allows you to modify the
properties of the selected Remove Material step.
The list displays all the references and instances of fasteners relative to the
selected Material Removal step and their components. If the fastener is a
secondary fastener, a specific  icon
appears near the Fastener reference.
icon
appears near the Fastener reference.
By clicking the Mount component or Unmount
component contextual command, you can choose to mount or unmount
the related component of the fastener. The 3D viewer is automatically refreshed.
You can also multiselect fasteners and mount or unmount all the components of the selected
fasteners.
As in the first step, you can sort the fasteners with filters on
Category, Linked parts, or
Diameter.
More about Fasteners and Secondary Fasteners
You may fix a fastener on a part by another fastener: this may be riveted or soldered screw,
for example. The fastener that fixes the screw on the part is called the
secondary fastener.
When creating a Manufactured Part, all the fasteners linked to the implemented part are verified.
For each fastener, a Remove Material implementing the fastener is created. If you select the
Mount
Fastener Components option in
and the fastener has components, the following behavior is
applied:
- If the fastener is not a secondary fastener: for each component, a Provided Part that implements the
component is created under the Manufactured Part.
- If the fastener is a secondary fastener: no Provided Part of the component is automatically created.
- If a component of a fastener is mounted and this component is linked to
a secondary fastener, then a Fasten step implementing this secondary
fastener is created under the Manufactured Part.
In the Manufactured Part Assistant, the secondary fasteners appear like other fasteners. The behavior
is different in the Fastener Components tab when you
mount or unmount a component. The behavior is as follows:
- If the component does not belong to a secondary fastener and if the
component is linked to a secondary fastener, a Fasten step implementing this fastener is created. The line related to this
fastener becomes not pickable. If a Provided Part implementing a component of this fastener had previously been
created, it is removed.
- If the component belongs to a secondary fastener and if a Provided Part of a component already exists, the line is pickable. If a Fasten step implementing the fastener exists, the line is not pickable.
The Fasten step is displayed in the tree and the tile view in the same way as the Remove
Material steps.
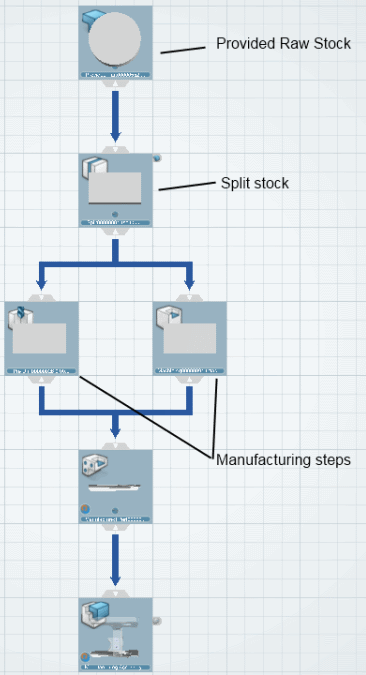
Milled Part Step Tab
In this tab, you can specify if a Manufacturing Assembly for milling parts is to be
created. This structure can include Machining, Provided Raw Stock, and Split Stock steps.

If the Generate machining step option is selected, a Machining step is created and inserted in the Manufactured Part or in the Manufactured Material. Then, if the option is cleared, the Machining step is removed.
If the Generate provided raw stock option is selected, a Provided Raw
Stock is then created under the Manufactured Part. The Machining and Remove Material steps are specified as successors of this Provided Raw Stock.
Optionally, you can search a product and associate it to the Provided Raw Stock
as an output (this product is not implemented by the Provided Raw Stock).
If the Generate manufactured material option is selected, a Manufactured Material is then created under the Manufactured Part. The Machining and Remove Material steps are specified as successors of this Manufactured Material. Optionally, you can search a product and associate it to the Manufactured Material as an output; this product is not implemented by the Manufactured Material.
The selection of the Generate provided raw stock and
Generate manufactured material options is exclusive,
that is, you can only select one of these options at a time.
Depending on the selected option, the Generate transform step option
creates a Machining and a Transform between:
- The Split and the Drillings
- The Provided Raw Stock and the Drillings
- The Manufactured Material and the Drillings.
This option is only available if the
Generate provided raw
stock or the
Generate manufactured
material option is selected.
When the Provided Raw Stock or the Manufactured Material is created, you can select the Generate split stock
step option to generate a split stock. A Split stock is then
created under the Manufactured Part, as the successor of the Provided Raw Stock or the Manufactured Material. The Machining and Remove Material steps are specified as successors of this Split stock.
Notes:
- Optionally, you can search a product and associate it to the Split
stock as an output; this product is not implemented by the Split
stock.
- A Split stock can be created in step 2 of the Assistant only. This
type of item cannot be created elsewhere in the app.
You can modify the attributes of the Split stock, as follows:
- Number of cut pieces in one raw stock: by
default, the number of splits is 1.
- X, Y, Z Direction, and associated Cutting
length: these attributes indicate in which direction the
stock is to be cut. By default, no direction is specified and the
cutting length is 0mm.
- Custom Direction and Cutting
length: a customizable direction can be specified, with
a specific name (Length, Height, for example) and a cutting length.
If the Generate split stock step option is cleared, the Split stock is
removed and its successors are specified as successors of the Provided Raw
Stock.
If the Generate provide raw stock option is cleared, the Provided Raw
Stock and Split stock steps are removed.
If the Generate manufactured material option is cleared, the Manufactured Material and the Split stock steps are removed.

 : If selected, the 3D viewer is always reframed to display all the
components attached to it.
: If selected, the 3D viewer is always reframed to display all the
components attached to it.  : If
selected, the other parts linked to the current part through fasteners
are displayed. If a Manufactured Part is associated with this part, the corresponding Manufactured Part product is displayed.
: If
selected, the other parts linked to the current part through fasteners
are displayed. If a Manufactured Part is associated with this part, the corresponding Manufactured Part product is displayed.  :
If selected, the fasteners are displayed in the 3D viewers.
:
If selected, the fasteners are displayed in the 3D viewers.  : Updates the Manufactured Part product.
  :
Opens the Manufactured Part product in a new tab.
:
Opens the Manufactured Part product in a new tab. 


 command. Click it to display or hide all the fasteners linked to
the parts implemented by the Manufactured Parts, including the
internal fasteners.
command. Click it to display or hide all the fasteners linked to
the parts implemented by the Manufactured Parts, including the
internal fasteners.  command