Creating a Sequential Axial Operation with the Legacy Interface | ||||
|
| |||
-
From the
Axial Machining section, select Sequential
Axial
 then
a position in the Manufacturing Program.
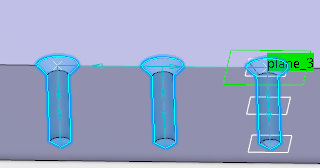
A typical part to machine with Sequential Axial looks like this:

- A Sequential Axial entity is added to the Manufacturing Program.
- The Sequential Axial dialog box opens directly at
the Geometry tab
 . This
tab includes a sensitive icon to help you specify the geometry.
 - Areas colored red, or texts such as No point and No geometrical feature has been selected, indicated that geometry is required.
-
Still in the Geometry tab, which comprises a
Global and a Local tab:
-
In the Global tab, select the red hole depth
representation then select the three holes.
See Selecting Geometry for more information.

The sensitive icon is updated with information such as:
- The number of machining points.
- The depth and diameter of the first selected hole.
- The counterbore depth.
- The angle.
-
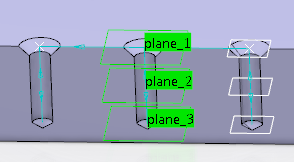
In the Local tab, select the plane representations
in the sensitive icon, and the required planes in the part.

- Optional: Select the axis representation in the sensitive icon to invert the tool axis direction.
- Optional: Select the check boxes below the sensitive icon to modify the corresponding data.
-
In the Global tab, select the red hole depth
representation then select the three holes.
-
Select the Strategy tab
 to specify the
following parameters.
- Power
- Approach clearance (A)
- Compensation parameters, such as First Compensation and Compensation Application Mode. These depend on those available on the tool.
- Automatic ROTABL
- Output CYCLE syntax
-
Select the Motions tab in the
Strategy tab
 and define the
required motions.
- Click the icon corresponding to the required motion.
- From the lists, select or enter the values.
- Click OK to add the motion.
For example:
Motion Icon Syntax Parameter 1st Spindle Speed 
SPINDL/ 60,000,RPM,CLLW Spindle Mode = Local Spindle (60tr/mn)
Way of Rotation=CCLW
2nd Go to Plane 
- Plane number=1
Feedrate Mode = Local Feedrate (50mm_mn)
3rd PP Word 
COOLNT/CENTER,70 4th Delay 
DELAY/ 3.000000 Spindle Dwell Time=By Time
Spindle Dwell Time (3s)
5th Go to Plane 
- Plane number=3
Feedrate Mode = Machining
6th Go to Clearance 
- Feedrate Mode = Local Feedrate (50 mm_mn
The motions are added and listed in the dialog box. -
Select the Tool tab
 and choose a tool.
Note: The following mill tools available:
and choose a tool.
Note: The following mill tools available:- Drill
- Multidiameter drill
- Spot drill
- Center drill
- Countersink
- Two sides chamfering
- Boring and chamfering
- Boring bar
- Reamer
- T-slotter
- end mill
- Face mill
- Thread mill
- Conical mill
- Counterbore
-
Select the Feeds and Speeds tab
 to specify the
feedrates and spindle speeds for the operation.
-
Select the Macros tab
 to specify the
required transition paths.
-
Click Display or
Simulate to verify the validity of the operation.
- The progress indicator appears.
- You can cancel the tool path computation at any moment before 100% completion.
-
Click OK to create the operation.
Note: If your PP table is configured with the following statement for Sequential Axial operations:
CYCLE/SEQAXIAL, %MFG_TOTAL_DEPTH, %MFG_CLEAR_TIP
A typical NC data output is as follows:
CYCLE/SEQAXIAL, 40.00000, 3.0000
For more information on the parameters available for PP word syntaxes for this type of operation, see NC_SEQAXIAL.