Analyze Sketched Geometry Using the Sketch Analysis
You can analyze sketched geometry using the Sketch Analysis.
From the Analysis section of the action bar, click Sketch Analysis.
The Sketch Analysis dialog box appears.
Note:
Some geometrical items and constraints are highlighted
so that you can see them easily. You can check and change the orientation of the profile of the sketch under analysis.
Sketch under analysis
The Geometry and the Use-edges tabs display information helping
you know whether the sketch geometry or a use-edge is valid. In the Detailed
Information table, select an item.
Notes:
When the Geometry tab is selected, you
can change the orientation of the selected output profile in a
same way as that of a sketch profile. Under
Corrective Actions, click
Reverse Orientation or click the
green color arrow in the 3D area.
You can select more than one reversible output elements from the
table.
A panel showing the previous orientation of the output profile
appears if the selected element already has a result outside the
sketch.
The orientation of an output feature, output axis, and output
plane cannot be changed. Only the output profiles publishing
curves are taken into account and multi-domain output profiles
are not considered.
Use the commands in the Corrective Actions section to resolve a geometry or a use-edge.
Select the Diagnostic tab.
The information on this tab displays a full
diagnosis of a sketch geometry. It provides:
A global analysis
of the sketch as a whole, and specifies whether individual geometrical
elements in the sketch are under-constrained (under-defined),
over-constrained (over-defined), or iso-constrained (well defined).
The type of elements listed. An element can be categorized as geometric, construction, or a constraint element.
Right-click the Point.xxx item in the sketch or from
the tree and select Point.xxx object > Fix.
Repeat this operation for the other items.
Re-open the Sketch Analysis dialog box and
select the Diagnostic tab.
You can notice that the items you fixed are now iso-constrained.
Analyze Sketch for Design Range
You can analyze if
an element in the sketch is beyond the design range of the model.
From the Analysis section of the action bar,
click
Sketch Analysis.
appears.
In the
Sketch Analysis dialog box, click the
Diagnostic tab.
A footprint of the intersection with the 3D
model limits appears in the
work area.
It is shown in red dashed line type. You can zoom in or out to view the
footprint.
Notes:
Based on the range of the sketch dimensions, you can zoom in
or zoom out to view the footprint.
The foot print can be a square, rectangle, pentagon, or a
hexagon based on the orientation of the working plane.
Under
Detailed Information, the
Scale check of each element is listed.
Scale check can be:
Valid: inside limits: For the geometric
elements within size limits and with correct positioning.
Invalid: exceeds limits: For the
geometric elements beyond the size limits of the design range. It is also
applicable for elements which are positioned so far from the origin that they
fall outside the footprint. If you exit
Sketcher,
without scaling down these elements within the size limits of the model, a
warning message appears in 3D prompting the same.
Ignored: not applicable: For the
elements that do not appear in 3D such as construction elements, or
constraints.
???: For the elements whose status
cannot be computed. This is an undesirable status.
 .The Sketch Analysis dialog box appears.Note: Some geometrical items and constraints are highlighted so that you can see them easily. You can check and change the orientation of the profile of the sketch under analysis.
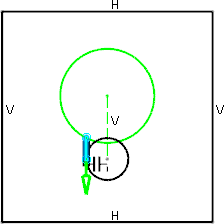
 color arrow in the 3D area.