Creating a User Group

You can create as many user groups that you can reuse in any 3DEXPERIENCE Platform user-group compatible app.

Note: By default, the My Groups node is selected on the left pane.
If you have access to several platforms, and you want to create the group in a different platform, on the left pane, select Platforms > Your Desired Platform.


Before you begin: See User Groups Roles and Access Rights
Note: By default, the My Groups node is selected on the left pane.
See Also
Adding Members to a User Group
Editing a User Group
Creating and Updating User Groups through a File Import
Searching for User Groups and Users
  1. In the User Groups dashboard app, click + Group.


    Important: By default, the group is private. Private groups cannot be seen by the members of the group.
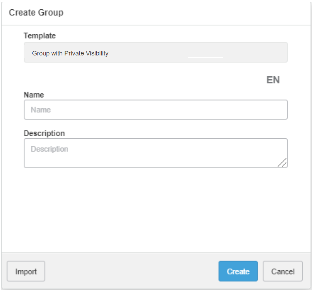
  2. Enter a name and a description.

    • English - EN - is the language applied by default. The name and description user group's values are linked to the given language. You can select another language afterwards to link both a different name and description to the user group. If you change your 3DEXPERIENCE language preferences, for example to French, and have modified the name and description of a group for this language, the French name and description will be displayed for this group all over the 3DEXPERIENCE platform.
    • The name of the user group must contain between 3 and 128 alphanumeric characters.
    • The description is optional.

  3. Click Create.

The user group is created, and made available to any user-group compatible app.

Important:
  • The group will be kept as private unless you change this setting in the Properties tab.
  • Only platform administrators and the group owner can access the group.
  • If you use a private group to add members to an app, they will not be aware that they are members of that group.