Add and configure your form composite widget on a page
Once your composite widget is saved, close the Widget properties panel to return to the main Design view.
Select the page on which you want to add your composite widget.
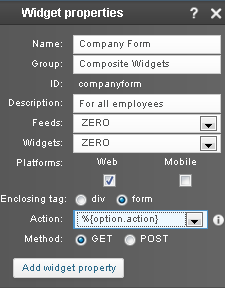
From the Widgets > Composite Widgets group, select your Company Form composite widget, and drag and drop it on the canvas.
From its properties panel, select the page that will display the search results of your form from the Action property.
Select the Feeds view and edit the feed called by the composite widget to define the behavior of the query so as to search after the start date and before the end date delimited by the two datepickers.
Select the feed called by the widget and expand the Advanced parameters section.
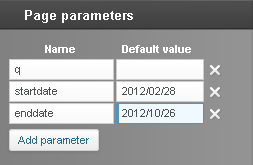
In the Query restrictions field, restrict the query to use the span of time between
your startdate and enddate datepickers:
after:${page.params["startdate"]}before:${page.params["enddate"]}
From the Page parameters panel create two page parameters for startdate and enddate and choose their default values. The time format of these dates is YYYY/MM/dd.
Select the Preview to check your configuration changes.
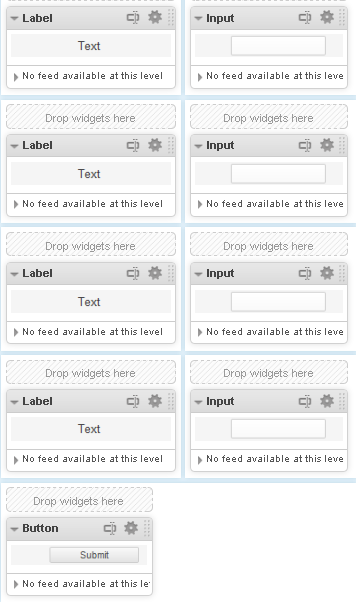
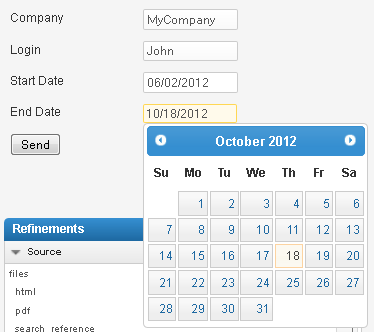
You should now see the composite widget on your Mashup Builder page, and be able to complete the form.
See Figure 1.
You can use the datepickers to filter the search results.
Click Apply.
Form composite widget to refine the page results
Link addresses to static Google Maps
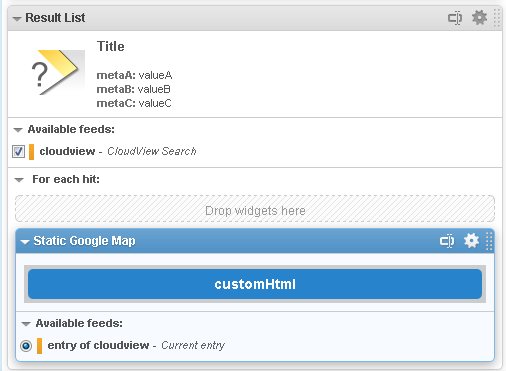
The following use case describes how to proceed if you want to link postal addresses to static Google Maps in a result list. Each address will be displayed as both text and image, as shown in .
Create a composite widget linking addresses to static images
Before you begin: This example requires that an address meta is defined in your data model.
In Mashup Builder, select a page, for example /search, and select the Design view.
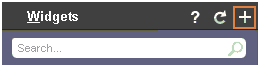
In the Widgets panel header, click the + sign.
In the Widgets properties panel:
Fill in the Name field, for example Static Google Map.
Enter a description (optional).
For Feeds, define how the widget supports feeds by selecting a cardinality, for example ONE.
Select the platforms for which the composite widget will be available, for example WEB.
>For Enclosing tag, select the type of enclosing tag used by the widget, for example div.
Click Add widget property and create the three following properties in the General tab.
Property
Options to configure
Address
Id: address
Name: Address
Arity: ONE
Description: Meta(s) containing the address to position the marker
Is evaluated
Check functions: isEmpty()
Context menu functions: Metas()
Display functions: SetType('code', 'js')
Height
Id: height
Name: Heigth
Arity: ONE
Description: map height (in pixels but without px extension)
Check functions: isInteger()
Display functions: SetType('number')
Width
Id: width
Name: Width
Arity: ONE
Description: map width (in pixels but without px extension)
Check functions: isInteger()
Display functions: SetType('number')
From the Widgets panel, drag and drop an HTML widget.
Variables made with the custom properties created in step 4 (option.width, option.height, option.address). They are used to configure the width and height of the image, and the address display in the widget.
A call to the Google Maps api.
A command to center the address in the static map.
A command to add a blue marker to flag the address in the static map.
Add and configure the static Google Map composite widget
We are now going to add the composite widget within the Result List widget to get one image per result. If you do not nest the composite widget within the Result List widget, you will get an image for the first result only.
Once your composite widget is saved, close the Widget properties panel to return to the main Design view.
Select the page on which you want to add your composite widget, for example search.
From the Widgets > Composite Widgets group, select your composite widget Static Google Map, and drag and drop it within the Result List widget.
Click the widget header to open its properties panel, and for the Address property, enter: ${entry.metas['address']} to link the widget to the address meta of the Result List widget.
Select the Preview to check your configuration changes.
You should now see the composite widget as it will be displayed on your Mashup Builder page. Each result in the result list displays the postal address as test and the location of this address on a static Google Map.