What Is a Track?
A Track is the route taken by an object. It is typically used to specify how
a product is to be assembled and disassembled. No resources are defined to make the
product move along the Track: it is an abstract motion. A Track has a duration and
speed at which the object travels.
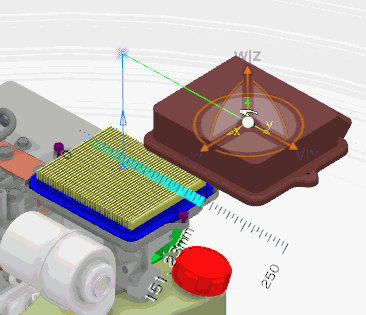
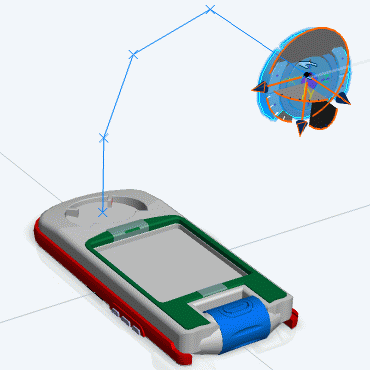
The path taken by the object is its trajectory. You define a trajectory by moving the object
through space and recording Trajectory points (also called T-Points). A trajectory
segment is interpolated between each T-Point. The trajectory comprises trajectory
segments and points. When you create a nonkinematic Track, a trace of the trajectory
appears on the 3D data.
Positions in the Track are defined with respect to the moving object's coordinates. If a Track
is defined for a part and the part position is modified in the product definition,
the Track is updated accordingly and therefore remains consistent.
When you are creating or modifying a Track, the Track Authoring
context toolbar provides you with the commands required for the task. While you are working on
Tracks, remember that what you are modifying is generally the Trajectory points that
define the shape of the Track through space. When you click:
- Record
 , you record the position and orientation of a
T-Point. , you record the position and orientation of a
T-Point.
- Modify
 , you modify either the position or orientation of a
T-Point. , you modify either the position or orientation of a
T-Point.
- Delete
 , you delete a T-Point. , you delete a T-Point.
Each Track also has a direction, which you determine as you create the Track. You can observe
the reverse movement of the Track using Play Backward
 on the Experience Player that
appears whenever you create or modify the Track. However, playing the Track backward
does not reverse the Track's definition. To do this, use the Reverse
Track command. on the Experience Player that
appears whenever you create or modify the Track. However, playing the Track backward
does not reverse the Track's definition. To do this, use the Reverse
Track command.
First Selected Object and Track Type
The type of Track to be created is determined by the first object to move that is
selected.
Tracks are created using New
Track
 in
the action bar. in
the action bar.
| First selected object |
Selection done in |
Type of Track created |
Location of created Track |
| Product |
Tree or work area
|
Product Track |
Excitations
|
| Resource (other than an organizational resource) |
Tree or work area
|
Product Track |
Excitations |
| Manufactured item |
Tree |
Manufactured item Track |
Excitations |
| Operation |
Tree |
Track under operation |
Selected operation |
| Organizational resource |
Tree |
Track under resource |
Selected organizational resource |
Track Interpolation Modes
The interpolation mode of a Track is specified by selecting Linear, Spline, or
Composite Spline interpolation in the Track Authoring dialog
box.
Linear Interpolation Mode
In Linear interpolation mode, the Track is created by means of linear
segments that pass through the selected T-Points. This is the default mode.
Spline Interpolation Mode
In Spline interpolation mode, the Track is created by means of an
interpolated spline curve that passes through the selected T-Points. Tangential
continuity is kept at each point where there is a change of direction. For more
information, see Create a Track with Spline Interpolation.

Composite Spline Interpolation Mode
In Composite Spline interpolation mode, the Track is created by means
of linear segments and splines curve sections that pass through the selected
T-Points. This occurs if there is no change of direction between two points a
linear segment is created. If there is a change of direction, tangential
continuity is kept at each point and a spline curve section is created. For more
information, see Create a Track with Composite Spline Interpolation.

Track Speed and Time
Each Track definition is not just a path an object takes through space, it
also involves a time duration, and a speed at which the object travels.
When you create or modify a Track, the Track Authoring dialog box
appears.
In the dialog box, you can either designate a Time or a
Speed for the Track. If you enter a time value, the
length of the Track determines the speed. If you enter a speed value, the length of
the Track determines the time.
The default Speed and Time values are
specify in the
Trajectory tab.
By default, a Track's T-Points are distributed based on the Track segment size so that the
speed remains consistent.
In the TPoints Reorder tab of the dialog box, you can edit the
Time and Cumulative Time values
for T-Points.

Time is the time from the previous T-Point. Cumulative
Time is the time from the first T-Point. You can modify a time
directly in the corresponding cell in the list editor. However, you cannot modify
the first and last T-Point times.
Track Operators
One way of creating a new Track is to run operations called Track operators.
The original Track is considered the input specification for the operation, and the
output is a new Track, which is considered a result.
If you modify the original Track (because of design or packaging changes), you can update the
resulting Track by right-clicking the Track and selecting Update Track
Position.
Note:
Update Track Position is not available for Tracks under operation.
Some Track operators are logged using a history displayed in the specification tree. The
original Track is considered a specification. Track operators are applied to this
initial Track. The new Track defined is the final result. This is displayed in the specification tree
and in the geometry area.
The original Tracks are hidden on the geometry. That is, they are visible in no-show space.
They are, however, displayed in the specification tree.
When you perform Track operations on a Track, the operations cannot be exported or imported.
Tracks Using Resources
Links can be created from operation to resources to specify Tracks.
Using Resources for Tracks on Operations
You can:
- Select only resources defined for the operation
- Set a resource as moving object for an existing Track
- Create Tracks for resources
- Define a sequence between Tracks
- Allow using the links from an operation to New resources (added as
implemented resources to the same operation) to specify or edit Tracks.
You can multiselect products for a Track in a resource context, and use the
Ctrl and Shift keys to help
with your selections.
Track Under Resources
You can select used resources only if they are within the context of the Track: that is, if
the selected used resources are directly or indirectly under the organizational
resource in which the Track is being defined.
You can select any available product in the session.
If the edited Track moves any used resources that are not in the context of the Track, an
information message appears to specify these resources. Remove these resources
to redefine the Track properly.
The Mirror, Split, and Join Track operators can be applied only if all the moving used
resources are valid. That is, in the context of the Track.
If the Track moves any used resources that are not in the context of the Track, then an
information message is issued specifying these resources. Remove these resources
and apply the required operator on the Track.
Track Simulation and Validation
Tracks can be simulated and validated.
You can simulate a Track using the dedicated player. See Players. You can also generate an animation file in AVI format.
You can validate your Track, verify interferences, and calculate the distance specification
using Clash Detection
 from the
action bar. from the
action bar.
Product and Resource Identification During Simulation
You can select a product or resource during Track authoring and simulation.
You can select an object by pausing the simulation. While still in the simulation
context, you can select an object in the 3D or the tree. The corresponding
object is highlighted in the tree and 3D.
When you right-click a product or resource when the simulation is paused, a
context menu containing Center Tree, Reframe
On, Hide/Show and
Properties commands is available on the selected
object.
When the context menu is accessed on an object, the object is not highlighted
directly. First select the object and then access the context menu by
right-clicking.
Once the simulation is restarted, the selected objects are no longer highlighted.
This behavior is available on Product, Operation, Resource, and Manufactured item Tracks.
It is also possible to select objects and use the context menu while playing a
Manufacturing Scenario or a Result of a Scenario.
Role of Rotation in Track Simulation
A 180 degree rotation can be used in Track simulation.
When simulating a rotation, products are always rotated by the minimum possible angle between
two consecutive T-Points.
When you use the Robot to rotate a part 180 degrees between T-Points, the direction of
rotation might not be consistent on consecutive rotations. The direction of
rotation can be either positive or negative.
Once a Track is created for a 180 degree rotation, the direction of rotation is consistent on
consecutive replays of the Track.
Cut, Copy, and Paste Rules for Tracks
Both assembly and kinematic Tracks can be cut, copied, or pasted in a
manufactured item.
Assembly and kinematic Tracks can be cut, copied, or pasted in the following scenarios:
- Work plan mode: under an operation
- Work plan mode: under an operation and using resources
- Work plan mode: under a resource
- In 3D Simulation: defined under the operations inside the PPR context.
Pasting a Track creates a new Track; the copied or cut Track is not changed. Tracks of the
same type can be pasted on each other. A kinematic Track can be pasted on an
assembly Track and vice versa if the paste adheres to product build-up rules. During
simulations, pasted Tracks behave identically to the Track from which they were
copied. The product positions of the pasted Track are not be automatically
sequenced. Tracks can be copied or cut and then pasted:
- On the same operation
- On a different operation if the manufactured item that is being moved by the
Track is in the product build-up
- Across systems if the manufactured item that is being moved by the Track is
in the product build-up and there is a system precedence link between
systems
- On the same operation that has a resource assigned, if the resource is also
assigned to the Track.
App Transition by Double-Clicking a Track
You can switch to the Assembly Evaluation app and the 3D Simulation environment from another app when you double-click a
Track.
This is particularly useful when you need to work on Tracks while
in the middle of a workflow.
If the current app is already set to Assembly Evaluation but the 3D Simulation environment is not activated, the 3D
Simulation environment is activated when you double-click a Track.
If the app is set to Assembly Evaluation and 3D Simulation environment is activated, the Track
Authoring panel is displayed for editing the Track.
App transition and environment activation are available by double-clicking all types of
fitting Tracks (MSR Track, Track under operation, Track under resource, and Track
for manufactured item) and kinematic Tracks.
|
