About Working with Context Toolbars

This section deals with basic concepts you should know before using the context toolbar.

A context toolbar is a smart toolbar that appears when you select geometry and contains only those tools that can be applied to the current selection. It allows you to create geometry and manipulate directly your 3D model.

This page discusses:

Concept of context toolbars

The context toolbar is based on the following concepts:

  • Using the Robot to perform manipulations on objects.

    For more information about the Robot, see 3DEXPERIENCE Platform: Native Apps Common Services: User Interface: About the Robot and 3DEXPERIENCE Native Apps: Native Apps Common Services: User Interface: Using the Robot.

  • Performing geometrical operations using commands directly accessible via the context toolbar.
  • Using immersive Navigation.

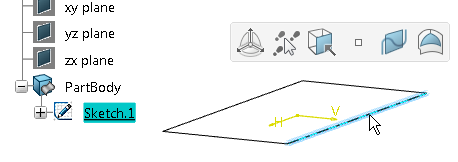
Important: When carrying out a command from the context toolbar, please note that if you select in the work area input geometry consisting of several sub-elements (for example a sketch to create a Fill surface, see figure below), the complete geometry is taken into account for the result computation, but only the selected sub-element is highlighted.

Robot context toolbar

When the Robot is attached to the selected geometry, a context toolbar appears containing options related to the Robot 's behavior and dispatched in option families.

The Robot context toolbar content depends on the selected geometry and on the currently selected options.

Copilot

The copilot is a Robot feature allowing you to interact with geometry during manipulations.

When manipulating the Robot, constraints (for example the Up-to element option available in commands using elements as limits) are automatically detected and indicated by graphic symbols. Once the Robot has successfully detected a constraint, the manipulated geometry snaps onto it and the ruler is hidden.

As snapping elements can be detected infinite planes, surfaces, and faces of solids or volumes.

Important: The following conditions must be met to detect a snapping element:
  • The element must be visible.
  • It must be located in the current representation.
  • It must intersect the current manipulated axis of the Robot.

For a solid or volume, several faces can be detected as snapping elements depending on the number of intersections.

During the edition with Navigate and edit parameters , the detection symbol is displayed and you can manipulate the corresponding Robot axis.

Tip: During the manipulation, you can deactivate the automatic detection temporarily by pressing the Shift key.

For an example, see Extrapolate a Curve Up to an Element and Creating and Manipulating Geometry.

Command behavior

The commands accessible from the Robot or the context toolbar have specific behaviors compared to the classic commands launched via the action bar:

  • They include only the mandatory inputs. No dialog box for advanced options is provided. However, you still open a dialog box by double-clicking the geometry or the icon in the tree.
  • Some of these commands provide immersive widgets.
  • They provide immersive parametric edition (For more information, see Navigating Through the Feature Structure and Editing Parameters).
  • They provide an automatic validation mechanism:
    • Cancel: Press the Esc to cancel the command. The feature under creation is rolled back.
    • Validate:
      • To validate a command, click when the validation pointer appears.
        Tips:
        • The validation cursor appears when the mouse pointer is over an element which does not belong to the current created feature or when the mouse pointer is over the background.
        • To create a feature with the last created feature as input, press Ctrl to keep the currently selected feature.
      • Press Enter or Space to validate the command and attach the Robot to the created feature if the Robot was attached to the geometry.

Customization of the context toolbar

You can customize the context toolbar in Me > Preferences > Context Toolbar.

In the Customize context toolbar dialog box you can:

  • Activate and deactivate the display of the context toolbar by selecting or clearing the Display contextual toolbar option
  • Activate and deactivate the availability of commands in the context toolbar by selecting or clearing the corresponding option in the Components frame.
  • Change the order of the icons in the context toolbar by moving the items in the list.