Use case - Analysis

OnePart Reduce allows you to perform an analysis on your parts. This use case uses a cost analysis example on an assembly using the Assembly analysis universe but you can perform:

  • Assembly analysis - to compare all the parts of this assembly to all the parts of a selected scopes to help you see if parts should be replaced depending on your criteria (price, similarity, etc…)
  • List analysis - to compare two list of parts

PROBLEM: I want to know if some parts should be replaced in my assembly. I want analyze an assembly to optimize my costs. It is useful to optimize the cost in terms of:

  • production: I need to use standard parts instead of a new designed one
  • procurement: I need to pay the best price for all the parts needed

SOLUTION: You can analyze an assembly by creating universes.

NOTE: When analyzing the clusters, you can take into account how many times the part is used in the assembly to view the true cost estimation.

This task shows you how to:

Create your Universe

The following procedure uses the Assembly analysis universe to perform cost analysis of the demo Skate assembly.

Before you begin: We recommend that you choose a large assembly that contains many parts. This procedure details the analysis of the demo Buggy assembly.

Context:

For details, see Import the cost analysis data

  1. Click Create Universe and enter a unique universe name.
    For example, Optimize my costs.
  2. Select the Universe type to create.
    For example, select Assembly analysis to check if parts can be replaced by cheaper ones.
  3. Click Define scope.
    1. For assembly analysis, you need to select one assembly at a time.
    2. Click on Buggy.CATProduct.

      The product details display in the right panel.
    3. Click OK to validate the selected assembly.
  4. Select a set of parts that will be compared against the selected assembly parts. For this example, use ALL the parts.
    1. Click the tag icon to expand the filters panel if needed.
    2. Apply the filters to define the scope you need.
    3. Click OK to validate this second part selection.
  5. Set the Clustering parameters if required.
    For this example, we'll use the default options.
  6. Click Run to perform the clustering.
    This compares all the parts of this universe scope with the parts of the assembly.
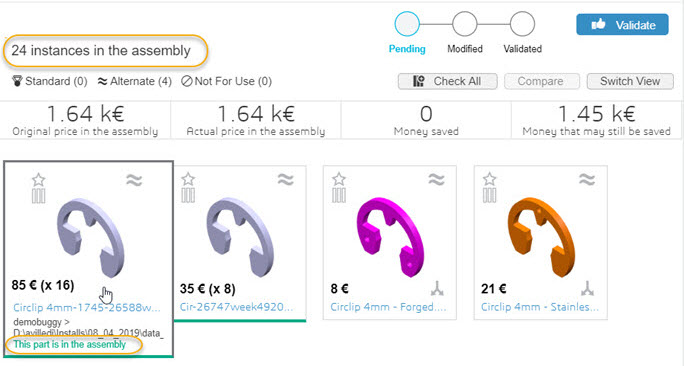
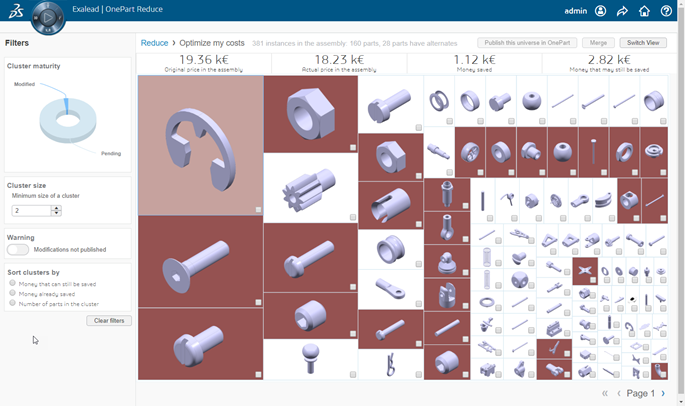
  7. The 1st level of clustering results display in the Cluster Dashboard.

    For example, the dashboard below shows that my universe has 381 instances in this assembly. However, there are 28 parts that may be replaced.

  8. Click the universe link.
    For example, Optimize my costs, to access the Universe Clusters Overview.
  9. The next step is to analyze the clusters.

Analyze Clusters

Here we find a summary of the cost analysis in the header. You see below that the price of the assembly is 19360€ and 4000€ can still be saved.

  1. Click on the largest cluster. For example, click on the circlip cluster with 4 parts in the cluster.


  2. For more details on this view, see Understanding the Universe Clusters Overview.
  3. Next step, is to Compare & Qualify.

Compare & Qualify

Here you need to choose which part should be kept as the standard, and all the others should be tagged as alternates. The number of instances in the assembly displays. The parts used in the assembly are marked "This part is in the assembly" in green.

Context:

Note:
In the example, there are 24 instances of this part in the assembly. There are 16 parts at 85€ and 8 parts at 35€. The sum of these equals 1640€.

  1. Select the parts with the Add to compare icon and click Compare to compare the part attributes. For details, see Comparing parts.

    • Since these parts have 100% similarity, the part choice is obvious at 35€ vs 85€.
    • Click Close when you're finished comparing.
  2. Tag the 35€ part as the standard using the icon. See also Editing Clusters.

  3. Click the icon to set parts as an alternate if needed.
  4. Click the universe link to go back to the Universe Clusters Overview. For example, click on Optimize my costs.

    You can see that the circlip cluster is still brown which means that you can still optimize costs.

  5. Repeat the Analyze Clusters steps to fully optimize your costs.
  6. When you are finished with this process, click Publish this universe in OnePart.
    This publishes the clusters with the status Validated; see Cluster Status.
  7. You can go back to the cluster to edit it if needed:
    1. Click Publish if you need to update the cluster.
    2. Click Unpublish if you need to unpublish the cluster.