What is OnePart Reduce?
In addition to exploring data in standard
NETVIBES
OnePart
interfaces,
OnePart
Reduce allows you to:
How to access OnePart Reduce
This section details how to access
OnePart
Reduce. A dedicated
OnePart
Reduce home page is available from the home menu.

OnePart
Reduce requires a special
license. Users that have the proper rights and license can
access Reduce from the
OnePart
UI as follows:
- Open
OnePart
in your web browser at
http://<ONEPART_SERVERNAME>:<BASEPORT>/reduce
- For example,
http://localhost:10000/reduce
- Log in to
OnePart.
You can either:
- Enter your local
Windows user name and password. OR
- Enter the demo login
User:
user1 and Password:
user1
Note:
The
OnePart
Reduce user must have access to all the files for clustering.
- This brings you to the
OnePart
Reduce home page.
Limited version
A limited version of
OnePart
Reduce includes a 2-user license and 15,000 imported items but does NOT include
the publishing feature. Users can only view 1 out of 4 Clusters. Note that this
evaluation mode is not available in the 3DDashboard.
It is available with
OnePart
Standard at:
http://<ONEPART_SERVERNAME>:<BASEPORT>/reduce
For more details, see
Reduce evaluation mode
Document tokens
This section details how
OnePart
counts the document tokens.
The number of documents that can be processed in
OnePart
Reduce is restricted. To know how many documents you can use in Reduce, divide
the "onepart.reduce.tokens" license feature value (default is 900) by the value
of the "indexing.costs.business-item" license feature (default value is 0.06).
So, by default, you can reduce 900/0.06 = 15000 documents.
Each document is counted only once (based on its URI) even if it is
used in several universes. Even if you delete the universes containing a
document, it will still be counted forever. When building a new universe, only
new documents (never used in another universe) will be counted. It means that,
even if there are no more reduce document tokens, you can still use
OnePart
Reduce.
When the limit is reached, some documents of the scope may be ignored.
A warning ("i" icon turns red) on the universe will inform you of this.
Use case
Let's see how document tokens are counted. Consider that
the licence we have authorized 15000 documents.
- We create a first
universe A1 with 10000 documents, it will consume 10000 docs in Reduce (still
5000 available)
- We create a second
universe A2 with the exact same 10000 documents (with different parameters), it
will not consume anymore docs (still 5000 available).
- We create a third
universe B with 3000 docs and within this 3000 docs there are 2000 docs that
are in universe A1 (and A2); in this case it will consume 1000 docs (4000
available).
- We create a fourth
universe C with 7000 docs ( 2000 of these docs are in A1, A2 or B); in this
case it would consume 5000 new docs but you just have only 4000 available.
There fore in the universe only 6000 docs will be processed and 1000 will be
ignored and mentioned in the details of the universe.
Common terms used
Below are common terms used in
OnePart
Reduce.
- Cluster
is a group of similar parts.
- Standard/alternate parts -
in the standardization process, you define the
Standard parts for each cluster. All other
parts in the cluster are tagged as
Alternates when published.
- Universe is a group of
clusters.
- Facets are used to narrow
search results. Use them to drill-down into an area, such as language, author,
or file type.
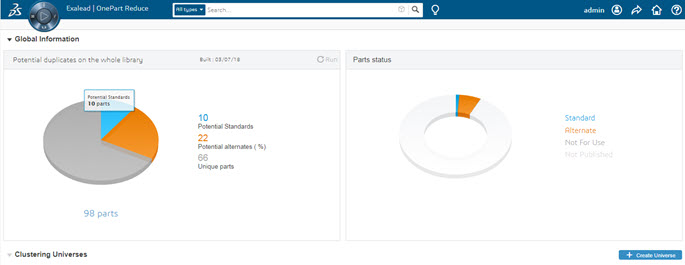
Understanding the Reduce homepage
From the
OnePart
Reduce homepage, you can see the work done in a universe and the stats on all
the data published in
OnePart.
| No.
|
Section
|
Detail
|
| 1
|
Universe statistics
|
Displays statistics of potential duplicates
on the entire dataset.
|
| 2
|
Run button
|
Click this button to compute clustering on
the entire dataset.
|
| 3
|
Parts status
|
Displays statistics by parts status including those parts
flagged as masters, duplicates, unique or not yet published.
|
|
4
|
Create universe button
|
Click to create the following universe types:
1. Standardization - Eliminate
duplicate parts by setting the standards in the universe; add classification -
see
Use case - Standardization
2. Analysis - You can either analyze:
- an assembly to
check if some parts could be replaced - see
Use case - Analysis
- 2 lists of parts
to check if some parts could be replaced
See
Clustering parameters
for the universes
|
| 5
|
Cluster dashboard
|
See
Cluster Dashboard
|
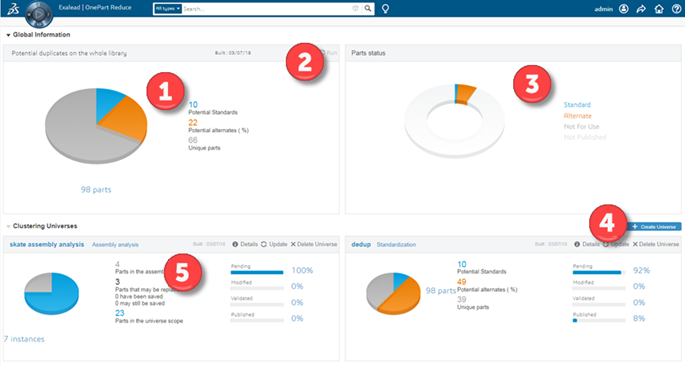
Cluster Dashboard
Cluster dashboard details for
OnePart
Reduce are below.
|
No.
|
Section
|
Detail
|
|
1
|
Universe link
|
Brings you to the
Universe Clusters Overview.
See
Understanding the Universe Clusters Overview
|
| 2
|
Information button
|
Click this icon to see the detailed
parameters of the universe including a link for the defined universe scope and
related links.
|
| 3
|
Update button
|
Updates the universe clusters with new
parts within the scope now available in the
OnePart
index.
Note:
You cannot update a universe if there are published
clusters with pending modifications
|
|
4
|
Delete button
|
This deletes the universe and all the
annotations done in this universe will be unpublished in
OnePart.
|
| 5
|
Stats chart
|
Related statistics display here.
For example, the potential alternates parts in this
universe.
|
| 6
|
Cluster status
|
See
Cluster Status.
|
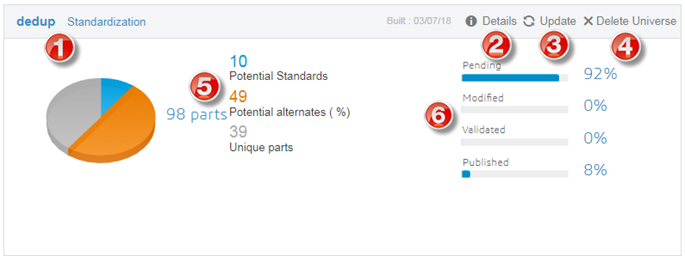
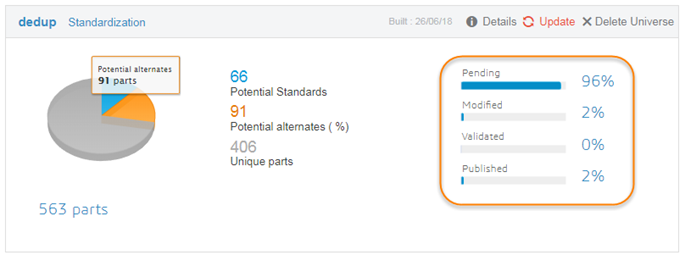
Cluster Status
The cluster lifecycle in
OnePart
Reduce contains 4 stages detailed below. Status percentages display for the
universe clusters.
-
Pending - these are the clusters pending
modifications
-
Modified - these cluster has been modified
-
Validated - when the user clicks “Validated”
-
Published - After a cluster has been
published, it can be updated by clicking
Publish again or it can be unpublished
For example, only 2% of my part library is published and 96% is
waiting for review. See also
Editing Clusters.
Clustering parameters
When creating a universe in
OnePart
Reduce, you must set the clustering parameters. These determine how to split
the clusters, set display attributes.

| No.
|
Section
|
Detail
|
| 1
|
Similarity inside a
cluster
|
Determines the shape similarity
strictness. By default, the slider is set to « medium ». This creates the
clusters based on shape.
Note:
If you select a "Fuzzy" clustering you might get only
partial similarity between the parts.
|
| 2
|
Taxonomy used for
Categorization
|
You can select a CSV file to apply a
taxonomy used for the categorization universes. See
Set up Taxonomy
|
| 3
|
Sub-clustering by
attributes
|
To split the shape clusters by either
Material or
Size:
- It can be text
(like
Material) or it can be numerical
values (like
Size).
- For numerical
values, a threshold can be set (in absolute value or in %).
For example, to create clusters based only on shape,
disable the
Size attribute.
Note:
If certain parts in the cluster have no material
value, Reduce will create an additional cluster.
|
| 4
|
Warning attributes in
clusters
|
You can setup warnings on clusters by attributes
- see
Set up Cluster warnings
|
Understanding the Universe Clusters Overview
For each universe, an overview page is available showing the
clusters for the scope selection.
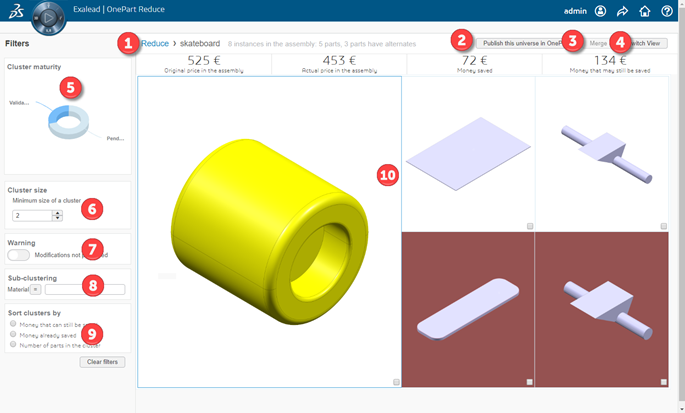
| No.
|
Section
|
Detail
|
| 1
|
Cluster title
|
The cluster name and number of clusters
found.
|
| 2
|
Publish
this universe in
OnePart
|
Publish all the clusters at once with the
Validated status in
OnePart.
|
| 3
|
Merge button
|
Merge the selected clusters using the check
boxes.
|
| 4
|
Switch view
|
Switch to table view. For standardization
universes, you can add classification to multiple parts directly in the table
view.
|
|
5
|
Cluster maturity
|
Filter the universe clusters based on status. See also
Cluster Status.
|
| 6
|
Cluster size
|
Filter the clusters based on the minimum cluster size.
|
| 7
|
Warning
|
Filter the clusters by warnings,
Classification, or by
custom attributes.
|
| 8
|
Sub-clustering
|
Filter by sub-clustering attributes such as
Material.
|
| 9
|
Sort clusters by
|
For the Assembly analysis universe type, you can sort by the
number of instances in the assembly.
For all clusters, you can sort by the number of parts in a
cluster.
|
| 10
|
Cluster display
|
You can analyze the Universe clusters displayed here. By
clicking on a cluster, you can explore it.
|
Editing Clusters
In an
Standardization universe, you can choose which
part should be kept as the standard, and all the others should be tagged as
alternates or "not to be used".
You can also add classification in this page.
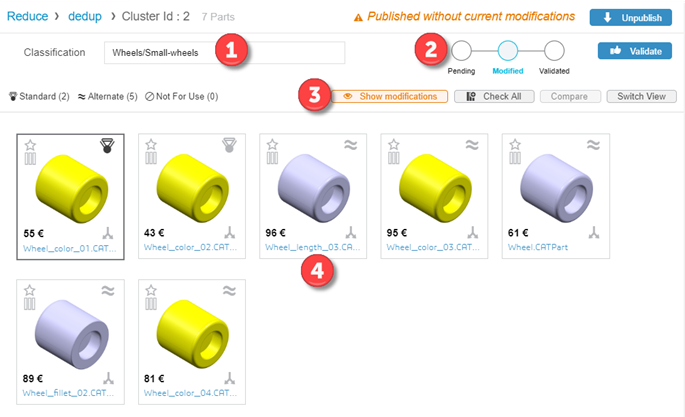
Use this area to:
| No.
|
Section
|
Detail
|
| 1
|
Classification
|
In a standardization universe, you can add
classification names to the parts in the cluster. You can add as many
sub-classification as you want. Enter
Classification/SubClassification. For example,
Wheels/Small-wheels. See
Use case - Standardization
|
| 2
|
Cluster lifecycle +
Publish button
|
This is the cluster lifecycle and publish the clusters with
the “Validated” status in
OnePart.
|
| 3
|
Cluster toolbar
|
Buttons include:
|
| 4
|
Cluster parts
|
Displays all the parts in current cluster.
You can:
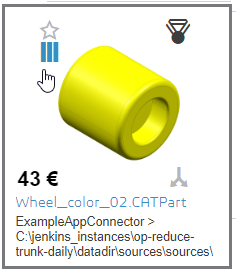
-
Tag a part as the standard with the
 icon. icon.
The last part selected as a standard is used as the
reference item and displays bold. The reference items is used for the 3D
similarity comparison and displayed as the main cluster part.
-
Tag alternate parts with the
 icon. icon.
-
Tag parts that should not be used with the
 icon. icon.
- Tag parts to be
compared with the
 icon. icon.
-
Bookmark parts for later with the
 icon. icon.
See also
Merging clusters
and
Split
cluster
|
Using the Table view
OnePart
Reduce provides a table view of the parts in the cluster.
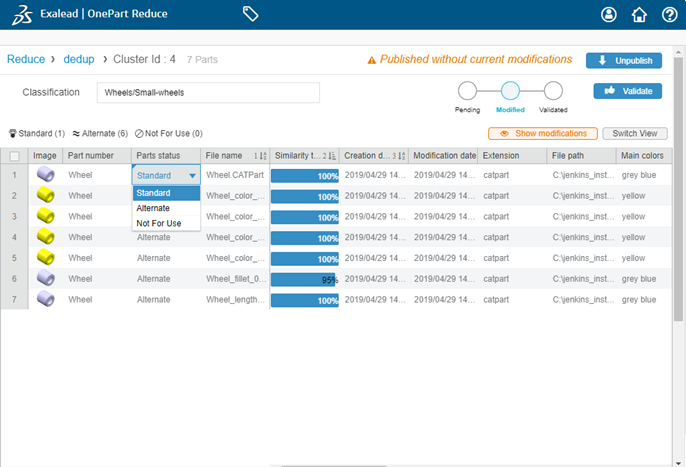
The table allows you to:
- Set parts as standards,
alternates or not for use
- Pin columns to the left or
right; Right-click on the column to pin it
- Sort part by columns; Ctrl
+ Click to select multiple columns in the order you need
- Select the columns to
display
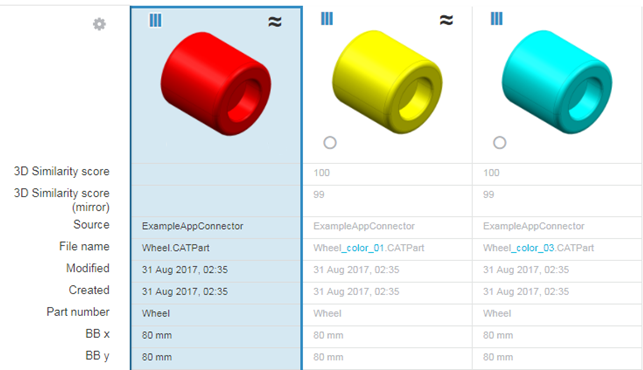
Comparing parts
You can compare the part’s attributes to help you make the right
business decision.
OnePart
Reduce provides 2D comparison.
Note:
As of
OnePart
R2019x FD03, the 3D Compare feature providing an exact 3D comparison for 2
selected parts is deprecated. You can still enable the feature from the Mashup
Builder page with the proper license.
The standard
OnePart
2D compare is available for 3 or more parts.
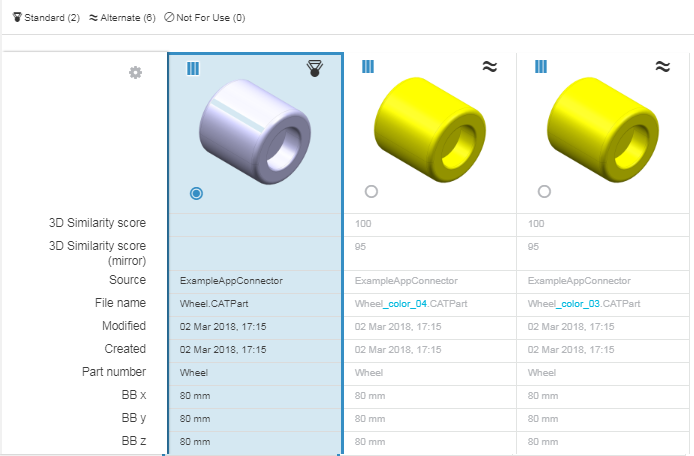
You can compare parts as follows. For example, let's take a look at
the demo skateboard assembly.
- Click
Check All or hover over each part and click
to compare.
- Click
Compare to view the part’s attributes.
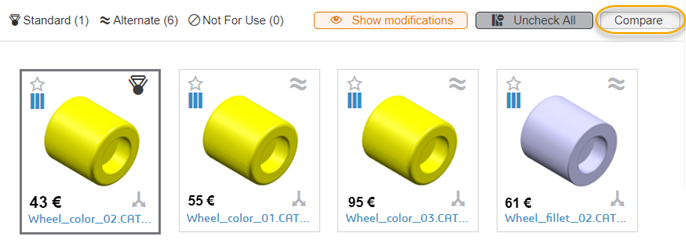
- Examine the part’s
attributes to help you make the business decision. Differences display in red.
Splitting parts from cluster
OnePart
Reduce allows you to split parts from In this cluster.
For example, you might want only want the gray CAMs so you can split
the two pink ones from the cluster. For assembly analysis, note that you cannot
split parts from the cluster that are in the current assembly instance.
- Click
on the parts to split.
- Click the blue
Split parts button to split the parts from the
cluster.

Merging clusters
OnePart
Reduce allows you to merger clusters that display In other similar
clusters with the parts In this cluster.
The number in the blue square represents the number of parts
in the cluster. When you merge, it will automatically add all the parts from
the selected clusters to the current cluster. By clicking on the image, you can
open the cluster to analyze it here. The similarity rules used are those
defined in the user preferences. You can edit the
3D similarity preferences to directly view more or
fewer clusters.
- Click
 on the cluster to merge. on the cluster to merge.
- Click the blue
Merge clusters button to merge the 2 clusters.
- Now you can tag the parts
just added - see
Editing Clusters

|