From the
Detail section of the
action bar,
click
Scallop on Panel and Plate.
The
Scallop dialog box appears.
In the
Applied on box, select a panel or a plate on
which scallops are to be created.
You can select multiple panels and plates.
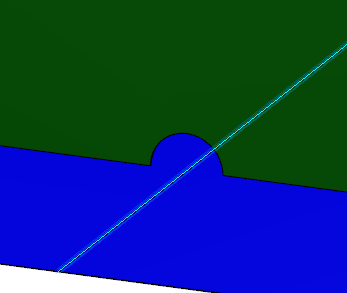
The possible corners on which the scallops can be created,
are listed in the dialog box. The corners are highlighted in the
3D area.
The
Type column lists the type of positioning
strategy.
Select the required rows and click
Create Scallop.
In the
Scallop Definition dialog box, define the
scallop parameters.
From the
Category list, select the category for
scallop.
If no dictionary is set in
Data Setup,
only the default category is available.
Optional:
Clear the
Automatic check box and type the required
name in the
Name box.
Note:
If a naming action rule is set in Rules Catalog or
Rules Library in Data Setup, and the
Automatic check box is selected, the
structural object is named automatically according to naming action
rule. For more information, see Action Rule for Naming.
Under
Position Strategy, select two limits.
By default, the scallop positioning type is
Limit/Limit. If you do not select any row,
the scallop is created with the
Limit/Offset positioning strategy.
Select the contour type and contour name in the respective
lists.
Note:
The snipe and clearance types are available only for the
Limit/Limit position strategy.
The Parameters area displays the
contour parameters and a bitmap image of the contour.
Note:
If
no opening table is defined in the Resources Catalog or
the Resources Library resource, specified in Data Setup, the Type list
becomes unavailable. But, you can still create the catalog, snipe, and clearance
type scallops by clicking More... in the
Name list and:
Selecting the required opening reference from the catalog or library, if
the Structure Reference Catalog or the
Structure Reference Library resource is
specified in Data Setup.
Searching the required opening reference in the database, if no
Structure Reference Catalog or
Structure Reference Library resource is
specified in Data Setup.
Click
Apply to apply the inputs.
Click
OK to save the applied inputs.
The scallop parameters are defined. The contour type and
contour name of the scallops are displayed in the respective columns of the
Scallop dialog box. The scallops are created.
Scallop on Corner
Scallop on Edge
Tip:
To create a scallop at the edge of a panel or plate by selecting split line of
the seamed panel, you need to select the edge of the split plate as a
Reference.
After
creating the scallop, if you modify the definition of the seam, the scallop is
not updated automatically.
 .
The Scallop dialog box appears.
.
The Scallop dialog box appears.