You can create slots
and collars on panels, plates, and stiffeners for the free passage of
stiffeners.
A set of standard slots is defined in the slot
table assigned in
Data Setup.
Before you begin: Open a structure to create the slots and
collars. The structure must contain penetrated elements (panels, plates, or
stiffeners) and penetrating elements (stiffeners).
From the
Detail section of the
action bar,
click
Slot.
The
Slot panel appears.
In the
Penetrated Element box, select a panel, a
plate, or a stiffener.
You can select multiple penetrated elements.
In the
Penetrating Element box, select a stiffener.
You can select multiple stiffeners.
New rows are added for all intersections and the selected
elements appear in the
Penetrated Element and
Penetrating Element columns.
Select the rows and click
Define/Edit Slot.
In the
Define Feature and Parameters dialog box, define
the slots:
In the
Type list, select the slot type.
In the
Name list, select the required slot.
The name of the slot section depends on the
selected slot type.
If no Resources Catalog or Resources
Library resource is set in Data Setup, the Type list
becomes unavailable and you can click More... in the
Name list:
To select the required slot reference from the catalog or library, if the
Structure Reference Catalog or the
Structure Reference Library resource is
set in Data Setup.
To search the required slot reference in the database, if no
Structure Reference Catalog or
Structure Reference Library resource is
set in Data Setup.
Optional:
Keep the
Linked to reference check box selected so as to
link the instantiated slot with its slot reference.
By default, this check box is selected when the slot is defined as
linkable in the slot table.
The slot parameters are displayed under
Slot.
The bitmap image of the slot appears next to the
parameters. If the selected slot type has a collar, the collar parameters
are displayed under
Collar.
Important:
If the selected slot section does not contain any collar, the
collar area becomes unavailable.
You cannot change the parameters for slot and collar, after
clicking
Apply.
Optional:
If the selected slot type has a collar, specify the material and
orientation for the collar.
Click
OK.
The slots and collars are created. The defined slot,
forming mode, and status of the created slot are displayed in the
Slot panel.
Note:
The
Structure Designapp
creates the collar as a surface or an axis, as defined in the collar
parameters. You can:
Use the surface as a support for creating physical collar
objects.
Use the axis to position the already created physical collar
objects.
Slots with collars
Slots without collars
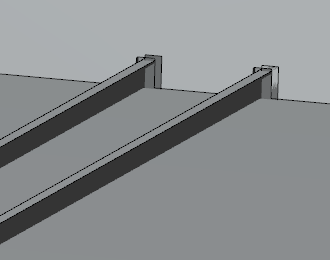
Slots on stiffeners
Here the deck transverse stiffener is penetrating the deck
longitudinal stiffeners.
Close the
Slot panel.
Important:
In
Structure Functional Design,
if you created the slot by selecting the
Link with reference check box, then the slot
created using the
Split by Volume command in
Structure Design
will also be linked with slot reference.
After the slot creation, if the stiffener is modified and the
corresponding slot is not valid to the modified profile, the status of such
slot becomes
Invalid. You can either modify or delete the
slot.
The slot becomes invalid when:
The penetrating element is deleted.
There is no intersection between the penetrated and
penetrating elements.
The slot and collar on a panel take into account the thickness of the panel,
not of the split plate.
 .
The Slot panel appears.
.
The Slot panel appears. .
.