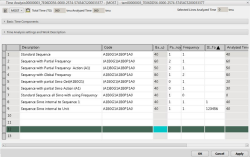
Time Analysis Dialog Box | ||
| ||
Top Section
The top section provides the basic functions that affect the open time analysis.
- Datacard

- Opens the datacard dialog box, in which you can define or change the codes for work elements of the subsystem for that time analysis. A selection here, with your pointer highlighting a row of the worksheet below, assigns the applicable values to that row. Existing criteria in the worksheet of a row changes, or an empty row fills. Manually entering the code can be entered on single click a code cell. This is also applicable to all editable cells like the description and H columns. See Datacards Dialog Box.
- Calculate

- Calculates the entire time analysis using the assigned values. Displays changes in the applicable sum boxes. Typically used to recalculate after changing control options, as identified below.
- Analyzed the Time 0 sec.
- Shows the sum of total units of time specified in the worksheet column Time. Clicking Calculate updates the sum as applicable. You choose the unit in which Analyzed Time is displayed here in the Analyzed Time selector on the Time Analysis settings and Work Description panel.
- Left hand
- MTM1, MTM2, and RWF only. Select to enable entering time codes only in the Code L.H. column, and side, of the Time Analysis worksheet.
- Right hand
- MTM1, MTM2, and RWF only. Select to enable entering time codes only in the Code R.H. column, and side, of the Time Analysis worksheet.
- Both hands
- MTM1, MTM2, and RWF only. Select to enable entering time codes simultaneously in the Code L.H. and Code R.H. columns, and sides, of the Time Analysis worksheet.
Basic Time Components
The table in this panel presents the types of assembly time that includes in a time analysis. It provides the sums of total time specified in the worksheet column Time plus the parts quantities you specify in the Time Analysis settings and Work Description panel. The column to the right identifies the unit of time in which the sums calculate and display. You specify this in the Basic Time selector in the Time Analysis settings and Work Description panel.
- Human Time (TTB): This shows that the Human time after data has been entered
into the Time Analysis settings and Work Description
section and has been calculated
 . This time is changeable because humans can work at
different speeds.
 - Machine Time (TTU): This shows that the Machine time after data has been
entered into the Time Analysis settings and Work
Description section and has been calculated
 . This time is unchangeable because the machines
work at the same speed.
 - Waiting Time (TW): This shows that the Waiting time after data has been
entered into the Time Analysis settings and Work
Description section and has been calculated
 .
. - Total Time (TG): This shows the Total time, or resulting time after data has
been entered into the Time Analysis settings and the Work
Description section has been calculated
 .
. - Setup Time (TRG): This shows that the Setup time after data has been entered
into the Time Analysis settings and Work Description
section and has been calculated
 .
.
Time Analysis Settings and Work Description
In this panel, you can change the criteria by which the content in the worksheet presents in Basic Time Components. You can also add notes about, and details of, the analysis as useful.
- Time Type
- You can select a category, or all categories, that total in the Basic Time
Components table when you click Calculate.
- T**: Totals all categories that have data.
- TTU: Basically Machine time - This time is unchangeable because Machines work at the same speed.
- TTB: Basically human time - This time is changeable because Human can work at different speeds.
- TRG: Setup time.
- TW: Wait Time.
- Analyzed Time:
- Change the unit of measure for the Analyzed Time calculation in the top section. Changing the unit of measure changes the total (Same as Basic Time below).
- Basic Time
- Change the units of measure shown for the totals in the Basic Time
Components table by selecting an increment on this list.
sec: secondmin: minuteh: hourd: daymon(fisc): montha: annual (365 days)tmu: 1/100000 hourfac: 0.2 tmuzmi: 1/10000 minutetmi: 1/1000 minutehmi: 1/100 minutecmi: 1/10 minuteim: is 1000 tmumillisec: millisecond
- Number of Parts
- Provide or change the number of parts handled in the operation that it
analyzes. Click Calculate, recalculated the category
totals shown in the Basic Time Components table. Note: Maximum 10 characters each.
- Parts Simultaneously
- Provide or change the number of parts handled simultaneously in the
operations analysis. Click Calculate, recalculates
the category totals shown in the Basic Time Components table. Note: Maximum 10 characters each.
- Added Percentage:
- A percentage that covers unexpected or unmeasurable factors that can affect the operation. As an example, if you enter a value of 10, then the analyzed calculates time plus 10 percent of calculated time. Analyzed time = 970 + 10% of 970 = 1067.
- Work Description:
- In these text fields, Start, Include, End Limitation,
you can provide a brief log or record of the operation and the analysis
results. Note: Maximum 80 characters for Include, others maximum 30 characters each.
- Time Description
- You can provide or modify a description. This description field is the same
one available on the Time Analysis dialog box when you
create the time analysis. Note: Maximum 60 characters.
- Long Text
- You can provide or modify additional reference information here.
Note: Maximum 80 characters.
- Up/Down
- Two commands Up/Down
 on the time analysis panel to move selected lines
up or down. Select one OR more continuous line and click move up to shift
lines upward and similarly you may click move down to shift selected lines
downward.
Time Analysis Lines Worksheet
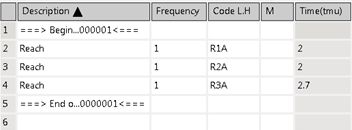
The worksheet is visible under the Time Analysis settings and Work Description panel. Refine a time analysis by entering, adjusting, and testing datacard code criteria to determine their impact on the results.
You can enter datacard codes in one or more code columns of the worksheet. That row automatically shows corresponding values across the applicable columns. You can also Hide/Show the columns.
- Worksheet Cells
- Based on the point of RMB click, you can apply color. If it is a particular
cell, the select color applies only to that cell. If the RMB click is on row
headers, then all the cells of that row have color. The applied color saves
to the local machine and information stores in Preferences.
- Font Color: A color picker panel appears. Select the color to apply. This also supports multiline selections. On selecting a color, the panel closes automatically.
- Fill Color: A color picker panel appears. Select the color to apply. This also supports on multiline selections. On selecting a color, the panel closes automatically.
- Worksheet Columns
- A menu appears when right-clicking the column:
- Hide Column: Hides the selected column
- Show All Columns: All hidden columns shown again.
- Show Column: Lists all the hidden columns as a submenu then select the particular column to appear.
Reorder Columns - A contextual command on the column header is provided to rearrange the order of columns. This order is persistent with the previous dialog box session.
- Worksheet Rows
- The worksheet rows represent motions associated with a specific operation,
which can attach. The columns represent datacard code criteria that you
specify from the datacard dialog box. You access this in the top section
 , or right-click in the cell for the menu, or that you
manually enter.
- Number
- This column shows the number of the rows.
- Description
- This column presents a one- or two-word name of the type of datacard code inserted into a row. To manually modify that default description, double-click a cell to open the text entry box. If you insert a different datacard code into the row, of course the description changes along with other row columns.
- Local Description
- This column presents the description in the local language. Enable this column by going to , and select Display description in local language.
- H (Hand)
- STD, UAS, MEK, and GTE only. You can apply a subsystem hand criterion.
Double-click a cell and then select the resulting list:
- L for Left hand
- R for Right hand
- B for both Left and Right hands
- S for simultaneous use of both hands
- P (Priority)
- STD, UAS, MEK, and GTE only. Clicking the input field of this column opens a pop-up menu for marking parallel processes.
- Distance
- This is the distance when using distance in 3D.
- Code
- STD, UAS, MEK, GTE, SAM, and MOST only. Identifies the datacard code
assigned to the row. You can insert a different code into the row from the
datacard dialog box. To manually insert or change a code, double-click a
cell to open the text entry box.
In MTM1 analysis, requires to build groups of codes for the left hand, right hand, or both hands. Those blocks define in the M-column of the time analysis sheet by using brackets characters. For fulfilling the current MTM1 standard, the following bracket types and combination of brackets: ) or] or | or)] or)|.
Also provided is a contextual command to Manage the blocks. Select several selected time analysis rows and right-click to open the contextual commands:
- Create one hand block.
- Create both-hand block.
- Remove selected block.
- Remove all selected blocks.
- Basic Time
- Shows time in units defined in options and Work Description, Analyzed Time.
- Time Type
- Shows time in units defined in options and Work Description, Time Type.
- Frequency
- Shows the frequency of the activity.
- SIMO to (in MOST Time Analysis)
-
There are two types of simultaneous cases:
- Internal to Sequence: For Internal to Sequence, the work is being performed Simultaneous Motions (SIMO) to another MOST analysis line happening in the same time analysis. Work can be in SIMO with a part of a sequence. For this, enter line number - index number.
- Internal to Unit: For Internal to Unit, the work is being performed SIMO to work happening in a different Unit of time analysis.
To achieve this, enter 1 or 1-5 or string (Op20) in the SIMO column. It is information. There is no change in Basic time or Analyze time. Then change PF or GF to zero as per your requirement. These use PF and GF in the calculation of Basic time and Analyze Time.
In SIMO To attribute, you can enter any string or numbers representing another TA line that is in simultaneous motion with the current line.
This SIMO To value has no impact on the time. It provides information on the Simultaneous motion of the current TA line.
Simultaneous motion using Partial Frequency or Frequency as zero.
After entering some description in the "SIMO To" column, you might want to update the total analyzed time for that line taking into account simultaneous motions. Enter Partial Frequency as zero if the part of a line is in SIMO with the other line. Then enter a frequency as zero if the whole line is SIMO with the others. Basic Time considers partial frequency and frequency but does not take into account SIMO. Analyzed time is basic time minus time for SIMO. The table below gives all details of calculations of Basic Time and Analyzed time for different sequences.
Note: Each Index is 10 tmu. A1 = 10 tmu. A6 = 60 tmu.Description Sequence Basic Time calculation PF F SIMO Basic Time Analyzed Time Standard Sequence A1B0G1A1B0P1A0 10+0+10+10+0+10+0 1 1 40 40 Sequence with Partial Frequency Get (A1B0G1) (A1B0G1)A1B0P1A0 (10+0+10)*2+10+0+10+0 2 1 60 60 Sequence with Partial Frequency Action (A1) (A1)B0G1A1B0P1A0 (10)*2+0+10+10+0+10+0 2 1 50 50 Sequence with global frequency A1B0G1A1B0P1A0 (10+0+10+10+0+10+0)*2 1 2 80 80 Sequence with partial SIMO Get (A1B0G1) (A1B0G1)A1B0P1A0 (10+0+10)*2+10+0+10+0 0 1 1 40 20 Sequence with partial SIMO Action (A1) (A1)B0G1A1B0P1A0 (10)*2+0+10+10+0+10+0 0 1 2 40 30 Standard Sequence with all line SIMO using Frequency A1B0G1A1B0P1A0 (10+0+10+10+0+10+0)*2 1 0 OP1 40 0 Sequence SIMO internal to line A1B0G1A1B0P1A0 10+0+10+10+0+10+0 1 1 1 40 40 Sequence SIMO internal to unit A1B0G1A1B0P1A0 10+0+10+10+0+10+0 1 1 12345 40 40 - Rows 1-4 are regular cases of standard sequence without and with partial frequency and frequency.
- Rows 5-7 are cases of SIMO because PF and F are zero. Basic time needs to not consider SIMO. So we use 1 as PF or F for calculating Basic time. Analyzed time is equal to Basic Time - SIMO time.
- Row 5, PF is 0. (A1B0G1) is SIMO. So 20 tmu for (A1B0G1) reduces from Basic Time and Analyzed time becomes 20.
- Row 6 PF is 0. (A1) is SIMO. 10tmu for (A1) reduces from Basic Time and analyzed time becomes 30.
- Row 7, Frequency is 0. Whole line is SIMO. So 40 tmu reduces from Basic Time and Analyzed Time becomes 0.
- Rows 8-9 are also cases of SIMO when entering information in the SIMO column. But has not entered PF and F as zero. So there is no change in Basic and Analyzed time.
All these code sequences, PF/F/SIMO enters in the time analysis sheet.
- Analyzed Time:
- Part of the sum shown in Basic Time Components. Shows time in units defined in options and Work Description, Analyzed Time.
- Setup Time
- Part of the sum shown in Basic Time Components. Shows time in units defined in options and Work Description, Analyzed Time.
- Value Added
-
Identifies whether a value-add category adds to the subsystem.
- Helps in identifying the areas where they can improve and optimize.
- Applicable only to a single handed process such as MEK, UAS, and STD.
- The number needs to be unique, otherwise a Key constraint violation message appears.
- Do not change at template level as considers to be as standard.
- The Value Added group cannot have subfolders, if so the system miss-interprets and this results in the wrong calculation.
MTM time analysis Value Added column. When the user assigns a Value Added category to a time analysis line, the color of the cell of the column changes. It is defined as the color assigned to the Value Added category inPreferences. The user is to minimize all operations without Value Added to optimize manufacturing. By use of a color code, the Time Analyst can immediately see the Value Added category without reading the text.
Note: The highlighted color of the cell in the table dominates the coloring of a VA cell and is defined in Customizing Preferences, the Value Added tab. You get a list of the Value added categories and their respective colors. Add or remove a new category.

- Frequency
- MTM1 and MTM2 only. Specify the frequency of the specific motion by double-clicking a cell to open the text entry box, then entering a number.
- M (Combined Movements)
- MTM1 and MTM2 only.
In MTM1 and MTM2 analysis, requires you to build groups of codes for the left, right, or both hands. Defining these blocks in the M column of the time analysis sheet by using bracket characters. For fulfilling the current MTM1 standard, the following bracket types and combination of brackets need to be supported ),],|, )],)|,None.
Previously you could enter in the character or select a box and manually create M Blocks. But this is tedious and error-prone. Also, to differentiate continuous blocks, you can leave an empty line between blocks. To overcome, removed the field. Create/Remove blocks only through contextual commands.
Select:- Create one hand block with context menu
You can mark several lines of one code column (for example right hand) and select Create One Hand Block. Then, the block is solved and M column symbol is define in a one hand block.
- Find the line having the highest time value in the block and show only that time. The time for remaining lines (noncontributing) is define to empty, and the text of noncontributing codes is gray.
- Also the background of M column is alternate gray colors for differentiating blocks.
- In case the selected lines do not contain body-movement (SS, TBC,B, S, KOK, AB, AS, AKOK, KBK, AKBK, SIT, STD,W). Eye travel (EF, ET). Including or not process time (PTU). Including or not, eye travel (EF, ET). Including or not, process time (PTU). Then mark block them with round bracket OR ) in M column for right-hand block OR for left-hand block respectively.
- In case-selected codes that do contain body-movement including or not, eye travel Including or not, process time then mark the block with | bracket in the M column
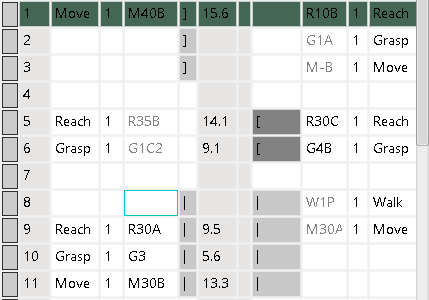
- Three One Hand blocks. One hand left block and one hand
right block having a body movement and one hand right
block.

Management of invalid scenarios:
- Block can create on continuous lines. If the rows selected are not continuous, then this message displays (Blocks can not have unselected lies in between. Please check the line Selection.) and the block does not create.
- One hand block cannot create on both hand blocks. If creating one hand block on the both hand block, then this message displays (One Hand blocks can not be created on Both Hand block.) and the block does not create.
- Block cannot create on single line. Trying to create one hand block selecting a single line, then this message displays (Blocks can occur on a single line) and the block does not create.
- Create both hands block with context menu
Mark several lines and select Create Both Hand Block. This solves the block is and the M column symbol defines in the case of both hand block;
- Get the sum of left-hand side (LHS) times and the sum of right-hand side (RHS) times separately and consider only the side, which has the highest sum value.
- Specify the noncontributing (side with lesser sum time) sides column text is gray.
- Specify M column cell background of higher value side to gray.
- In a case-selected code does not contain body-movement (SS, TBC,B, S, KOK, AB, AS, AKOK, KBK, AKBK, SIT, STD,W). Eye travel (EF, ET). Including or not, process time (PTU). Then define the left side M column with the symbol ] if LHS sum is higher or with [ on the right side of the M column if RHS sum is higher.
- In case-selected lines that have a body movement, then mark
M column of both sides with the
pipe | symbol.
Management of invalid scenarios:
- Block can create on continuous lines. If the rows selected are not continuous, then this message displays (Blocks can not have unselected lies in between. Please check the line Selection.) and the block does not create.
- Block cannot create on single line. Trying to create one hand block selecting a single line, then this message displays (Blocks can occur on a single line) and the block does not create.
- Multiple blocks
This allows creating a Both hand block on one hand block, and it is called a multi block. Create a one hand block on selection and on that again it creates the both hand block using the contextual commands. This solves this block and M column symbol (in the case of multiple blocks).
- First solve the one hand block as per one hand block calculation. Specify the one hand block symbol ( OR ) on M column. And applies a back ground color for the M column.
- Retain the one hand block results and apply both hand block calculation on it. Specify the [ OR ] on the higher sum side. If the column already has one hand symbol ( OR ), then define the symbol as )] OR [ respectively.
- If the selected lines have a body movement, then use pipe | symbol instead of [, ]. And show pipes on both sides.
- Gray the text of noncontributing codes.
- No background color with respect to the Multi block applies to the M column.

Management of invalid scenarios:
- Block can create on continuous lines. If the rows selected are not continuous, then this message displays (Blocks can not have unselected lies in between. Please check the line Selection.) and the block does not create.
- Block cannot create on single line. Trying to create one hand block selecting a single line, then this message displays (Blocks can occur on a single line) and the block does not create.
- Both hand block cannot create on an incomplete selection of one hand block, then this message displays (Complete block not selected. Please select complete block.) and the block does not create.
- Removing block with context menu
Two context menu to remove blocks;
- Remove selected block - Removes only one type of block. If selected lines have only one hand block OR only two hand block,are removed. If the selected line is multi block, this command removes only both hand block of multi block.
- Remove all selected blocks - Removes all blocks on the selected line. After removing, the M column and code text color updates.
Management of invalid scenarios:
- Block can exist on continuous lines. If the rows selected are not continuous, then this message displays (Blocks can not have unselected lies in between. Please check the line Selection.) and the block does not remove.
- Block cannot exist on single line. Trying to remove the block selecting a single line, then this message displays ((Blocks can not occur on a single line.) and the block does not remove.
- Remove of partial block is not allowed, If so, then this message displays (Complete block not selected. Please select complete block.) and the block does not remove.
- Management Cut/Copy/Paste and Mirror command on
blocks
- Cut/Copy/Paste - Is supported on line
shaving blocks. However incomplete block
Cut/Copy is not allowed and also
paste of copied/cut is not allowed on lines having a block.
- Cut/Copy of partial block shows message (Complete lock not selected. Please select complete block.) and cut/copy does not execute.
- Paste on lines having block shows message ( Line(s) can not be pasted o blocked lines(s).) and paste does not execute.
- Mirror Change Hand - Mirror change hand on blocks change the one hand left block to one hand right block. If the lines have both hand block, the codes on each side swap and block calculation is as per both hand calculation. If the lines have a multi block, codes on each side swap, and this solves the block as per multi block calculation.
- Mirror copy - Is allowed only if codes are on one side only. We cannot have One hand block on both side, because in this case Both hand block can create. So, on mirror copy having one hand block has no impact on blocks. Only columns like Code, Frequency, Description is mirror copied.
Management of invalid scenarios:
- Mirror change hand cannot execute on partial block. If so, this message displays (Complete block not selected. Please select complete block.) and the mirror change hand does not execute.
- If mirror change hand is called on single line this message displays (Block can not occur on single line.) and the mirror change hand does not execute.
- If selected lines are not continuous and the block exists, then this message displays (Block can not have unselected lines in between. Please check the line Selection.) and the mirror change does not execute.
- Cut/Copy/Paste - Is supported on line
shaving blocks. However incomplete block
Cut/Copy is not allowed and also
paste of copied/cut is not allowed on lines having a block.
- Create one hand block with context menu
- Code L.H., Code R.H.
- MTM1, MTM2, and RWF only. Identifies the datacard code assigned to the row.
You can insert a code into the row from the datacard dialog box. To manually
insert or change a code, double-click a cell to open the text entry box.
Right-click for the menu and selecting Mirror allows you to:
- Mirror Change Hand: Selecting a row/multiple rows then click Mirror Change Hand, the codes on the left-hand code (Code L.H) move to the right-hand side (Code R.H) and vice versa. If there is code on one side, on executing this command, the code moves to the other side.
- Mirror Copy: Selecting a row/multiple row and click Mirror Copy, the code and other details of the existing codes side are copied to the other side. If there are codes on both side, then a message, One or few line have code on both left hand and right hand. Deselect them and proceed with copy.
- S (Synchronization)
- RWF only. Choose to synchronize left and right-hand codes of a particular worksheet row. Double-click a cell and then select Yes in the list. If synchronization is impossible, an information dialog box displays.
