Creating a Profile Contouring Operation: Between Two Curves | ||||||
|
| |||||
- From the Prismatic Machining section of the action bar, click Profile Contouring
 .The Profile Contouring operation appears under the manufacturing program. The Profile Contouring dialog box opens directly at the Geometry tab
 . This tab includes a sensitive icon letting you define the
geometry.
Areas of the icon are colored red indicating that this
geometry is required.
 - In the Geometry tab, do the following:
- Set the Contouring mode to Between Two Curves.
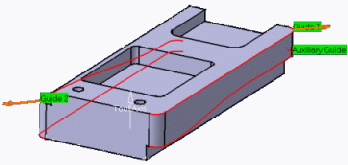
- Click the red guiding curve in the
icon. In the work area, select the three continuous
edges on the top of the part as
shown (Guide 1 in figure
below) and select the three continuous
edges of the downward slope on the
other side of the part as shown
(Guide 2 in figure below).
During the selection, answer No to the question about inserting a line.
Note: The top guiding curve in the icon is colored red indicating that this geometry is required for defining the operation. All other geometry is optional. - Click the auxiliary guiding curve
in the icon. In the work area, select the three continuous
edges of the downward slope the
part as shown (Auxiliary Guide in
figure below) and select the three continuous
bottom edges on the other side of
the part as shown.
During the selection, answer No to the question about inserting a line.
- If needed, set offsets on the geometric elements.
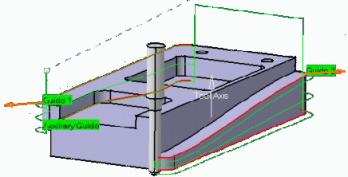
- Click the blue colored icon to calculate side to machine control in the 3D view.
For more information, see Selecting Geometry
The guide and limit elements of the icon are now colored green indicating that this geometry is now defined. These are also indicated on the part.
You can use Collision Checking to activate collision checking between the tool and guide elements during macro motions. - In the Strategy tab
 , do the following:
- Select a Tool path style.
- Set the other machining parameters. For more information, see Strategy Parameters.
- In the Tool tab
 , select a tool.
For more information, see Assigning a Tool Element to a Machining Operation.
- In the Feeds and Speeds
tab
 , specify the feedrates and spindle speed parameters for the operation.
 - In the Macro tab
 , add approach and retract motions to the operation.
For more information, see Defining Macros on Milling Operations.
-
Click Display or
Simulate to check the validity of the operation.

The tool tip shifts below the guiding curves by a distance equal to the tool corner radius. If you want the tool tip to exactly follow the guiding curves, enter an appropriate Axial Offset value. - Click OK to create the operation.